


Chapter 1, About the ERV-750: Installing the ERV-750 on Existing Equipment
E.H. Wachs
Part No. 79-MAN-01, Rev. 3-0409
11
2.
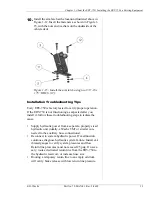
Mark the location of the 4 holes in the ERV-750 base.
Make sure you can drill into the equipment at these
locations without causing damage to the equipment.
3.
Refer to Figure 1-12 for dimensions and hole sizes.
Measure the locations for the arm latch holes and
make sure you can drill into the equipment there.
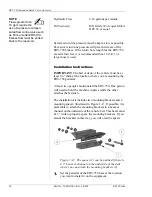
Figure 1-12. The drawing shows the top-view layout
for mounting the ERV-750 on a vehicle.
4.
Remove the ERV-750 and drill the four hole locations
using a 5/8” drill.
5.
Measure the locations for the two holes for the arm
latch, as shown in Figure 1-12. Drill the two holes
using a 3/8” drill.
6.
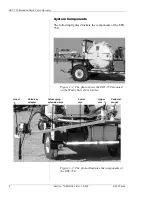
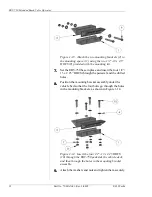
Assemble the two mounting brackets and the mount-
ing spacer as shown in Figure 1-13.
ERV-750
pedestal
Arm latch
Summary of Contents for ERV-750
Page 2: ...ERV 750 Extended Reach Valve Operator Part No 79 MAN 01 Rev 3 0409 E H Wachs...
Page 18: ...ERV 750 Extended Reach Valve Operator 14 Part No 79 MAN 01 Rev 3 0409 E H Wachs...
Page 22: ...ERV 750 Extended Reach Valve Operator 18 79 MAN 01 E H Wachs...
Page 40: ...ERV 750 Extended Reach Valve Operator 36 Part No 79 MAN 01 Rev 3 0409 E H Wachs Wiring...
Page 43: ......
Page 44: ...600 Knightsbridge Parkway Lincolnshire IL 60069 847 537 8800 www ehwachs com...


