background image


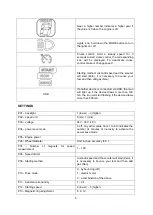
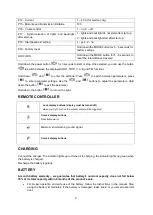
P14 - Current 

– 20 A (for service only) 

P15 - Motor speed transmission limitation 

100 

P16 - Cruise control 

– on, 0 – off 

P17  -  Synchronization  of  lights  and  backlight 
after start-up 

1 - lights and backlight do not start after start-up 

2 - lights and backlight start after start-up 

P18 - Start password setting 

– yes, 2 – no  

P99 - Factory reset 

Hold down the MODE button for 5 - 6 seconds for 
factory settings 

ODO: ODO 

Hold down the MODE button for 5 - 6 seconds to 
reset the total distance traveled 

Hold down the power button 

 for 3 seconds to start or stop. Once started, you can use the button 

to switch between the displayed ODO, TRIP, V, A, E and TM functions. 

Hold  down 

  and 

  to  enter  the  settings.  Press 

  to switch  between  parameters,  press 

  to  enter  parameter  settings.  Use  the 

  and 

  buttons  to  adjust  the  parameters.  Hold 

down the button 

 to exit the parameter. 

Hold down the button 

 to turn on the light. 

REMOTE CONTROLLER 


Lock display buttons (display must be turned off) 

when you try to turn on the scooter alarm will be triggered


Unlock display buttons 

Deactivate alarm 


Horn

 - A short warning sound signal  


Unlock display buttons


CHARGING 

Connect the charger. The indicator lights up red when it is charging, the indicator lights up green when 
the battery is charged. 

Recharge the battery regularly. 

BATTERY 

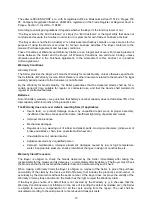
6-month  battery  warranty 

–  we  guarantee  that  battery's  nominal  capacity  does  not  fall  below 

70% of its total capacity within 6 months of the product

’s sale. 


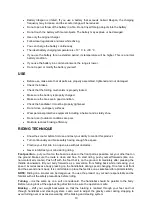
For  proper  operation  and  safe  use  of  the  battery,  follow  the  instructions  in  the  manual.  Stop 

using  the  battery  immediately  if  the  battery  is  damaged,  leaks  liquid  or  you  smell  abnormal 
odor. 

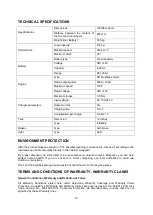
Summary of Contents for Tenmark

Page 1: ...USER MANUAL EN IN 23398 E Scooter W TEC Tenmark...

Page 2: ...CONTROL PANEL 6 FACTORY SETTINGS 6 SETTINGS 8 REMOTE CONTROLLER 9 CHARGING 9 BATTERY 9 USE 10 RIDING TECHNIQUE 10 CLEANING AND MAINTENANCE 11 STORAGE 11 TECHNICAL SPECIFICATIONS 12 ENVIRONMENT PROTEC...

Page 3: ...k that all parts are well held and the screws are not loosened Ex tighten them or contact a service center Unauthorized modifications or maintenance will reduce the safety of the equipment Improper us...

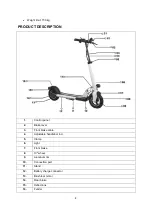
Page 4: ...Control panel 2 Brake lever 3 Front brake cable 4 Adjustable handlebar rod 5 Clamp 6 Light 7 Front brake 8 10 wheel 9 Aluminum rim 10 Connection port 11 Stand 12 Battery charge connector 13 Brushless...

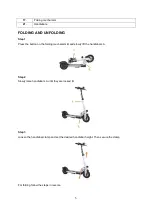
Page 5: ...Press the button on the folding mechanism B and slowly lift the handlebars A Step 2 Slowly raise handlebars A until they are locked B Step 3 Loosen the handlebar clamp and set the desired handlebar he...

Page 6: ...aximum speed up to 40 km h Press the power button to change the information you want to display TRIP currently covered distance 0123 5 shows 123 5 km ODO total distance traveled 12035 shows 12035 km T...

Page 7: ...switch An error code is displayed ERRO 1 Motor error ERRO 2 Handle error ERRO 3 Control error ERRO 4 The brake does not work ERRO 5 Surge protection ERRO 6 Communication error the scooter is not recei...

Page 8: ...mA the icon will start flashing if the device draws more than 500 mA SETTINGS P01 backlight 1 lower 3 higher P02 speed unit 0 km 1 mile P03 voltage 24 V 36 V 48 V P04 power save mode 0 off any other...

Page 9: ...press to enter parameter settings Use the and buttons to adjust the parameters Hold down the button to exit the parameter Hold down the button to turn on the light REMOTE CONTROLLER Lock display butto...

Page 10: ...scooter before first use and test your ability to control this product Turn continuously and brake safely having enough free space Practice your first ride in an open area without obstacles Never let...

Page 11: ...he charging port Never immerse the scooter Do not use high pressure cleaners If the tire pressure is low inflate it If you need to replace tires inner tubes please contact your specialist dealer or ma...

Page 12: ...e product lifespan expired or if the possible repairing is uneconomic dispose it according to the local laws and environmentally friendly in the nearest scrapyard By proper disposal you will protect t...

Page 13: ...s nominal capacity does not fall below 70 of its total capacity within 6 months of the product s sale The Warranty does not cover defects resulting from if applicable User s fault i e product damage...

Page 14: ...been agreed upon The day when the repaired or exchanged Goods is handed over to the Buyer is considered to be the day of the Warranty Claim settlement When the Seller is not able to settle the Warran...

Page 15: ...1CC 06 11 2018 IEC62321 4 2013 AMD1 2017 IEC 62321 5 2013 IEC62321 6 2015 IEC 62321 7 1 2015 IEC62321 7 2 2017 IEC 62321 8 2017 CERTIFICATE BST BSTDG181211138301EC 06 11 20108 EN 55014 1 2017 EN 61000...

Reviews: