background image

Troubleshooting

SYMPTOM


Remote control illuminates and 

appears to be working, but no 

features of the base will activate. 

Remote control will 

not illuminate. 

No features on the bed will 

operate 

Head or foot section will elevate, 

but will not return to the 

horizontal (flat) position. 

Head or foot lift function has

minor interference during

operation. 

Massage motors seem 

excessively loud during 

operation 

Zero Gravity function is not 

elevating headboard and/or 

footboard to correct position.

  SOLUTION


• Verify the power cord is plugged into a working grounded electrical outlet. A 

grounded, electrical surge protector device is recommended. Test the outlet by 

plugging in another appliance that you know works properly. 

• Replace the batteries in the remote control. 

• Verify the batteries are installed correctly in the remote control. 

• Re-Program the remote control.

• Unplug the power cord and wait 45 seconds before plugging the cord back into an 

electrical outlet. 

• The electrical circuit breaker in your home may have been tripped. Check your 

electrical service breaker box and reset if necessary. 

• The surge protection device or electrical outlet may be defective. Test the outlet by 

plugging in another working appliance. 

• The base mechanism may be obstructed. Elevate the base and check for obstruction 

and remove the obstruction if necessary. 

• The headboard may be too close to the edge of the mattress. Verify that the distance 

between the headboard brackets and the mattress is 1.5” (38.1mm) to 2” (50.8mm) 

and adjust if required. 

• The head section may be too close to the wall. Adjust if necessary. 

• Remove the battery cover on the hand remote and replace the batteries if necessary. 

• Make sure you are following the duty cycle of the motor (do not operate over 2 

minutes over an 18 minute period, or approximately 10% duty cycle). 

• The hand remote may be experiencing common radio frequency interference from 

other radio transmitting devices.

• Press the lift buttons squarely and accurately. 

• If the base is located on a hard surface, place rubber caster cups or carpet pieces under 

each leg. 

• Elevate the head or foot section a short distance (with the remote control) to realign 

the lift/lower mechanisms with the base support. 

• If the base is installed over a bed frame, then make sure the massage motors are not 

causing the bed frame, or it’s components, to vibrate. 

• Verify the headboard attachment hardware is securely fastened, if being used.


• Zero Gravity function can be reprogrammed. To save new position, elevate headboard 

and footboard to desired position and press and hold ZG button for 5 seconds until 

you hear the “beep”. Typical Zero Gravity position is elevating the headboard 

slightly up (around 15 degrees) and your knees up to about heart level. Angles can be 

measured with different tools such as protractor, angle meter or any smartphone with 

accelerometer.

Page 8

Summary of Contents for COMFORT-n-MOTION S2766

Page 1: ...with the touch of a button Changing your life OWNER S MANUAL S2766 R30191 REV 5 ...

Page 2: ...a false sense of movement and or exercise This may or may not affect your pacemaker If you have any concerns please consult your physician Your adjustable bed also contains Neodymium magnets which may interfere with devices such as pacemakers ICD s and any other device sensitive to magnetic fields It is strongly recommended that owners of such medical devices consult their physician prior to using...

Page 3: ...er to it in the future This information can be found on the side of the power supply on the underside of the adjustable base on the outside of the box on the main label and on the warranty registration card Model S27 Serial Number Page 2 Contents Customer Care Toll Free 888 846 3840 Email customerservice wsilvermx com NOTE All pictures in this manual are shown for illustration purposes only and ma...

Page 4: ...S AND COMPONENTS THAT NEED TO BE INSTALLED ARE LOCATED IN BOXES UNDER THE BASE OR ATTACHED TO THE ADJUSTABLE BED FRAME Legs 4 Page 3 Hardware Included 4 Short Allen Head Screws 2 1 8 Washers 1 1 16 Washer 1 Cotter Pin 1 Clevis Pin Tools needed FrameAssembly Allen Head Wrench included Optional Headboard Flathead screwdriver 7 16 Wrench 2 Long Allen Head Screws Bluetooth Module Optional To control a...

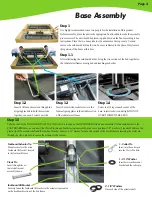
Page 5: ... Step 1 2 Insert 4Allen socket screws through the aligning brackets to hold the sections together you need 2 screws per side Step 1 5 Take the shaft of the FOOTBOARDACTUACTOR which is located on the HEADBOARD frame and assemble it to the main bracket in the FOOTBOARD frame as you insert the Clevis Pin through bracket actuator assembly make sure you insert 1 8 washers 2 required between the plastic...

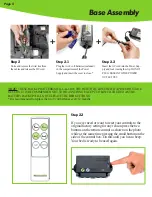
Page 6: ...e the twist ties from the cables and release the DC cord Step 2 2 Insert theAC cord into the Power Sup ply and lock it using the clip DO NOT PLUG BASE INTO THE POWER OUTLETYET Step 2 1 Plug the two 9 volt batteries included in the compartment of the Power Supply and insert the cover to close NOTE THESE BACKUP BATTERIES WILLALLOW THE BED TO BE LOWERED IFAPOWER OUTAGE OCCURS IT IS RECOMMENDED NOT TO...

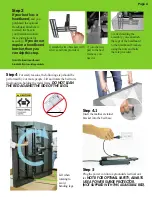
Page 7: ...et into the bed base 1 attach the two brackets with screws and nuts provided 2 join the new part to the bed frame as you need it 3 after finishing the assembly you can attach the legs of the headboard to the headboard brackets using the nuts and bolts that are provided Step 3 If your bed has a headboard and you purchased the optional Headboard Bracket kit to attach the base to your headboard follo...

Page 8: ...ress and hold to lower the head Foot Down Press and hold to lower the foot Head Up Press and hold to raise the head Foot Up Press and hold to raise the foot Zero G Press to achieve a Zero G position Flat Press to put the bed in the flat position ...

Page 9: ... necessary The headboard may be too close to the edge of the mattress Verify that the distance between the headboard brackets and the mattress is 1 5 38 1mm to 2 50 8mm and adjust if required The head section may be too close to the wall Adjust if necessary Remove the battery cover on the hand remote and replace the batteries if necessary Make sure you are following the duty cycle of the motor do ...

Page 10: ...able bed caused by the purchaser b if there has been any unauthorized repair or replacement parts c if the adjustable bed has been damaged caused by mishandling during transit or by other means subjected to physical or electrical abuse or misuse or otherwise operated in any way inconsistent with the operation and maintenance procedures outlined in the Owner s Manual this limited warranty and any o...

Page 11: ... Base Price Paid Serial Number Store Where Purchased City State Store Invoice Number EMAIL MAIL or FAX A COPY OF YOUR PROOF OF PURCHASE TO W SILVER PRODUCTS ATTN WARRANTY CLAIMS DEPARTMENT 9059 DONIPHAN DR VINTON TX 79821 Email CUSTOMERSERVICE WSILVERMX COM Fax 915 774 9089 Or register online comfort n motion com or wsilverproducts com ...

Page 12: ...ote Your screen may have different functions than the one shown in the picture depending on your adjustable foundation model To operate your base from a smart device you would need to buy the Bluetooth mod ule and download the W Silver Products application to the desired smart device from the App Store Apple or Google Play Store Android Interested Contact Customer Care 1 888 846 3840 customerservi...

Reviews: