


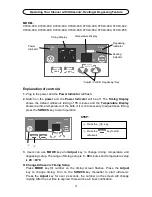


Operating Your Cleaner
with Ultrasonic & Heating Feature
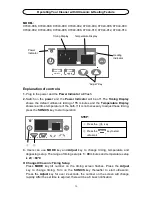
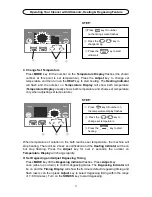
STEP:
①
Press key till number
on the timing screen flashes
②
Press the
key to
change timing
③
Press the key to start
ultrasonic
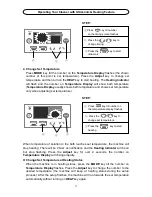
Change Set Temperature
Press
MODE
key till the number on the
Temperature
Display
flashes (the shown
number at this point is set temperature). Press the
Adjust
key to change set
temperature and then turn on the
HEAT
key to start heating. The
Heating Indicator
will flash and the number on
Temperature
Display
will show bath temperature
(
Temperature Display
usually shows bath temperature and shows set temperature
only when adjusting set temperature).
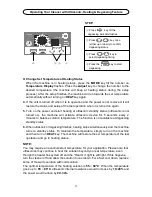
STEP:
①
Press key till number on
the temperature display flashes
②
Press the
key to
change set temperature
③
Press the key to start
heating
When temperature of solution in the bath reaches set temperature, the machine will
stop heating. There will be 2 buzz as notification and the
Heating Indicator
will be on
but stop flashing. Press the
Adjust
key for over 2 seconds, the number on
Temperature Display
will change rapidly.
Change Set Temperature at Heating Status
When the machine is in heating status, press the
MODE
key till the number on
Temperature Display
flashes. Press the
Adjust
key to change the number to the
desired temperature (the machine will keep at heating status during the setup
process). After the setup finishes, the machine will run towards the set temperature
automatically without turning on
HEAT
key again.
MODE
SONICS
ON/OFF
MODE
POWER
min
℃
HEATING
SONICS
ON/OFF
HEAT
ON/OFF
①
②
③
MODE
HEAT
ON/OFF
MODE
POWER
min
℃
HEATING
SONICS
ON/OFF
HEAT
ON/OFF
①
②
③
17
Summary of Contents for 97043-930
Page 28: ......


