background image

6

position (o), the unit will not function and the battery will not charge. 

Only move the switch to the Off position when the watch will not be 

used for an extended period of time. 
Note: It is not necessary to turn the watch off in daily use. Once the 

Master Power Switch is Off, the watch will stop functioning. After it is 

turned On again, the time and date will have to be reset.

BATTERY RECHARGING

Note: Adult operation required.
The watch should be fully charged before first use. To charge the 

My First KidiSmartwatch, connect the watch to a computer using 

the included 

Micro-USB Cable (Please refer to the CHARGING 

GUIDELINES section of this guide). To do so correctly, please follow 

these steps: 
•  Make sure that the 

Master Power Switch is set to the On position 

before charging. 

•  Pull open the rubber cover of the 

Micro-USB Port on the side of the 

watch. 

•  Insert the 

Micro-USB Cable (small end) into the Micro-USB Port on 

the watch.

•  Insert the large end of the 

Micro-USB Cable into a USB port on your 

computer or USB port (Output DC 5V 1A) with Class II   or III   

symbol. 

•  Once the connection is successful, you will see a battery charging 

symbol   appear on the watch screen. 

•  Check the charging progress regularly throughout recharging.
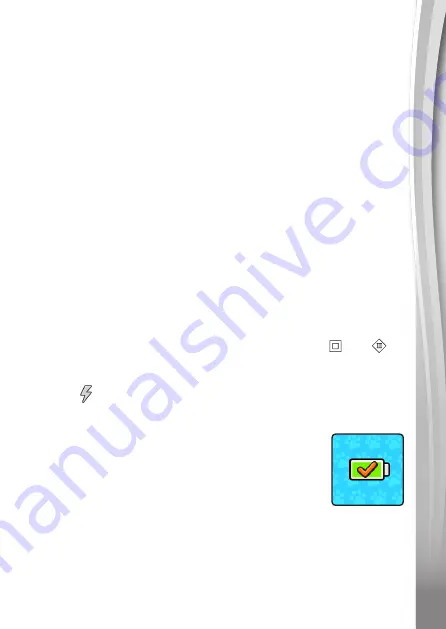
•  When the battery is fully charged, the fully 

charged battery icon will appear. Then the 

screen will automatically turn off. You may then 

disconnect your fully charged watch from the 

computer.

Note: It will take approximately 3.5 hours to fully 

charge the battery. The actual charging time 

depends on the charging current, the remaining charge in the battery 

prior to recharging, and the ambient temperature. The optimum 

ambient temperature is  

32°F - 104°F (0°C to 40°C).

Summary of Contents for 552803

Page 1: ...MY FIRST Instruction Manual...

Page 2: ......

Page 3: ...ating reminders for potty training nap time meals and more with this smart interactive watch Give the pup a name then feed walk and groom them using the touch screen Time telling tools are also includ...

Page 4: ...ur child s safety NOTE Please save this Instruction Manual as it contains important information This toy is only to be connected to equipment bearing either of the following symbols or The label cover...

Page 5: ...prevent this we suggest children remove the watch before going to bed for the night take the watch off if it s feeling uncomfortable and keep their wrist and the band clean and dry In addition wearing...

Page 6: ...o the On position before charging Pull open the rubber cover of the Micro USB Port on the side of the watch Insert the Micro USB Cable small end into the Micro USB Port on the watch Insert the large e...

Page 7: ...the charging cord periodically for conditions that may result in the risk of fire electric shock or injury to persons such as damage to the cord housing or other parts In the event of such conditions...

Page 8: ...t dispose of the toy in a fire as the batteries may leak and explode Keep batteries safely out of children s reach before disposing of them via a safe disposal system The battery in this product must...

Page 9: ...local council for kerbside collections WARNING MESSAGES 1 Master Power Switch Is Off Slide the Master Power Switch to the On position before charging the battery 2 Temperature Out of Range The chargi...

Page 10: ...turn the alarm On or Off Tap the displayed time to set it Reminder To set the reminder go to the Home Menu and swipe to see the Reminder icon If there are reminders set tap to see all the reminders T...

Page 11: ...e Tick icon when you re done Name Your Pet Tap on the Arrow icons to select the pet name and name tag icon you would like to use Tap the Tick icon when you re done To Begin Play Press the Clock Button...

Page 12: ...and change the light colour Note Hold the Clock Button for approximately 2 3 seconds to turn off Home Menu Press the Home Button to display the Home Menu and choose an activity Swipe left or right to...

Page 13: ...er their teeth by swiping back and forth over the screen Take a Bath To give your pet a bath move the sponge and shower head over your pet by swiping back and forth over the screen Potty Time Tap on t...

Page 14: ...the Step buttons to tell your pet to jump one or two stones Try to collect as many bones as possible along the way B Sneaky Toy Tap the Start button to hide a toy under a basket Watch as the baskets s...

Page 15: ...magic tricks to your friend s pet B Balloon Ride Have a balloon race with your friend and their pet Blow into the microphone to blow up the balloon and see how far it goes C Send Emoticon In this app...

Page 16: ...he Music Style button to change the music Note When adjusting the volume in Music Player the volume for all activities on the watch will also change 13 Alarm Set an alarm by choosing from a selection...

Page 17: ...ts Reminder Tap the Add Reminder icon on top of the screen and then tap the Good Habit Reminder icon to create a new Good Habit Reminder The Good Habit Reminder will ring at an interval during the set...

Page 18: ...up or down on the hours minutes and AM PM to set the time Tap the green Tick icon to save Woof Woof Clock There is an hourly time signal with a woof woof sound Once its set on your pet will happily b...

Page 19: ...also set whether the watch will automatically enter this mode on weekdays weekends or every day During the School mode period only the selected clock face will be displayed on the watch screen Other...

Page 20: ...s of flashing colours or patterns Please consult your doctor if you have an epileptic condition or experience any unusual symptoms while playing Turn off the light if you do not feel comfortable While...

Page 21: ...nd then press any button to turn the watch on The screen should now function normally Cannot connect in 2 Watch Connection 1 My First KidiSmartwatch can only connect with another My First KidiSmartwat...

Page 22: ...4dBm DECLARATION OF CONFORMITY Hereby VTech Electronics Europe Plc declares that the radio equipment type 5528 is in compliance with The Radio Equipment Regulations 2017 2017 No 1206 The full text of...

Page 23: ...will be happy to help you UK Customers Phone 0330 678 0149 from UK or 44 330 678 0149 outside UK Website www vtech co uk support Australian Customers Phone 1800 862 155 Website support vtech com au NZ...

Page 24: ...Visit our website for more information about our products downloads resources and more www vtech co uk www vtech com au TM 2022 VTech Holdings Limited All rights reserved IM 552800 003 Version 0...

Reviews: