VRG CONTROLS LLC.
17 of 39
MAY 2021
RCVC 3000 - Red Circle Valve Controller
Installation, Operation, Maintenance Manual
Setting Open and Close Limits
1. Open programming connection to RCVC and
connect to the device.
2. Click on the Setup Tab then select the Equipment
Tab, the Limits will be found in the Actuator Limits
section.
3. To change the Open or Close limits, click on the
box next to the limit that needs to be changed. In
the pop-up window change to the desired value
and click OK.
4. The Open and Close limit is used to determine
when Lock up will occur. If the valve position is
below the Close limit or above the Open limit Lock
up will engage if it is turned on.
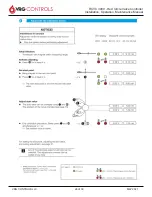
Split Range Configuration
1. Open programming connection to RCVC and
connect to the device.
2. On the Home Tab, select Manual Calibration
under the calibration section.
3. In the calibration window select Analog Input from
the Type drop-down menu. Select Command
Signal from the Signal drop-down menu.
4. Adjust Command Signal Input to desired value for
the valve CLOSE position and select Record
Minimum or Record Maximum depending on
value.
5. Adjust Command Signal Input to desired value for
the valve OPEN position and select Record
Minimum.
Dead Band Calibration
1. Open programming connection to RCVC and
connect to the device.
2. Click on the Setup Tab then select the Equipment
Tab the dead band will be in the Dead Zone
section.
3. In the Dead Zone section select the box next to
the value that needs to be changed. In the pop-up
window change the value to desired value.
a. NOTE: The static Dead Zone should
always be 0.1% greater than the moving
Dead Zone.
4. It is recommended to change both the open and
close dead bands, so they have the same value.
This can help reduce cycling issues when the
valve is in control.
Pulse Zone Control
1. Open programming connection to RCVC and
connect to the device.
2. Click on the Setup Tab then select the Equipment
Tab, the Opening and Closing Pulse Zone
sections will contain the value and the times
3. To change the Pulse zones, click on the box next
to the value and in the pop-up window change to
the new value. Click OK to accept the changes.
4. In this section the Pulse Zone times can be
changed as well to modify the duration of the
pulse.
a. Open/Close Max Move: Maximum time
Pulse will be active. VRG Value: 100ms
b. Open/Close Min Move: Minimum time
Pulse will be active. VRG Value: 30ms
c. Open/Close Max Pause: Maximum time
Pulse will be inactive. VRG Value: 150ms
d. Open/Close Min Pause: Minimum time
Pulse will be inactive. VRG Value: 150ms
Mode
FULL Closed
FULL Open
Open on
Increasing /
Direct Acting
6.0, 8.0, 10, 12
mA Typ.
20 mA
Close on
Increasing /
Reverse Acting
18, 16, 14, 12
mA Typ.
4.0 mA
Click
CLICK
RECORD MIN
CLICK
RECORD MAX


