


4
|
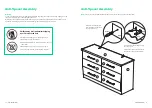
6-Drawer Dresser
6-Drawer Dresser
| 5
Hardware List
1
M4 Allen Key
1 Pc
8
Nail
50 Pcs
2
Screw M6.3 × 50
18 Pcs
9
12” Drawer Slide
6 Sets
3
Handle (7.6”) MH2
6 Pcs
10
Screw M3.5 × 16
84 Pcs
4
Screw M4 × 22
12 Pcs
11
Dowel 8 × 30
8 Pcs
5
Sticker
12 Pcs
12
Screw M8 × 32
24 Pcs
6A
Cam Lock
30 Pcs
13A
Minfix Cam Lock
6 Pcs
6B
Cam Nut
30 Pcs
13B
Minfix Cam Nut
6 Pcs
7
Bottom Pin
6 Pcs
14
Screw M4 × 38
6 Pcs
Anti-tipover Hardware
Anchor
2 Pcs
Screw M3.5 × 16
2 Pcs
Bracket
2 Pcs
Screw M4 × 38
2 Pcs
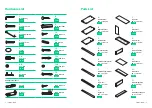
Parts List
A
Left Side Panel
26.6 × 14.0 × 0.6”
1 Pc
I
Top Panel
46.9 × 15.6 × 0.7”
1 Pc
B
Right Side Panel
26.6 × 14.0 × 0.6”
1 Pc
J
Back Panel
23.7 × 11.7 × 0.1”
4 Pcs
C
Divider Panel
22.8 × 14.0 × 1.0”
1 Pc
K
Drawer Front
23.1” × 7.6 × 0.6”
6 Pcs
D
Horizontal Shelf
45.6 × 3.1 × 0.6”
1 Pc
L
Drawer Left Side
13.5 × 5.5 × 0.6”
6 Pcs
E
Divider Support (Front)
45.6 × 3.1 × 0.6”
1 Pc
M
Drawer Base
20.6 × 13.4 × 0.1”
6 Pcs
F
Divider Support (Back)
45.6 × 3.1 × 0.6”
1 Pc
N
Drawer End
20.1 × 5.4 × 0.6”
6 Pcs
G
Leg (Front)
45.6 × 3.1 × 0.6”
1 Pc
O
Drawer Right Side
13.5 × 5.5 × 0.6”
6 Pcs
H
Leg (Back)
45.6 × 3.1 × 0.6”
1 Pc
P
Drawer Base Support
12.9 × 1.7 × 0.5”
6 Pcs