background image


10 

cartridge you are using and or the particular record being played.  The knob's 
scale  makes  it  easy  to  return  to  a  previous  setting  by  making  a  note  of  the 
number above the index mark and the number of complete turns taken. 


The  old  wisdom,  which  had  the  arm  tube  parallel  to  the  record  surface, 
assumed not only that all cartridges had the same internal geometry and stylus 
rake  angle  but  also  that  all  records  were  cut  with  the  same  equipment  set  the 
same way.  The idea was that everything would line up properly with the arm 
parallel to the record.  This is not true and the VTA should be adjusted for best 
sound in your system.   


Rule of thumb: Raising VTA lowers bass and increases treble.  Lowering 
VTA increases bass and decreases treble.


H.  CONNECTING TO THE PREAMPLIFIER/AMPLIFIER 


ONLY USE INTERCONNECTS THAT ARE SHIELDED AND PROPERLY 
GROUNDED.   NON-SHIELDED INTERCONNECTS CAN HUM AND PICK UP RF. 


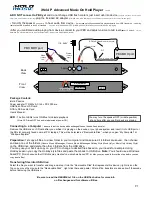
The  connector  block  at  the  rear  of  the  arm  base  has,  in  addition  to  the  Lemo 
receptacles two phono receptacles and a ground connector. 


Plug  one  end  of  the  output cable into the phono jacks.  The jack with the red 
ring is the right channel and the jack with the black or white ring is the left. 


Plug  the  other  end  of  the  cable  into  the  turntable  inputs  on  your  pre-
preamplifier, preamplifier, or integrated amplifier as appropriate. 


The  ground  connection  is  available  to  eliminate  hum  if  necessary.    If  hum  is 
present,  first  connect  a  ground  lead  from  the  connector  block  to  the 
preamplifier  or  amplifier  to  which  the  output  cable  is  connected.   If  this  does 
not  eliminate  the  hum,  run  a  ground  wire  from  the  turntable  chassis  to  the 
connector  block  as  well.    The  block's  connector  will  accept  bare  wires, spade 
lugs, or ring tongue connectors.


I.


VERY IMPORTANT!!!  

 
 Do not run the HR-X for days at a time to break it in.  The 
flywheel runs on a Teflon thrust disc and continuous running 
will damage this disc.  The table will be broken in after three to 

Summary of Contents for TNT HR-X

Page 1: ...1 THE TNT HR X REFERENCE TURNTABLE TONEARM SETUP AND INSTRUCTION MANUAL VPI INDUSTRIES INC 77 CLIFFWOOD AVE 3B CLIFFWOOD N J 07721 PHONE 732 583 6895 FAX 732 946 8578 www vpiindustries com...

Page 2: ...Remove the foam or cardboard and you will find the Motor Drive Unit or MDU and the platter Carefully place the MDU in a safe location Under the round foam cutout is the platter Remove it and place it...

Page 3: ...VER TURN THE MFA OVER THE FLYWHEEL CAN FALL OUT AND GET DAMAGED OR HURT YOU If the belt does not run level between the platter and the flywheel readjust the corner leveling legs If you turn them all o...

Page 4: ...TING HOLES Use the screws supplied by the cartridge manufacturer to mount the cartridge Any other screws may not fit the thread properly and may even damage the threads and cartridge USE ONE OF THE SU...

Page 5: ...eed this large weight The counterweight is held in position by a setscrew The counterweight is used for setting the azimuth lateral balance of the cartridge and the vertical tracking force For now pos...

Page 6: ...stylus rests on the dot Now viewing the cartridge from above line it up so that its sides are symmetrically positioned between the lines of the grid If the cartridge has parallel sides these should b...

Page 7: ...it Following the gauge instructions set the tracking force to the cartridge manufacturer recommendation plus 1 10 of a gram more We always recommend going to the high side when it comes to tracking fo...

Page 8: ...12 arm has a very small offset angle and therefore a very low skating force to deal with After very careful listening tests we have determined that every tonearm we tried sounded better with their mec...

Page 9: ...ike a spring to supply this force If you try adjusting the anti skate with a groove less record or a test record you will ruin the twist in the wire and void your warrantee Double check the horizontal...

Page 10: ...NNECTSCANHUMANDPICKUPRF The connector block at the rear of the arm base has in addition to the Lemo receptacles two phono receptacles and a ground connector Plug one end of the output cable into the p...

Page 11: ...11 four records Turn the HR X on 20 minutes before listening to loosen everything up and warm up the drive belts...

Page 12: ...casionally lubricate the motors and flywheel If either unit ever makes noise it is time to re lube it There is a break in period of at least 30 hours before the HR X will sound the best For best possi...

Page 13: ...card If your card is not received within 30 days of purchase you are jeopardizing your warrantee The motor and bearings of the HR X are warranted for 5 years There is nothing else that can fail on you...

Reviews: