background image

- 7 -

Part Names and Functions

Top Panel

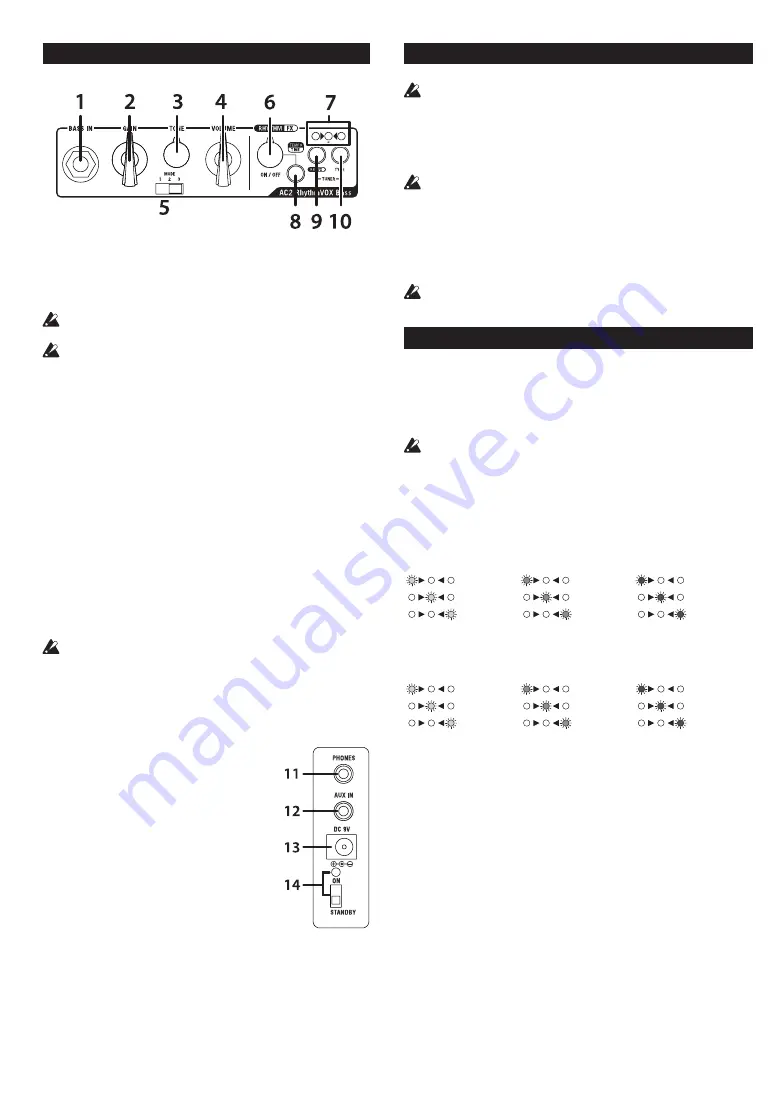
1

Amplifier section

1. 

BASS IN Jack

Plug in your 

bass 

guitar here.

2. 

GAIN knob

This control enables you to adjust the amount of gain. Increase the 

gain (turn the knob clockwise) to increase distortion.
  When the gain is turned to minimum (all the way counter-clockwise), 

no sound will be heard.

  Even when the gain is set to a low value, the sound may distort 

when the volume is turned up.

3. 

TONE knob

Adjust the tonal color of the amplifier.

4. 

VOLUME knob

Controls the level of the amplifier volume.

5. 

MODE 1/2/3 switch

Switches between different amp types.

1. Normal / 2. Flat / 3. Scoop

RHYTHM/FX section

6. 

RHYTHM/FX knob

This knob adjusts the rhythm/effect output level. Turn this knob while 

pressing the ON/OFF button to adjust the tempo of the rhythm, effect 

time/speed and so on.

7. 

Status LEDs

Show the rhythm/effect selection status. Turn off when the rhythm/

effect is not being used.

8. 

ON/OFF button

Switches the rhythm play/stop and effect on/off.
  The rhythm and effect cannot be used at the same time.

9. 

RM/FX button

Switches between rhythm mode and effect mode.

10. 

TYPE button

Switches between the rhythm pattern and effect type.

Side panel

11. 

PHONES jack 

Connect the headphones here. If you connect 

the headphones to this jack, the internal speaker 

will be muted.

12. 

AUX IN jack

Use this jack to connect an external audio device 

to the amplifier.

13. 

DC 9V jack

Connect a separately-sold AC adapter here.

14. 

Power LED, power switch

When the power switch is moved to the ON po

-

sition, the power turns ON and the power LED 

lights up. When the power switch is moved to the 

STANDBY position, the power turns OFF, and the power LED turns 

off.

Setting Up Your Amplifier

This section explains the basic setup procedure for your amplifier.

 See 

page 6 for instructions on inserting the batteries.

1. 

Set the VOLUME knob and RHYTHM/FX knob on the AC2 RhythmVOX 

Bass to minimum.

2. 

Insert batteries into the battery compartment. Alternatively, connect a sepa

-

rately-sold AC adapter to the DC 9V jack on the side panel, then insert the 

plug on the other end of the AC adapter into an appropriate AC outlet.
  Use only the specified AC adapter.

3. 

Plug your 

bass 

guitar into the BASS IN jack on the top panel.

If an audio player will be used, connect it to the AUX IN jack on the side 

panel.

4. 

Move the power switch to the ON position to power on the amplifier.

5. 

Turn up the VOLUME knob slowly to adjust the volume level.

Use the RHYTHM/FX knob to adjust the rhythm and effect volume.

 Some bass 

guitars or certain settings on the amplifier may generate 

feedback. In such cases, turn down the VOLUME knob.

Using the Rhythm Section

This amplifier features a total of 81 rhythm patterns, with 9 genres and 9 varia

-

tions.

Entering rhythm mode

Press the RM/FX button. Each time you press the RM/FX button, the mode will 

change. When entering rhythm mode, one of the status LEDs will light.

  If several seconds have passed without a rhythm being played back, the 

status LEDs will go dark.

Selecting a rhythm pattern

Press the TYPE button while pressing the ON/OFF button to display the cur

-

rent genre on the status LEDs. Hold down the ON/OFF button and then press 

the TYPE button to change the genre. The status LEDs will light as shown be

-

low. Release the ON/OFF button to choose the genre.

Green

Orange

Red

8 Beat 1

16 Beat

Heavy

8 Beat 2

6/8 Beat

Soft

Accent

Dance

Metronome

Press the TYPE button to select the variation. Each time you press the TYPE 

button, the variation will change, and the status LEDs will light as shown below.

Green

Orange

Red

VARIATION 1

VARIATION 4

VARIATION 7

VARIATION 2

VARIATION 5

VARIATION 8

VARIATION 3

VARIATION 6

VARIATION 9

Starting and stopping the playback of a rhythm 

pattern

Press the ON/OFF button to play or stop the rhythm. During playback, the illu

-

minated LEDs will blink in sync with the tempo.

Adjusting the volume of a rhythm pattern

Use the RHYTHM/FX knob to adjust the rhythm volume.

Changing the tempo of a rhythm pattern

Turning the RHYTHM/FX knob while pressing the ON/OFF button will adjust 

the tempo. The tempo ranges from 40 to 240 bpm.

Summary of Contents for AC2 RhythmVOX

Page 1: ... com アフターサービス 修理または商品のお取り扱いについてのご質問 ご相談はお客様相談 窓口へお問い合わせください お客様相談窓口 PHS等一部の電話ではご利用できません 固定電話または 携帯電話からおかけください 受付時間 月曜 金曜10 00 17 00 祝祭日 窓口休業日は除く サービス センター 168 0073 東京都杉並区下高井戸1 18 16 2F 輸入販売元 KORG Import Division 206 0812 東京都稲城市矢野口4015 2 http www korg kid com VOX AC2 RhythmVOX Bass 保証書 本保証書は 保証規定により無償修理をお約束するものです お買い上げ日 年 月 日 販売店名 保証規定 必ずお読みください 本保証書は 保証期間中に本製品を保証するもので 付属品類 ヘッドホン など は保証の対象になりません 保証...

Page 2: ...t via the internet through mail order and or via a telephone sale you must verify that this product is intended to be used in the country in which you reside WARNING Use of this product in any country other than that for which it is in tended could be dangerous and could invalidate the manufacturer s or distribu tor s warranty Please also retain your receipt as proof of purchase otherwise your pro...

Page 3: ...stellung gekauft haben müssen Sie bestätigen dass dieses Produkt für Ihr Wohngebiet ausgelegt ist WARNUNG Verwendung dieses Produkts in einem anderen Land als dem für das es bestimmt ist verwendet wird kann gefährlich sein und die Garantie des Herstellers oder Importeurs hinfällig lassen werden Bitte bewahren Sie diese Quittung als Kaufbeleg auf da andernfalls das Produkt von der Garantie des Her ...

Page 4: ...コードの上に重いものを乗せない コードが破損し 感電や火災の原因になります 大音量や不快な程度の音量で長時間使用しない 大音量で長時間使用すると 難聴になる可能性があります 万一 聴力低下や耳鳴りを感じたら 専門の医師に相談してくださ い 本製品に異物 燃えやすいもの 硬貨 針金など を入れない 温度が極端に高い場所 直射日光の当たる場所 暖房機器の近く 発 熱する機器の上など で使用や保管をしない 振動の多い場所で使用や保管をしない ホコリの多い場所で使用や保管をしない 風呂場 シャワー室で使用や保管をしない 雨天時の野外のように 湿気の多い場所や水滴のかかる場所で 使 用や保管をしない 本製品の上に 花瓶のような液体が入ったものを置かない 本製品に液体をこぼさない 濡れた手で本製品を使用しない 注意 この注意事項を無視した取り扱いをすると 傷害を負う 可能性または物理的損害が発生する可...

Page 5: ... 2 A 2 2 6 8 Beat A 2 2 Soft A 2 3 8 Beat 2 A 3 3 6 8 Beat A 3 3 Soft A 3 4 8 Beat 2 B 1 4 6 8 Beat B 1 4 Soft B 1 5 8 Beat 2 B 2 5 6 8 Beat B 2 5 Soft B 2 6 8 Beat 2 B 3 6 6 8 Beat B 3 6 Soft B 3 7 8 Beat 2 C 1 7 6 8 Beat C 1 7 Soft C 1 8 8 Beat 2 C 2 8 6 8 Beat C 2 8 Soft C 2 9 8 Beat 2 C 3 9 6 8 Beat C 3 9 Soft C 3 Accent 1 Accent A 1 Dance 1 Dance A 1 Metronome 1 Metronome A 1 2 Accent A 2 2 D...

Page 6: ...peut être assez brève Einlegen von Batterien Entfernen Sie den Batteriefachdeckel auf der Rückseite des Verstärkers Legen Sie sechs AA Batterien auf die nachstehend gezeigte Art ein Auswechseln der Batterien Wenn die Power LED nur noch schwach leuchtet müssen Sie die Batteri en ersetzen Bei einer geringen Batteriespannung tritt eventuell Rauschen auf Erschöpfte Batterien müssen sofort entnommen we...

Page 7: ... Alternatively connect a sepa rately sold AC adapter to the DC 9V jack on the side panel then insert the plug on the other end of the AC adapter into an appropriate AC outlet Use only the specified AC adapter 3 Plug your bass guitar into the BASS IN jack on the top panel If an audio player will be used connect it to the AUX IN jack on the side panel 4 Move the power switch to the ON position to po...

Page 8: ...M FX or the TYPE button will end the tuning Tip After you tune the 4th string tune the other strings using the 4th string as a reference About Sleep Mode When there is no input sound from the BASS IN jack and about 30 minutes or more have passed since the RHYTHM FX section knobs or buttons have been operated the amplifier will automatically enter sleep mode low power state In sleep mode the status...

Page 9: ...s Vous pouvez aussi bran cher un adaptateur secteur vendu séparément à la prise DC9V IN en face arrière puis brancher la fiche à l autre extrémité de l adaptateur à une prise de courant Utilisez exclusivement l adaptateur secteur spécifié 3 Branchez votre basse à la prise BASS IN en face avant Si vous souhaitez utiliser un lecteur audio branchez le à la prise AUX IN du panneau latéral 4 Placez l i...

Page 10: ... Quand vous avez accordé la 4ème corde accordez les autres cordes en utilisant la 4ème corde comme référence À propos du mode de veille Si l appareil ne reçoit aucun signal d entrée à sa prise GUITAR IN et qu aucune manipulation des commandes et boutons de la section RHYTHM FX n est effectuée pendant 30 minutes ou plus l amplificateur passe automatiquement en mode de veille mode d économie d énerg...

Page 11: ...eine Ende eines optionalen AC Netzteils an die DC9V IN Buchse auf der Seitenplatte und das andere Ende an eine geeignete Steckdose anschließen Verwenden Sie ausschließlich das beiliegende Netzteil 3 Verbinden Sie den Bass mit der BASS IN Buchse auf der Oberseite Verbinden Sie gegebenenfalls einen Audioplayer mit der AUX IN Buchse an der Seitenplatte 4 Schieben Sie den Ein Ausschalter in die Positi...

Page 12: ...r Instrumente 4 Zum Beenden der Stimmfunktion drücken Sie entweder die RM FX oder die TYPE Taste Tipp Wenn die 4 Saite richtig gestimmt ist können Sie sich zum Stimmen der übrigen Saiten an der 4 Saite orientieren Der Sleep Modus Falls kein Eingangssignal an der GUITAR IN Buchse anliegt und seit mindestens 30 Minuten keine Regler oder Tasten der RHYTHM FX Sektion bedient worden sind fährt der Vers...

Page 13: ...nimo 2 Inserte las pilas en el compartimiento Como alternativa puede conectar un adaptador de CA que debe adquirir por separado al jack DC9V IN del panel lateral e insertar el conector del otro extremo del adaptador de CA a una toma de corriente adecuada Utilice solo el adaptador de corriente especificado 3 Conecte el bajo al jack BASS IN del panel superior Si va a utilizar un reproductor de audio...

Page 14: ...ón TYPE Nota Después de afinar la 4ª cuerda afine otras cuerdas utilizando la 4ª cuerda como referencia Acerca del modo de suspensión Cuando no llega ningún sonido de entrada al jack GUITAR IN y han transcurrido unos 30 minutos o más sin llevar a cabo ninguna acción con los mandos o botones de la sección RHYTHM FX el amplificador auto máticamente entra en modo de suspensión estado de bajo consumo ...

Page 15: ...定しま す 2 電池を入れるか 別売のACアダプターをサイド パネルのDC 9V 端 子に接続します ACアダプターを使用する場合には コンセントに ACアダプターを接続します ACアダプターは必ず指定のものを使用してください 3 ベース ギターに接続したケーブルをトップ パネルのBASS IN端子 に接続します オーディオ プレイヤーなどを使用する場合には サ イド パネルのAUX IN端子に接続します 4 電源スイッチをONの位置にして 電源を入れます 5 VOLUMEノブをゆっくりと上げて音量を調節します リズム音 エ フェクト音の音量はRHYTHM FXノブで調節します 使用するベース ギターや 本機の設定によってはハウリングを起こ す可能性があります その場合はVOLUMEノブを絞って 音量を下 げてください リズムを使う 本機は 9ジャンル x 9バリエーションの計81個のリズ...

Page 16: ...るとき 少し高い方にずれているとき チューニングが合っているとき 少し低い方にずれているとき 低い方にずれているとき Tip オクターブ違いのEも認識します ハーモニクスでのチューニングや 他の楽器のチューニングにも使用できます 4 RM FXボタンまたはTYPEボタンを押すと チューナーが終了しま す Tip チューナーで4弦を基準音に合わせたら 4弦を基準にして 他の弦を チューニングしてください スリープ状態について 本機は BASS IN端子からの入力音がなく RHYTHM FXセクショ ンのノブやボタンのいずれも操作しない状態が約30分間続くと 自動 的にスリープ状態 低消費電力状態 になります スリープ状態では ステータスLEDが消灯し 電源LEDが点滅します スリープ状態のときにBASS IN端子から音を入力したり RHYTHM FXセクションのボタンを操作すると スリープ状...

Reviews: