background image

A5P | 01

locked unit. 

Make sure that the cord is located so that it will not be 

stepped on, tripped over, or otherwise subjected to dam-

age or stress.

Remove the plug from the mains socket / battery (where 

applicable) before carrying out any adjustment or main-

tenance.

Always store the power tool/machine in a dry place.

If the power cord is damaged, it must be replaced by a 

qualified service technician. 

Keep the ventilation slots and motor housing as free of 

dirt and dust as possible (where applicable).

Clean the power tool/machine by rubbing it with a clean 

cloth and blow it clean using low-pressure compressed 

air is recommended.
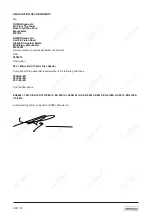
Ensure you have all the pieces listed. If you are missing 

any components, contact our customer services depart-

ment at 

[email protected] 

.  DO NOT proceed with assembly if any components 

are missing.
HAND HELD SANDERS & POLISHERS

For Belt Sanders, Drum Sanders and polishers, the 

direction of rotation shall be indicated on the tool by an 

arrow, raised or sunk, or by any other means no less 

visible and indelible. Hold the Power Tool by insulated 

gripping surfaces when performing an operation where 

the fastener may contact hidden wiring or its own cord. 

Fasteners contacting a ‘live’ wire may make exposed 

metal parts of the power tool ‘live’ and could deliver an 

electric shock.

TECHNICAL SPECIFICATION
Rated Voltage 230V ~   


Rated Power 250W 


Rated Frequency 50Hz

No Load Speed 2980/min-

1

Summary of Contents for 3500219

Page 1: ...ur ears Protect your hands Wear a dust mask Protective clothing must be worn DO NOT allow two people to use the sander at the same time Remember that when the sanding belt and disc are in operation th...

Page 2: ...ion facilities ensure these are connected and properly used Use of dust collection can reduce dust related hazards WORK AREA SAFETY Keep work area clean and well lit Cluttered or dark areas invite acc...

Page 3: ...essed air is recommended Ensure you have all the pieces listed If you are missing any components contact our customer services depart ment at support domu co uk DO NOT proceed with assembly if any com...

Page 4: ...r M24 2RW Declare under our sole responsibility the product SKU 3500219 Description 25 x 760mm Belt 125mm Disc Sander Complies with the essential requirements of the following directives 2006 42 EC 20...

Page 5: ...A5P 01 COMPONENTS 2 14 7 3 1 9 10 4 13 5 8 15 8 6 11 12...

Page 6: ...fasten it permanently to a mounting board that can easily be clamped to a workbench or other stable surface The mounting board should be of sufficient size to avoid tipping while Belt and Disc Sander...

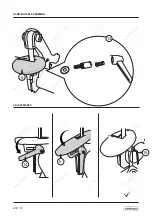
Page 7: ...A5P 01 ASSEMBLY ASSEMBL E VERSAMMLUNG MONTAJE MONTAGGIO EL MONTAJE 9 10 9...

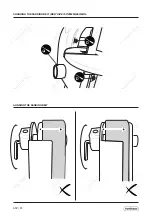
Page 8: ...A5P 01 SANDING TABLE ASSEMBLY ADJUSTMENTS 5 14 14 5 15...

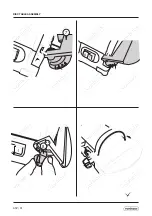
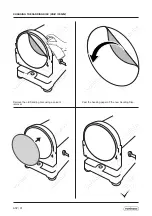
Page 9: ...A5P 01 DISC TABLE ASSEMBLY 7 8 x2...

Page 10: ...A5P 01 OPERATION MITRE GUIDE ADJUSMENTS 1 6m m Max 11 6...

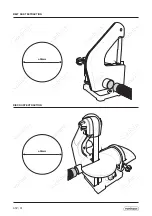
Page 11: ...A5P 01 BELT DUST EXTRACTION 39mm 39mm DISC DUST EXTRACTION...

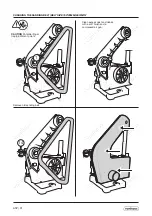
Page 12: ...A5P 01 CHANGING THE SANDING BELT BELT SIZE 760 25MM 860 MIN 1 4...

Page 13: ...01 Clean excess dust and debris with a soft brush and a compresed air gun CAUTION Potential finger trap pinchment points Remove old sanding belt CHANGING THE SANDING BELT BELT SIZE 760 25MM 860 MIN 1...

Page 14: ...A5P 01 ALIGNING THE SANDING BELT CHANGING THE SANDING BELT BELT SIZE 760 25MM 860 MIN 1...

Page 15: ...A5P 01 Remove the Sanding Disc Table ALIGNING THE SANDING BELT CHANGING THE SANDING DISC DISC 125MM 3 15...

Page 16: ...A5P 01 CHANGING THE SANDING DISC DISC 125MM Remove the old Sanding Disc using a solvent remover Peel the backing paper off the new Sanding Disc...

Page 17: ...A5P 01 Re install the Sanding Disc Table as previously shown CHANGING THE SANDING DISC DISC125MM...

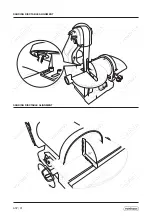
Page 18: ...A5P 01 SANDING DISCTABLE ALIGNMENT SANDING DISC TABLE ALIGNMENT...

Page 19: ...g 3 Do not keep workpiece in one place for too long Motor will not start Fuses or circuit breakers tripping or blowing 1 Short circuit in line cord or plug 1 Inspect cord or plug for damaged insulatio...

Page 20: ...g tracking instructions in this manual 3 Weak or broken tension spring 3 Have tension spring replaced by service technician 4 Broken defective sanding accesso ries 4 Replace sanding belt disc Workpiec...

Page 21: ...A5P 01...

Page 22: ...d accurately Any abuse of the product or the manner in which it is used will invalidate the warranty Returned goods will not be accepted unless re packaged in its original packaging and accompanied by...

Reviews: