background image

Section 01: ENGINE 

PA1561 

42


3.  Drain the engine cooling system. Refer to 

Section 05 

COOLING

 under "Draining Cooling 

System".  


FIGURE 20: ENGINE COMPARTMENT 

01044


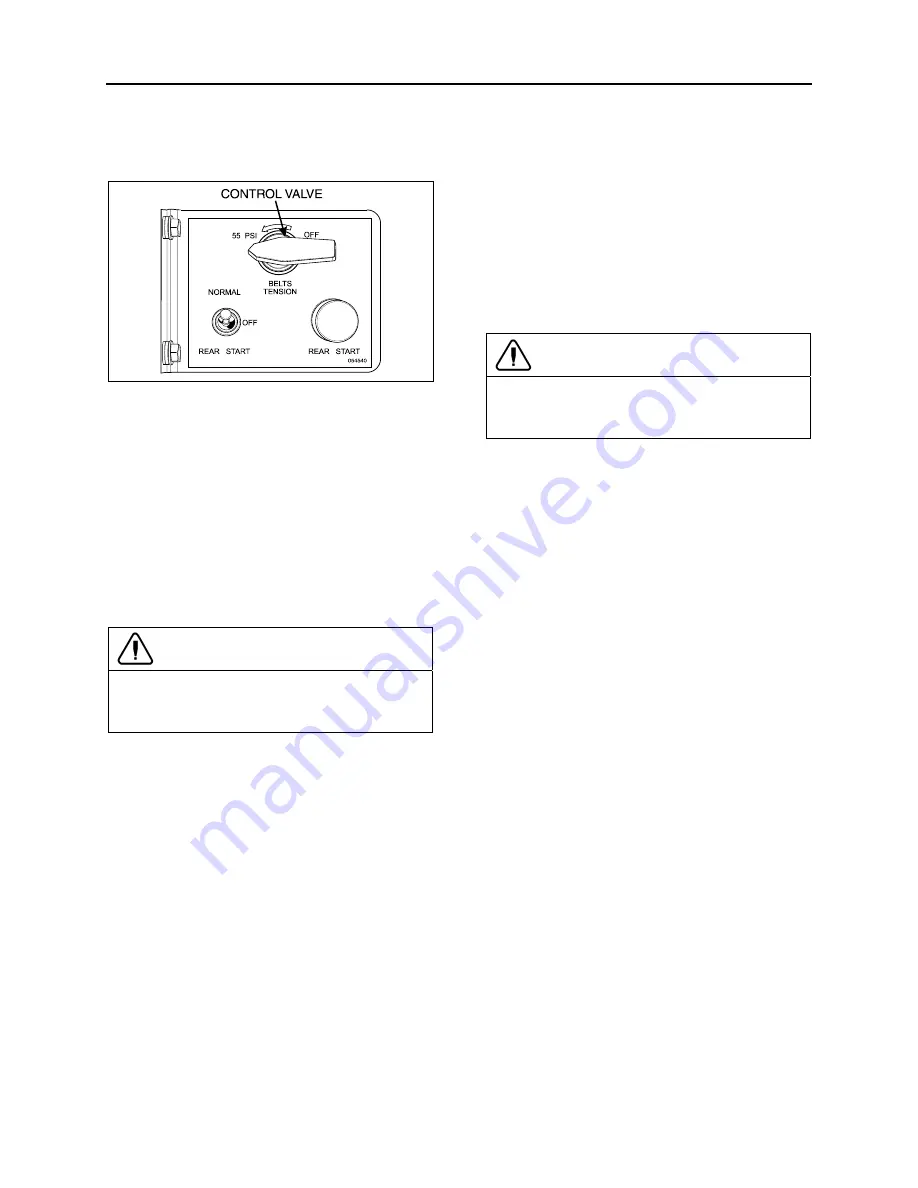
4. Locate the A/C compressor drive belt 

tensioner control valve (Fig. 23). Turn handle 
clockwise in order to release pressure in belt-
tensioner air bellows and loosen belts. 


Remove the belt. 

5.  Release all pressure from the air system. 

Refer to Section 12 BRAKES & AIR 
SYSTEM for instructions. 

6. Disconnect and remove the engine-air 

intake duct mounted between air cleaner 
housing and turbocharger inlet. 


CAUTION


To avoid damage to turbocharger, cover the 
turbocharger inlet opening to prevent foreign 
material from entering. 

7.  Disconnect and remove the air intake duct 

mounted between the turbocharger outlet 
and the charge air cooler inlet. 

8.  Disconnect and remove the air intake duct 

mounted between the charge air cooler outlet 
and the engine intake. 

9.  Disconnect and remove section of coolant 

pipe assembly mounted between the radiator 
outlet and the water pump inlet.  

10. Disconnect and remove a section of coolant 

pipe assembly mounted between the 
thermostat housing and the radiator inlet. 

11. 

Disconnect the coolant delivery hose 

mounted between the coolant surge tank and 
the water pump.  

12. 

Disconnect two vent hoses from the 

thermostat housing and from the coolant pipe 
assembly. 

13. 

Disconnect the fan-clutch electrical 

connector. 

14.  Disconnect the radiator fan drive shaft. 

15.  Disconnect the small heater hose located on 

the cylinder head at the back of the engine. 

16. Disconnect and remove the exhaust pipe 

mounted between the turbocharger outlet 
and the exhaust bellows. If necessary, refer 
to Section 04 

EXHAUST SYSTEM

 under “AFT 

Removal and Installation". 

CAUTION


To avoid damage to turbocharger, cover the 
turbocharger outlet opening to prevent foreign 
material from entering. 

17. Disconnect the block heater connector 

above the power steering pump. 

18. Disconnect the steel-braided airline from the 

A/C compressor air bellows. 

19. Disconnect the oil delivery hose from the 

valve located at the reserve tank drain. 

20. Remove the power steering pump, leaving 

the supply and discharge hoses connected t 
it. 

21. Close engine fuel supply shutoff valve on 

primary fuel filter.  Disconnect the fuel line 
connected to inlet port. On vehicles equipped 
with the optional water-separator-fuel-filter, 
disconnect the connector and remove cable 
ties from cradle. 

22. Disconnect fuel return line from bulkhead 

fixed on engine cylinder head end. 

23. Disconnect the air compressor discharge 

airline. 

24. Disconnect the coolant hose to the sump 

tank heater system. 

25. Disconnect positive (+) cable (red terminal) 

from starter motor solenoid. 

26.  Disconnect starter motor ground cables from 

rear subframe ground-stud located close to 
the starter motor. 

27. Disconnect VIH (vehicle interface harness) 

main connectors from MCM and VSS 
(vehicle speed sensor). 

28. On vehicles equipped with an automatic 

transmission provided with a hydraulic output 
retarder, disconnect steel-braided airline from 

Summary of Contents for D13

Page 1: ...SENSORS 19 2 6 MOTOR CONTROL MODULE MCM 19 2 7 COMMON POWERTRAIN CONTROLLER CPC 19 2 8 DDEC VI DIAGNOSTICS 19 2 8 1 Diagnostic system 19 2 8 2 Check Engine Telltale Light AWL 20 2 8 3 Stop Engine Warning Light RSL 20 2 8 4 Stop Engine Override Switch SEO 20 2 8 5 Diagnostic Data Link DDL Connectors 20 2 9 READING DIAGNOSTIC CODES FLASHING LIGHT METHOD 20 2 10 DDEC VI CPC DIAGNOSTIC CODES LIST 21 2...

Page 2: ...ALLATION 15 FIGURE 11 VEHICLE INTERFACE HARNESS GENERAL APPLICATION SHOWN 16 FIGURE 12 DETROIT DIESEL 2007 SERIES 60 ENGINE TYPICAL 18 FIGURE 13 MOTOR CONTROL MODULE MCM 19 FIGURE 14 CPC 19 FIGURE 15 THE CPC COMMUNICATES OVER THE J1587 AND J1939 DATA LINKS TO THE VEHICLE 19 FIGURE 16 FLASHING FAULTS CODES 21 FIGURE 17 ENGINE OIL LEVEL DIPSTICK 39 FIGURE 18 OIL RESERVE TANK 39 FIGURE 19 UNDER VEHIC...

Page 3: ...the fault These faults can be read via a diagnostic computer or through the instrument cluster display if equipped The Premium Tech Tool PTT is the preferred tool for performing diagnostic work Using a diagnostic computer or PTT connected to the Serial Communication Port expands the technicians diagnostic capabilities with additional data and tests For diagnostic software contact your local dealer...

Page 4: ... in pressure between the two ports Measurement of the pressure before and after the EGR valve is used to calculate EGR flow The EGR Differential Pressure Sensor is located on the left or right side of the engine EGR Temperature Sensor The EGR temperature sensor detects exhaust gas temperature for EGR system The sensor modifies a voltage signal from the control unit The modified signal returns to t...

Page 5: ...rature Sensor is a thermistor whose resistance varies inversely to temperature The sensor has a negative temperature coefficient which means the sensor resistance will decrease as the inlet air temperature increases The Intake Manifold Boost Temperature Sensor is located in the intake manifold Intake Manifold Pressure Sensor The Intake Manifold Pressure Sensor contains a pressure sensitive diaphra...

Page 6: ...te under Parts Service On Volvo web site you will find detailed service procedures for parts replacement repair and maintenance FIGURE 1 D13F ENGINE ALTERNATOR SIDE TYPICAL 1 Breather Tube 7 Fuel Filter 2 Intake Manifold 8 Fuel Water Separator 3 Air Compressor 9 Fuel Filter 4 Power Steering Pump 10 Hand Priming Pump 5 Fuel Pump 11 Crankcase Ventilator 6 Engine Electronic Control Unit EECU 12 EGR M...

Page 7: ...lant Filter 25 EGR Valve 19 Venturi Pipe 1 3 ENGINE OIL 1 3 1 General Keep the engine oil at the proper level and change it at the recommended intervals Always replace the oil filters at the same time as when the oil is changed 1 3 2 Oil Quality Volvo North America recognizes engine oils that meet or exceed the standards given by American Petroleum Institute API for the oil classifications listed ...

Page 8: ...Change Intervals The length of time an engine can operate before an oil change depends on the quality oil used the type of fuel used fuel consumption engine oil consumption vehicle application level of dust in the air and fuel consumption The change intervals given in this manual are maximum intervals If the vehicle is operating in heavy duty operation dusty or off road conditions etc reduce the i...

Page 9: ...temperatures An oil is not fully defined until both the API quality classification and the viscosity grade are specified Choose the viscosity grade for the typical ambient temperature for the application Multigrade oils have a broad range that suit operation in changing temperature Volvo North America recommends the viscosities shown in the viscosity temperature table for Volvo engines 1 3 7 Oil A...

Page 10: ...oil immediately after driving when the oil is warm Always replace the oil filters when changing the oil Component Capacity L Oil pan 24 min 32 max Engine block 4 5 Filters 3 6 Total oil fill empty 42 5 NOTE Since about 1 liter of oil remains in the engine after draining approximately 38 liters will be needed for a complete oil change 1 3 10 Oil Filters Change WARNING Hot oil can cause severe burns...

Page 11: ... OIL FILLING TUBE FIGURE 7 ENGINE OIL LEVEL DIPSTICK 1 4 POWER PLANT ASSEMBLY REMOVAL To access the engine or engine related components the vehicle power plant assembly must be removed as a whole unit by means of a slide out cradle The power plant assembly includes the engine transmission including retarder if so equipped air compressor alternator and transmission oil cooler Remove the power plant...

Page 12: ...assembly mounted between the radiator outlet and the water pump inlet 11 Disconnect and remove a section of coolant pipe assembly mounted between the thermostat housing and the radiator inlet if applicable 12 Disconnect the electric fan clutch connector located near the cooling fan right angle gearbox 13 Disconnect the cooling fan drive shaft CAUTION To avoid damage to cooling fan right angle gear...

Page 13: ...onnect VIH vehicle interface harness connector 30 Disconnect fuel return line from bulkhead fixed on engine cylinder head end 31 Unfasten and put aside engine compartment lighting fixture and turbocharger fire suppression nozzle if applicable 32 Disconnect turbo boost pressure gauge airline from engine air intake if applicable 33 Disconnect the engine coolant hose near the starter 34 On partition ...

Page 14: ...ers are filled with fuel oil refer to Section 03 FUEL SYSTEM 4 Start engine for a visual check Check fuel oil cooling pneumatic and hydraulic system connections for leakage Test operation of engine controls and accessories 1 6 ENGINE MOUNTS The power plant assembly is mounted to the cradle by means of rubber mounts and supports Two engine support brackets are used at the front of the engine while ...

Page 15: ...D M8 1 25 G8 8 16 22 B SCREW CAP HEXAGONAL HEAD M8 1 25 G10 9 22 30 C SCREW CAP HEXAGONAL HEAD M10 1 5 G10 9 43 58 D SCREW CAP HEXAGONAL HEAD M12 1 75 G8 8 60 81 E SCREW CAP HEXAGONAL HEAD M14 2 0 G8 8 90 122 F SCREW CAP HEXAGONAL HEAD M16 2 0 G8 8 140 190 G SCREW CAP HEXAGONAL HEAD M16 2 0 G10 9 190 258 H SCREW CAP HEXAGONAL HEAD M20 2 5 G10 9 450 610 ...

Page 16: ...termines all values required for the operation of the engine A diagnostic interface is provided to connect to an external diagnosis tester Besides the engine related sensors and the engine resident control unit the Motor Control Module MCM this system has a chassis mounted control unit for vehicle engine management the Common Powertrain Controller CPC The connection to the vehicle is made via a CA...

Page 17: ...ry fuel filter 7 Fuel pump 8 Air compressor 9 Engine oil filling tube 10 Bosch alternators 2 11 Engine oil dipstick 12 EGR delta pressure sensor 13 EGR valve 14 Intake throttle 15 EGR mixer 16 Intake manifold 17 Engine Harness 18 Thermostat housing 19 Turbo compressor outlet 20 Actuator coolant return line 21 Electrically controlled actuator 22 HC doser 23 Closed crankcase breather oil separator ...

Page 18: ... EGR pressure for EGR control EGR Temperature Sensor Senses EGR exhaust temperature after EGR cooler Used for EGR system diagnosis Engine Coolant Temperature Sensor ECT Sensor Senses coolant temperature for functions such as engine protection fan control and engine fueling Engine Oil Pressure Sensor EOP Sensor Senses gallery oil pressure for functions such as engine protection Engine Oil Temperatu...

Page 19: ...Motor Control Module is factory programmed by Detroit Diesel Reprogramming must be done at a Detroit Diesel authorized service center However some changes may be performed to the cruise control and road speed limiter using a diagnostic data reader see paragraph DDEC VI Diagnostic Codes in this section FIGURE 13 MOTOR CONTROL MODULE MCM 01145 2 7 COMMON POWERTRAIN CONTROLLER CPC The CPC is the inte...

Page 20: ...has been detected and that a code has been stored in the MCM memory This light also has a 5 second bulb check when the ignition is first turned on 2 8 3 Stop Engine Warning Light RSL This light also mounted on the telltale light panel illuminates to indicate that a major engine problem is occurring with the exception of a 5 second bulb check when the ignition is first turned on 2 8 4 Stop Engine O...

Page 21: ...h again Flashing codes provide a four digit number Each fault code is flashed twice in order to help with counting the flashes If there are no active faults or if there are no inactive faults the number 3 is flashed once followed by an 3s delay FIGURE 16 FLASHING FAULTS CODES Refer to DDEC Troubleshooting Manual 6SE567 for more information and SAE codes NOTE Active codes are flashed in ascending n...

Page 22: ...J1939 Wheel Based Vehicle Speed Signal from Source 3 is missing 84 20 PID 84 2113 Vehicle Speed Sensor Drifted High Error VSS signal not plausible 91 13 PID 91 2114 Accelerator Pedal Learn Error 91 3 PID 91 2114 Accelerator Pedal Circuit Failed High 91 4 PID 91 2114 Accelerator Pedal Circuit Failed Low 91 8 PID 91 2114 Pwm Accelerator Pedal Signal 1 Frequency Out Of Range 91 14 PID 91 2114 Pwm Acc...

Page 23: ... J1939 Transmission Output Shaft Speed Signal is erratic 191 13 SID 231 2132 J1939 Transmission Output Shaft Speed Signal is missing 247 9 PID 247 2615 MCM Engine Hours Data not received or stopped arriving 247 10 PID 247 2615 MCM Engine Hours Data increasing at an implausible rate 247 0 PID 247 2615 MCM Engine Hours Data higher than expected 247 1 PID 247 2615 MCM Engine Hours Data lower than exp...

Page 24: ...tch Signal from Source 2 is missing 597 19 SID 246 2141 J1939 Service Brake Switch Signal from Source 3 is erratic 597 13 SID 246 2141 J1939 Service Brake Switch Signal from Source 3 is missing 599 4 SID 243 2142 Cruise Control SET and RESUME Circuits Failed Low 600 19 SID 243 2143 J1939 Cruise Control Coast Switch Signal from Source 1 is erratic 600 13 SID 243 2143 J1939 Cruise Control Coast Swit...

Page 25: ...nown MUID 625 9 SID 248 2151 Incorrect MCM System ID Received 625 9 SID 248 2151 MCM System ID Not Received or Stopped Arriving 625 4 SID 248 2151 ECAN Link Circuit Failure 628 14 SID 254 2151 XFLASH Static Fault Code Memory Page Read Write Failure 628 13 SID 155 2615 20ms ECU OS Task Locked in an Endless Loop 628 13 SID 155 2615 20ms ECU OS Task Timed out Prior to Completion 628 13 SID 155 2615 1...

Page 26: ...Output 3 12 Circuit Failed Low 709 3 SID 257 2224 Digital Output 3 16 Circuit Failed High 709 4 SID 257 2224 Digital Output 3 16 Circuit Failed Low 710 3 SID 258 2225 Digital Output 4 06 Circuit Failed High 710 4 SID 258 2225 Digital Output 4 06 Circuit Failed Low 711 3 SID 259 2231 Digital Output 1 05 Circuit Failed High 711 4 SID 259 2231 Digital Output 1 05 Circuit Failed Low 712 3 SID 260 2232...

Page 27: ...chograph Vehicle Speed Signal is erratic 1624 13 SID 231 2315 J1939 Tachograph Vehicle Speed Signal is missing 1663 7 SID 123 2321 Optimized Idle Safety Loop Faulted 1716 9 SID 231 2615 J1939 ERC1 Message is missing 1845 9 SID 231 2615 J1939 TCFG2 Message is missing 2623 14 PID 91 2322 Pwm Accelerator Pedal GAS1 and GAS2 Signal Missing 2623 8 PID 91 2322 Pwm Accelerator Pedal Signal 2 Frequency Ou...

Page 28: ...High 51 1 PID 51 1112 Intake Air Throttle Position Low 51 7 PID 51 1112 Intake Throttle Auto Calibration Error 94 4 PID 94 1112 Fuel Compensation Pressure Sensor Circuit Failed Low 94 3 PID 94 1112 Fuel Compensation Pressure Sensor Circuit Failed High 94 1 PID 94 1112 Fuel Pressure Too High Too Low 97 4 PID 97 1615 Water in Fuel Circuit Failed Low 97 3 PID 97 1615 Water in Fuel Circuit Failed High...

Page 29: ...Low 175 3 PID 175 1224 Engine Oil Temperature Circuit Failed High 175 14 PID 175 1224 Engine Oil Temperature Sensor Plausibility Fault 175 2 PID 175 1224 Engine Oil Temperature Sensor General Temp Plausibility 190 2 PID 190 1225 Engine Speed High 354 4 PID 354 1231 Relative Humidity Circuit Failed Low 354 3 PID 354 1231 Relative Humidity Circuit Failed High 411 4 PID 411 1232 EGR Delta Pressure Se...

Page 30: ...oost System Performance 615 14 SID 155 1615 Starter Electronic Fault ECU internal Res 615 14 SID 155 1615 Starter Jammed Tooth to Tooth Jam 615 14 SID 155 1615 Rail Pressure Governor Valve Stays Open 615 14 SID 155 1615 MU_RPG_INT_MON_SRH I Term Value Too High 615 14 SID 155 1615 Rail Pressure Governor Leakage in High Pressure Too High 615 14 SID 155 1615 Rail Pressure Governor Sensor Signal Drift...

Page 31: ... 625 9 SID 248 1234 No Data Received from Engine CAN Link 625 9 SID 248 1234 Engine CAN Low Wire Defect wire 1 625 9 SID 248 1234 Engine CAN High Wire Defect wire 2 630 12 SID 253 1452 EEPROM Read Write Operation Failed 630 13 SID 253 1455 Calibration Data Not Plausible 630 13 SID 253 1455 Calibration Data Not Plausible CPLD 634 4 SID 40 1321 Constant Throttle Valve Circuit Failed Low 634 3 SID 40...

Page 32: ... Cylinder 3 Needle Control Valve Valve Shorted Circuit 653 31 SID 3 1244 Engine Smoothness Control Cylinder 3 Value Out of Range 654 14 SID 4 1245 Injector Cylinder 4 Needle Control Valve Abnormal Operation 654 10 SID 4 1245 Injector Cylinder 4 Needle Control Valve Abnormal Rate of Change 654 5 SID 4 1245 Injector Cylinder 4 Nozzle Control Valve or Spill Control Valve Jammed Closed 654 7 SID 4 124...

Page 33: ...ignal Voltage Too Low 723 3 SID 64 1415 Camshaft Position Sensor Open Circuit 723 4 SID 64 1415 Camshaft Position Sensor Short to Ground 723 8 SID 64 1415 Camshaft Position Sensor Time Out 723 14 SID 64 1415 Camshaft Position Sensor Pins Swapped 729 4 PID 45 1421 Grid Heater Circuit Failed Low 729 14 PID 45 1421 Grid Heater Special Instructions 729 3 PID 45 1421 Grid Heater Circuit Failed High 729...

Page 34: ...ator Indicates Turbocharger Wastegate Position Error 1213 4 SID 257 1333 MIL Lamp Circuit Failed Low 1213 3 SID 257 1333 MIL Lamp Circuit Failed High 1213 5 SID 257 1333 MIL Lamp Circuit Failed Open 1323 31 SID 155 1433 Cylinder 1 Misfire detected 1323 14 SID 156 1434 Misfire Detected 1324 31 SID 155 1435 Cylinder 2 Misfire detected 1325 31 SID 155 1441 Cylinder 3 Misfire detected 1326 31 SID 155 ...

Page 35: ... Smart Remote Actuator 3 EGR Internal Test Running 2791 31 SID 146 1521 Smart Remote Actuator 3 EGR Unknown Error Code 2795 9 SID 269 1241 CAN3 Communication Error 2795 4 SID 269 1522 Position Waste Gate VNT Failed Low 2795 3 SID 269 1522 Position Waste Gate VNT Failed High 2795 2 SID 269 1522 VNT Valve Position Feedback Failed 2795 0 SID 269 1522 VNT Valve Position Feedback Position Too Low High ...

Page 36: ...e Very High 3251 1 SID 324 1534 DPF Pressure Out of Range Low 3251 9 SID 324 1534 Abnormal Soot Rate 3251 16 SID 324 1534 DPF Pressure Out of Range High 3358 4 SID 155 1535 EGR Pressure Failed Low 3358 3 SID 155 1535 EGR Pressure Failed High 3464 4 SID 59 1313 Intake Throttle Valve Circuit Failed Low 3464 3 SID 59 1313 Intake Throttle Valve Circuit Failed High 3464 5 SID 59 1313 Intake Throttle Va...

Page 37: ...7 1615 Switching Power Supply Voltage Failed Low 3599 3 SID 317 1615 Switching Power Supply Voltage Failed High 3609 4 PID 370 1554 DPF Inlet Pressure Circuit Failed Low 3609 3 PID 370 1554 DPF Inlet Pressure Circuit Failed High 3609 10 SID 370 1554 DPF Inlet Pressure Sensor Stuck 3609 20 SID 370 1554 DPF Inlet Pressure Sensor Drifted High In Range Fault Low Box 3609 2 SID 370 1554 DPF Inlet Press...

Page 38: ...r 8 Spill Control Valve Abnormal Operation 3666 10 SID 369 1623 Injector Cylinder 8 Spill Control Valve Amplifier Abnormal Rate of Change 3666 6 SID 369 1623 Injector Cylinder 8 Spill Control Valve Amplifier Valve Shorted Circuit 3719 16 SID 155 1624 Soot Level High 3719 0 SID 155 1624 Soot Level Very High 3719 31 SID 155 1635 DPF Zone 2 Condition 3719 15 SID 155 1636 DPF Zone 3 Condition 3720 15 ...

Page 39: ...NING Touching a hot engine can cause serious burns CAUTION Do not overfill Oil may be blown out through the crankcase breather if the crankcase is overfilled CAUTION Clean end of tube before removing the dipstick to prevent oil contamination FIGURE 17 ENGINE OIL LEVEL DIPSTICK 01027 CAUTION If the oil level is constantly above normal and excess lube oil has not been added to the crankcase consult ...

Page 40: ...arking brake applied It is best to drain the oil when the engine is still warm 1 From under the vehicle remove the engine drain plug on the oil pan Allow oil to drain Fig 19 WARNING Hot engine oil can cause serious burns Wear coveralls with sleeves pulled down and gloves to protect hands 2 Reinstall the drain plug 3 Remove the spin on filter cartridge using a 1 2 drive socket wrench and extension ...

Page 41: ...irements of non synthetic oils outlined previously Synthetic oils do not permit extension of recommended oil drain intervals NOTE COLD WEATHER STARTING The proper selection of the engine oil grade will ease cold weather starting refer to the lubrication and servicing schedule for the engine oil grade recommendation Other practical considerations such as the use of batteries cables and connectors o...

Page 42: ...he radiator fan drive shaft 15 Disconnect the small heater hose located on the cylinder head at the back of the engine 16 Disconnect and remove the exhaust pipe mounted between the turbocharger outlet and the exhaust bellows If necessary refer to Section 04 EXHAUST SYSTEM under AFT Removal and Installation CAUTION To avoid damage to turbocharger cover the turbocharger outlet opening to prevent for...

Page 43: ...e Check for connections or hoses not mentioned in this list as some vehicles are equipped with special or aftermarket components 33 Remove the six retaining bolts washers and nuts securing the power plant cradle to the vehicle rear subframe Fig 23 NOTE Check if any spacer s have been installed between power plant cradle and vehicle rear subframe and if so note position of each washer for reinstall...

Page 44: ...Section 01 ENGINE PA1561 44 FIGURE 21 ENGINE COMPARTMENT H3 COACHES TYPICAL 01177 FIGURE 22 ENGINE COMPARTMENT VIP TYPICAL 01178 ...

Page 45: ...3 FUEL SYSTEM 9 Start engine for a visual check Check fuel oil cooling pneumatic and hydraulic system connections for leakage Test operation of engine controls and accessories 2 17 JAKE BRAKE Refer to both The Jake Brake Troubleshooting and Maintenance Manual and Installation Manual for Model 797 Engine Brakes for troubleshooting and installation procedures They are annexed at the end of this sect...

Page 46: ...sor is installed in accordance with the manufacturer s specifications It is recommended that the idle count be at 50 or higher with a full throttle count of up to 200 The TPS is self calibrating and therefore has no optimum closed throttle or wide open throttle count value If the counts are within the 50 to 200 range the sensor is properly set FIGURE 24 ELECTRONIC FOOT PEDAL ASSEMBLY 03035 Monitor...

Page 47: ...causes battery cables improperly connected fuse blown faulty battery equalizer activate the DDEC self diagnostic system and contact your Detroit Diesel service center engine does not rotate what is the voltage reading on 24 volt system dashboard indicator is the shift selector to neutral N position higher than 24 volts lower than 24 volts yes no faulty 24 volt system power supply or low battery vo...

Page 48: ...12 volt system indicator higher than 10 volts lower than 10 volts with diagnostic code in hand contact your Detroit Diesel service center probable causes 12 volt system batteries low faulty battery equalizer 12 volt system batteries improperly connected 12 volt system battery master switch to OFF position H3 40 probable cause no fuel check the 2 breakers on the injector feeding system Contact Detr...

Page 49: ...tomer may easily switch from one rating to another within the same table by having the DDEC VI system reprogrammed Coach Engine 14 0L 425 HP 1800 rpm 1450 lb ft 1200 rpm 445 HP 1800 rpm 1450 lb ft 1200 rpm Motorhome 14 0L 470 HP 1800 rpm 1650 lb ft 1200 rpm 515 HP 1800 rpm 1650 lb ft 1200 rpm Entertainer Engine 14 0L 455 HP 1800 rpm 1550 lb ft 1200 rpm 490 HP 1800 rpm 1550 lb ft 1200 rpm 515 HP 18...

Page 50: ...train Type Diesel four cycle Description Turbo Air to air charge cooled No of cylinders 12 8 L inline 6 Recommended cruise speed range 1300 1500 RPM Maximum RPM 2100 Engine oil level quantity Oil Pan Capacity Low Limit 25 quarts 24 liters Oil Pan Capacity High Limit 34 quarts 32 liters Total Engine Oil Capacity with Filters 45 quarts 42 5 liters Lubricating oil filter elements Prevost number 47873...

Page 51: ...Section 01 ENGINE PA1561 51 NOTE For primary and secondary fuel filters refer to Specifications in section 03 ...

Reviews: