background image

[email protected] • 813.978.3700

- 5 -

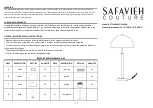
Install Luminaire in Railing, Deck Over-hang or Stair 

Determine Luminaire Location

4

Determine the desired location for the luminaire. 

Place the luminaire to the mounting surface and mark two points 

on the mounting surface where the holes are on the ends of the 

luminaire. The marks will be used for self-tapping screws or wall 

anchors. 

Note: Wall anchors are required for certain installation conditions 

(brick wall, concrete wall, etc.) 

A wireway hole may be drilled through the decking fascia or other 

surface adjacent to the mounting surface.

A.  Hold the luminaire in the desired mounting location. Mark the         

location where the wire exits the luminaire.

B.  Drill a hole through surface (suggested 1/4” [6.5mm] hole).
C.  Thread the wire through the drilled hole.

Self-tapping  

Screw

Luminaire

Railing, Deck

over-hang or Stair

Mark

Install from Bottom

Install from Side

Self-tapping  

Screw

Luminaire

Mark

Wireway 

Hole

Railing, Deck

over-hang or Stair

Wireway Hole

Summary of Contents for VHS-67 Series

Page 1: ...es INSTALLATION INSTRUCTIONS Specifications and product details subject to change without notice Copyright 2018 VOLT Lighting Lutz FL USA 33549 All rights reserved customersupport voltlighting com 813 978 3700 Help Hotline 1 813 978 3700 Mon Fri 8am 8pm Sat Sun 10am 6pm EST 1 ...

Page 2: ...inaires 10 feet 3 05M or more from pool spa or fountain 3 This luminaire is intended to be used only with a power supply transformer rated maximum of 300 watts 25 AMPS at 15 volts 4 DO NOT INSTALL in walls where the capstones overhang the wall less than 3 4 19mm or under stairs where the tread overhangs the riser less than 3 4 19mm 5 Wiring connections must be made with wire connectors that are su...

Page 3: ...Determine the desired location for each luminaire before construction of the wall is started Insert the stainless steel mounting plate sold separately in between the layers of hardscape material If prefered use an adhesive or mortar sold separately to secure the luminaire in place 75 7 2 13 19 Install Luminaire in Brick or Masonry Wall 75 75 75 ...

Page 4: ... management Attach the shield and the luminaire to the stainless steel mounting plate by using machine screws ships with mounting plate INSTALLATION INSTRUCTIONS 4 Strip both leads from the luminaire pigtail Using two wire connectors sold separately connect the leads from the luminaire to the main supply cable leads Luminaire Wires Main Low Voltage Supply Cable Wire Connectors Wire Connection 3 VO...

Page 5: ...nchors are required for certain installation conditions brick wall concrete wall etc A wireway hole may be drilled through the decking fascia or other surface adjacent to the mounting surface A Hold the luminaire in the desired mounting location Mark the location where the wire exits the luminaire B Drill a hole through surface suggested 1 4 6 5mm hole C Thread the wire through the drilled hole Se...

Page 6: ...e marks on the mounting surface and then insert the wall anchors Then install the luminaire and shield and secure them with the self tapping screws Rubber washers are required during installation from the side NOTE DO NOT OVER TIGHTEN SCREWS Return to Step 3 to complete the wire connections Self tapping Screw Luminaire Railing Deck over hang or Stair Mark Install from Bottom Install from Side Self...

Page 7: ...978 3700 7 Adjust Lamp Direction 6 Using an Allen wrench loosen the set screws on the ends of the lamp and then rotate the lamp to the desired direction Always tighten the set screws after adjustments Allen Wrench Set Screw Set Screw Lamp ...

Page 8: ...ails subject to change without notice Copyright 2018 VOLT Lighting Lutz FL USA 33549 All rights reserved customersupport voltlighting com 813 978 3700 w w w v o l t l i g h t i n g c o m Help Hotline 1 813 978 3700 Mon Fri 8am 8pm Sat Sun 10am 6pm EST 8 ...

Reviews: