

AUTOFILL UNIT
INSTALLATION INSTRUCTIONS
SETUP CONTROL FOR AUTOFILL USE
1. Press the Main Power Switch to turn the machine
on.
2. Press and hold the Menu button for two seconds.
3. Once the adjustment screens are displayed,
press the Menu button until the Refill screen is
displayed.
4. Press the up or down arrow button to change the
setting from Off to On.
5. Press the Menu button to save the setting.
6. Repeat steps 2-5 for each control.
7. Turn the Main Power switch Off.
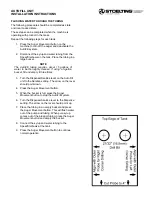
CONNECTING TUBING
The tubing for each tank must be connected to the
AutoFill for that specific tank. For these instructions, the
tank on the left when
viewing from the back of the
machine
is “Tank 1”. “Tank 2” is the middle (or right tank
on a two tank machine) and “Tank 3” is the rightmost
tank.
Included with the AutoFill unit is tubing for water and
product. The blue tubing is for water and the white tubing
is for product.
1. Measure the distance from the back of the
machine to the AutoFill unit and cut the tubing to
length. Leave slack in the tubing so that it doesn’t
kink.
2. Connect the tubing to the Speedfit elbows on
each tank. Use one blue tube and one white tube
for each tank.
3. Connect the tubing to the Speedfit connections
on top of the AutoFill unit.
NOTE
Make sure the tubing is connected from the AutoFill
unit to the correct tank number on the machine.
Tank 1 is the leftmost tank when viewing from the
back of the machine.
4. Connect the incoming water supply to the water
inlet on the back of the AutoFill unit. Use 3/8”
tubing and a Speedfit connector.
5. Connect the Speedfit connector attached to the
clear product tubing to the side of the AutoFill
unit. Connect the other end to a BIB connector.
Repeat for each tank.
NOTE
The BIB connectors are not included with the
AutoFill unit.
6. Once the connections are made, turn on the
water supply and check connections for leaks.
CLEANING & SANITIZING THE SYRUP TUBING
Clean and sanitize the tubing before the first use and on a
semiannual basis or as state and local codes dictate. The
machine must be empty and clean when following this
procedure.
Repeat the following steps for each tank.
1. Make sure the AutoFill unit is off.
2. Prepare 4 gallons of Stera-Sheen Green Label
Sanitizer according to manufacturer’s instructions
to provide a 100ppm strength solution.
3. Cut an adapter from an empty bag of syrup.
Connect the adapter to the BIB connector of the
syrup line. Put the BIB connector into the bucket
of sanitizer.
NOTE
If you do not have an empty bag of syrup, remove
the plug from the top of the BIB connector. Do not
lose the plug; it is needed for proper operation of
the BIB.
4. Turn the AutoFill Main Power and machine Main
Power switches On.
5. Press the Auger Movement button on the
machine. The AutoFill system will fill the tank.
6. Monitor the sanitizer level in the tank. Make sure
the AutoFill system turns off within 1” of the mix
level probe. If it does not, turn the AutoFill and
machine off, disconnect power, and check the
electrical connections.
7. After the sanitizer has run through the pump,
press the Auger Movement button again to stop
the auger and deactivate the AutoFill system.
8. Drain the machine and turn the machine Main
Power switch Off.
9. Disconnect the bag adapter from the BIB
connector (or reinsert the plug into the
connector). Connect the BIB connector to the
syrup BIB.
10. Turn the machine Main Power switch On and
place a cup under the clear tube in the tank.
11. Press the Auger Movement button to flush the
sanitizer out of the pump and tubing. When pure
syrup comes out of the tubing, turn the machine
off and discard the cup. Drain the water out of the
tank.
12. Place the cover on the tank. The machine is now
ready to operate.


