AUTOFILL UNIT
INSTALLATION INSTRUCTIONS
INTRODUCTION
Please read and follow the steps below to install the
AutoFill unit. The AutoFill unit should be located near the
machine. Do not extend the wiring or tubing.
NOTE
The machine must be empty and clean when
installing the AutoFill unit.
ADDITIONAL PARTS NEEDED
The following parts are needed to install the AutoFill unit
and are not included:
3/8” tubing for water supply
Shutoff valve for water supply
John Guest Speedfit fittings for water supply
Bag-In-Box
connector
INSTALL TUBING IN TANKS
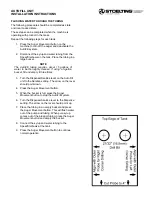
Cut out the attached template to determine the location of
the tubing holes and the depth of the mix level probe.
Follow the steps below to install the tubing into the tank.
1. Remove the tank lids from each tank.
2. Align the edge of the template with the top of the
tank and the outermost probe (either right or left
probe). Mark the tank with the hole locations.
NOTE
All the tanks must be drilled on the same side. If
drilling on the left corner of one tank, all the other
tanks must be drilled on the left corner.
Drill Location
3. Drill the tanks using a 21/32” (16.5mm) drill bit.
4. Install the grommets into the holes.
5. Press the Speedfit elbows into the grommets and
connect the 2” length of tubing to the elbows on
the inside of the tanks.
6. Measure and cut the mix level probe so that the
probe extends 4” into the tank.
Probe Length
WIRING THE AUTOFILL UNIT
1. Disconnect the machine from the power source.
WARNING
Hazardous Voltage
Disconnect all electric power before servicing.
Failure to disconnect power before servicing could
result in death or serious injury.
2. Remove the back panel.
3. In the AutoFill kit, locate the wire harness that
has the protective outer jacket.
4. Insert one end of the harness through the hole on
the bottom panel at the rear of the machine.
Connect it to the existing wiring harness terminal
in the machine.
5. Connect the other end to the AutoFill unit.
6. Install the panel onto the machine.
7. Connect power to the machine.
4”


