background image

209921A VOKKERO SQUADRA 8 - QATAR - User guide version V1.1

22

Page

of 26

6.4.  Admin Settings menu

This menu is reserved for factory settings and cannot be accessed by users.

6.5.  Default settings

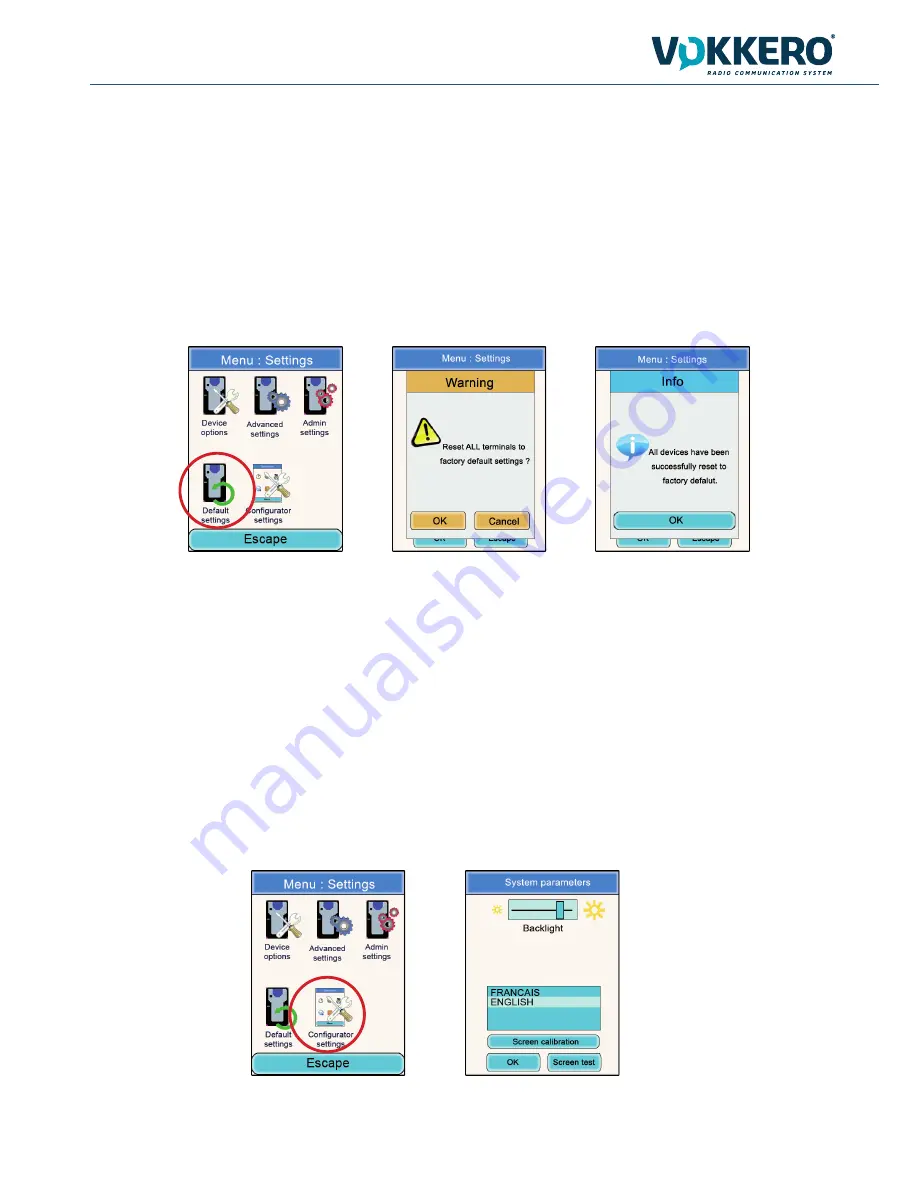
This menu allows to restore factory settings to all terminals plugged on the configurator.

Procedure :

• 

In the main menu, click on the Configuration icon.

• 

The Configuration sub-menu will appear. Click on “Default Settings”.

• 

A warning window is asking for a confirmation.

• 

Click on «OK» icon to restore factory settings.

6.6.  Configurator Settings menu

This menu provides access to settings specific to the configurator. Three parameters are adjustable:

•  LCD screen backlight

•  Language of the configurator: French or English

•  LCD screen calibration

Procedure:

• 

In the main menu, click on the Configuration icon.

• 

The Configuration sub-menu will appear. Click on “Configurator Settings”.

• 

A window relating to the modifiable parameters of the configurator’s LCD screen will appear.

• 

Using the stylus, modify the parameters desired and then click on “OK” in order to validate them and return to the 

screen saver.

Summary of Contents for SQUADRA 8

Page 1: ...RS QATAR Mode d emploi User Guide version V1 1 209921A VOKKERO Adeunis RF 283 rue Louis N el Parc Technologique Pr Roux 38920 CROLLES France Tel 33 0 4 76 92 07 77 Fax 33 0 4 76 04 80 87 www vokkero c...

Page 2: ...pie sans l accord d Adeunis RF Ce document pourra tre modifi sans pr avis Toutes les marques cit es dans ce guide font l objet d un droit de propri t intellectuelle No part of this document may be rep...

Page 3: ...ion harmonisation legislation Directive 2014 53 UE RED The following harmonised standards and technical specifications have been applied Title Date of standard specification EN 300 220 1 V2 3 1 2010 0...

Page 4: ...l s parameters 11 3 Warning about using frequencies 12 4 Automatic configuration of a Vokkero Squadra system 12 4 1 Selecting a channel 12 5 Manual parameterisation of a Vokkero Squadra system 13 5 1...

Page 5: ...ng the role number 23 8 The charger 24 8 1 Technical specifications 24 8 2 Powering the charger 24 8 3 Installing the terminals 24 8 3 1 The meaning of the configurator s batteries icons 25 8 4 Placin...

Page 6: ...209921A VOKKERO SQUADRA 8 QATAR User guide version V1 1 6 Page of 26 ENGLISH...

Page 7: ...stem are managed by the configurator This provides access to the settings menus via a touch screen In order to function the configurator must be connected to one or more chargers and the charger s mus...

Page 8: ...kkero Squadra terminal 1 1 Description of the screen icons default settings The screen displays key information for the user when using his or her terminal Battery icon Indicated the internal battery...

Page 9: ...nfigurator must be connected to one or more chargers These must be powered from the mains via the specific power supply unit supplied with the Vokkero Squadra kit The configurator is equipped with a U...

Page 10: ...onfigurator settings Title Charger button allows to view the chargers chained Charger n 2 Terminal slot Battery level of the terminal connected to slot n 5 Access button to the main menu Terminal conn...

Page 11: ...ear Click on the Modify button to access to the parameters see 6 2 Click on the Escape button in order to return to the home screen Information on terminal n 1 Role role number of the terminal in the...

Page 12: ...y configure all of the terminals connected to the charger s The parameters required for operating the system the encryption and the role number are managed automatically The communication channel sele...

Page 13: ...rent number Role menu Pair up the devices in conference mode Encryption menu 5 1 Frequencies menu 5 1 1 Manual selection of a channel Procedure In the main menu click on the Frequencies icon A window...

Page 14: ...b menu When the OK button has been clicked on a window will appear confirming that the operation has been duly comple ted Click on OK to return to the home screen 5 3 Setting the systems in conference...

Page 15: ...ssible to leave the channel used by the system open and the other terminals will be able to participate in the conference provided that they are all operating on the same communication channel In the...

Page 16: ...to select which item you want to update TERMINAL or CONFIGURATOR Using the stylus select the item by clicking on it Press the Select button A warning window appears mentionning that the terminals mus...

Page 17: ...rn level enabling you to listen to your own voice in your headset or earphone speakers 7 volume levels the Mute mode are accessible Procedure In the main menu click on the Configuration icon The Confi...

Page 18: ...k on the Modify button A window will open in which the terminal selected will be displayed Using the and buttons select Off or On Once the value has been selected click on the OK button in order to va...

Page 19: ...the sub menu When the OK button has been clicked on a window will appear confirming that the operation has been duly comple ted Click on OK and then on Escape to return to the home screen 6 2 5 Far v...

Page 20: ...Settings menu Be aware of the fact that this menu is only intended for certain types of users telecommunications equipment pool managers distributors after sales service technicians etc Consequently...

Page 21: ...vanced Settings A window will open and you will be asked to enter a PIN code Once the code has been entered another window will open and will ask you to select a terminal Click on OK Select a terminal...

Page 22: ...for a confirmation Click on OK icon to restore factory settings 6 6 Configurator Settings menu This menu provides access to settings specific to the configurator Three parameters are adjustable LCD sc...

Page 23: ...work created in such a way as to ensure that all the parties involved are indeed at the conference Procedure Simultaneously press the terminal s and keys for 3 seconds When the channel is displayed pr...

Page 24: ...5 A 50 to 60 Hz Operating temperature 5 C to 40 C 41 F to 104 F Charging time 5 hours Dimensions L 136 mm H 38 mm D 68 mm Battery autonomy 500 cycles 8 2 Powering the charger Connect the power supply...

Page 25: ...onfigurator 8 5 Warnings The disconnection system is the power cable the socket outlet shall be installed near the equipment and must be easily accessible Connecting the charging ARF7675AA on an IT sy...

Page 26: ...o a conference Make sure that the encryption operation has been carried out on each of the devices so that you can take part in the conference especially if you have added a device since the conferenc...

Reviews: