background image

Page 8 from 12

Manual Voice-Acoustic PA-Tower - 2019-02 EN

Working with PA-Tower

Assemble base frame

After ensuring the bearing capacity of the floor and the location is an even surface, you can begin with the 

assembly of the foot frame.

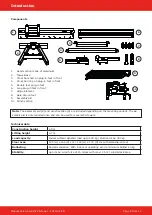
1.  Insert the double plug-in foot (A) on both sides into the rear part of the tower base until the locking bolt 

(B) can be snapped into the double plug-in foot for securing.

2.  Fold out the extension arm (C) of the double plug-in foot to the rear.

3.  Insert the long plug-in feet (D) into the front of the tower base on both sides until the locking bolts (E) are 

engaged in the plug-in feet for securing.

4.  For outdoor use, additionally attach the two short plug-in feet (F) to the long plug-in feet until the locking 

bolts (G) are engaged in the long plug-in feet for securing.

5.  Position the two crossbars short (H) and long (K).

6.  Place the foot frame in the balance using the circular bubble (L) and the adjustable feet.

A

B

D

E

F

G

K

H

L

Summary of Contents for PA Tower

Page 1: ...PA Tower Manual ...

Page 2: ... in the firm belief that details matter May we wish you a lot of pleasure with this product Muchas gracias por haber comprado un producto de Voice Acoustic Desdel año 2006 estamos desarrollando nuestros productos estando convencidos que son los detalles que cuentan Le s deseamos mucha alegría usando este producto Merci beaucoup d avoir acheté un produit Voice Acoustic Depuis 2006 nous développons ...

Page 3: ...4 Connection 4 Floor loading 4 Components 5 Technical data 5 Dimensions 6 Working with PA Tower Assemble base frame 8 Mounting mast with assembly aid 9 Ballasting 10 Dismantling of the PA Tower 10 Overview Accessories 11 Annex Imprint 12 Contents ...

Page 4: ...ufacturer or at least equivalent material The state and trade association regulations must be observed Connection The individual components of the PA tower are connected with cone connectors which are fastened with co nical bolts in the ends of the belt tubes The result is a completely non positive connection with power trans mission in the axes of the main belts Non positive connections require a...

Page 5: ...The assembly aid 8 and winch section 9 are included depending on the mounting variant The as sembly aid is only required once and can be used for several PA towers Technical data Construction height 4 9 m Lifting height 4 7 m Load capacity Indoor without dynamic load up to 400 kg Outdoor max 300 kg Floor area 133 w x 165 d cm 140 w x 174 d cm with Gala clip on feet Ballasting Recommendation With i...

Page 6: ...Page 6 from 12 Manual Voice Acoustic PA Tower 2019 02 EN Dimensions Plan view with and without gala clip on feet All dimensions in mm ...

Page 7: ...Page 7 from 12 Manual Voice Acoustic PA Tower 2019 02 EN Side view Rear view ...

Page 8: ...ble plug in foot for securing 2 Fold out the extension arm C of the double plug in foot to the rear 3 Insert the long plug in feet D into the front of the tower base on both sides until the locking bolts E are engaged in the plug in feet for securing 4 For outdoor use additionally attach the two short plug in feet F to the long plug in feet until the locking bolts G are engaged in the long plug in...

Page 9: ...russ element HOFKon 290 4 system and secure everything with pins 4 Insert the assembly aid into the mounting provided on the winch section 5 Connect the truss elements to the front buckling elements Note In the ideal case the head section is sufficient as a support when connecting the truss elements However if the floor is sloping the head section must be lined accordingly in order to relieve the ...

Page 10: ...ble attach the assembly aid and guide it over its roll 4 Tension the steel cable so that the mast does not tip over uncontrolled 5 Note Make sure that nobody is in the tipping area of the tower Remove the pins from the rear buckling elements 6 Slowly lower the mast forward by cranking 7 Note In the ideal case the head section is sufficient as a support when separating the truss elements However if...

Page 11: ...00 Truss Bag 100 square truss 100 cm Dimensions 30 x 30 x 100 cm Art Nr 999930100 Truss Bag 150 square truss 150 cm Dimensions 30 x 30 x 150 cm Art Nr 999930150 Truss Bag 200 square truss 200 cm Dimensions 30 x 30 x 200 cm Art Nr 999930200 Heavy duty flightcase for a PA tower without truss Art Nr 500003000 Stacking board Art Nr 500015000 VAPATO TOWERLIFTER Plug in assembly aid Art Nr 112290473 VAP...

Page 12: ...ions stipulating the continual improvement of product features For the safe operation of the unit this manual and all other required information must be available to all users at the time of assembly and disassembly of the unit and during opera tion Assemble or operate the unit only after reading and understan ding this manual and keeping it at hand at all times at the site We are happy to receive...

Reviews: