background image

Page 8 of 10

Manual Alea-4 - 2018-07 EN

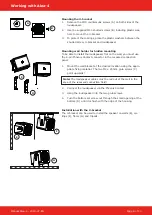
Mounting the U-bracket
1.  Remove the M10 countersunk screws (A) on both sides of the 

loudspeaker.

2.  Use the supplied M10 knurled screws (B) including plastic was-

hers to mount the U-bracket.

3. 

To protect the coatings, place the plastic washers between the 
knurled screw, U-bracket and loudspeaker.

Mounting wall holder for hidden mounting

To be able to install the loudspeaker flat on the wall, you must use 

the 4-pin Phoenix Contact connector in the recessed connection 
panel.

1.  Mount the wall bracket at the desired location using the appro-

priate fixing material. The two M4 x 20 mm grub screws (C) 

point upwards!

2. 

Note: The loudspeaker cables must be led out of the wall in the 

area of the recessed connection field!

Connect the loudspeaker via the Phoenix Contact.

3. 

Hang the loudspeaker into the two grub screws.

4.  Turn the bottom set screw out through the small opening at the 

bottom (D) until it is flush with the edge of the housing.

Installation with the U-bracket
The U-bracket can be used to install the speaker on walls (E), cei-

lings (F), floors (G) and tripods.

Working with Alea-4

A

B

C

D

E

F

G

Summary of Contents for Alea-4

Page 1: ...Alea 4 Ultra compact mid high loudspeaker Manual ...

Page 2: ... in the firm belief that details matter May we wish you a lot of pleasure with this product Muchas gracias por haber comprado un producto de Voice Acoustic Desdel año 2006 estamos desarrollando nuestros productos estando convencidos que son los detalles que cuentan Le s deseamos mucha alegría usando este producto Merci beaucoup d avoir acheté un produit Voice Acoustic Depuis 2006 nous développons ...

Page 3: ...nty 4 Components 5 Technical data 6 Connections 6 Setup 7 Connecting cables 7 Operation 7 Working with Alea 4 Mounting the U bracket 8 Mounting wall holder for hidden mounting 8 Installation with the U bracket 8 Overview Accessories 9 Manufacturer s declaration Imprint 10 Contents ...

Page 4: ...m and damage the surfaces Transport and storage When transporting and storing the unit it is important to ensure that the surface and front grill of the loudspe aker are not damaged Moisture can penetrate through exposed wood surfaces and cause the wood to swell A bent or broken front grill will no longer adequately protect the sensitive speaker membranes In addition appreciable dust deposits may ...

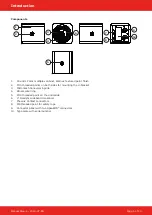
Page 5: ...eaded points on both sides for mounting the U bracket 3 Micromesh honeycomb grille 4 Ornamental ring 5 M10 threaded point on the underside 6 4 Neodym wideband transducer 7 Phoenix Contact connectors 8 M6 threaded point for safety rope 9 Connector panel with two SpeakON connectors 10 Type plate with serial number 3 7 8 4 5 2 1 6 9 10 ...

Page 6: ...ments Powerhandling 120 W AES 240 W program 480 W peak at 16 Ω Sound pressure 116 dB SPL AES 119 dB SPL program 122 dB SPL peak Dimensions Weight 419 h x 119 w x 160 mm d 3 2 kg Finish Warnex texture paint Connections The speaker has two loop through Neutrik NL4 SpeakON IN OUT connectors They use the 1 1 connection pins Additional loudspeakers can be looped through via the second connector 1 x Pho...

Page 7: ...lifier The total impedance of loudspeakers connected in parallel must not drop below the minimum operating impedance of the amplifier Voice Acoustic recommends to use the available 4 x 4 mm Speakon cables for mobile use We recommend wiring the basses with at least 4 mm in installations The cables of the tops in installations must be sufficiently dimensioned according to impedance power and cable l...

Page 8: ...ct connector in the recessed connection panel 1 Mount the wall bracket at the desired location using the appro priate fixing material The two M4 x 20 mm grub screws C point upwards 2 Note The loudspeaker cables must be led out of the wall in the area of the recessed connection field Connect the loudspeaker via the Phoenix Contact 3 Hang the loudspeaker into the two grub screws 4 Turn the bottom se...

Page 9: ... holder for hidden mounting Art Nr 400042001 Universal Joint with thread adapter for Alea 4 Art Nr 999919695 M20 adapter x 1 25 mm for Alea 4 stand Art Nr 999921950 Alea 4 stand with round base 27 5 cm 3 4 kg high 1 000 1 700 mm Art Nr 999926125 Alea 4 stand with round base 27 5 cm 3 kg pure white high 870 1 575 mm Art Nr 999926010 Carrying bag for 3 x Alea 4 stand with round base Art Nr 999926019...

Page 10: ...tions stipulating the continual improvement of product features For the safe operation of the unit this manual and all other required information must be available to all users at the time of assembly and disassembly of the unit and during opera tion Assemble or operate the unit only after reading and understan ding this manual and keeping it at hand at all times at the site We are happy to receiv...

Reviews: