background image

3

SAFETY INSTRUCTIONS

This manual explains the proper installation and use of your Rangehood, please read it carefully 

before using even if you are familiar with the product. The manual should be kept in a safe place 

for future reference.

Never to do:

•  Do not try to use the Rangehood without the grease filters or if the filters are excessively greasy!

•  Do not install above a cooker with a high level grill.

•  Do not leave frying pans unattended during use because overheated fats or oils might catch fire.
•  Never leave naked flames under the Rangehood.

•  If the Rangehood is damaged, do not attempt to use.

•  Do not flambé under the Rangehood.

•  CAUTION: Accessible parts may become hot when used with cooking appliances.
•  The minimum distance between the supporting surface for the cooking vessels on the hob and 

  the lowest part of the Rangehood. (When the Rangehood is located above a gas appliance, this 

  distance shall be at least 65 cm)

•  The air must not be discharged into a flue that is used for exhausting fumes from appliances


  burning gas or other fuels.

Always to do:

•  Important! Always switch off the electricity supply at the mains during installation and 


  maintenance such as light bulb replacement.
•  The Rangehood must be installed in accordance with the installation instructions and all 

  measurements followed.

•  All installation work must be carried out by a competent person or qualified electrician.

•  Please dispose of the packing material carefully. Children are vulnerable to it.
•  Pay attention to the sharp edges inside the Rangehood especially during installation and 

 cleaning.
•  When the Rangehood is located above a gas appliance,the minimum distance between the 

  supporting surface for the cooking vessels on the hob and the lowest part of the cooker 

  hood that distance must be:
Gas cookers:  

75 cm

Electric cookers: 

 65 cm

Coal or oil cookers:   75 cm

•  Make sure the ducting has no bends sharper than 90 degrees as this will reduce the efficiency of 


  the Rangehood.

•  Warning: Failure to install the screws or fixing device in accordance with these instructions


  may result in electrical hazards

Summary of Contents for 330264

Page 1: ...mm Stainless Steel Black Fascia To prevent the risk of accidents or damage to the appliance it is essential to read these instructions before it is installed and used for the first time 330264 INSTALLATION INSTRUCTIONS USER GUIDE ...

Page 2: ...CONTENTS SAFETY INSTRUCTIONS 3 INSTALLATION 5 START USING YOUR RANGEHOOD 8 TROUBLESHOOTING 8 MAINTENANCE AND CLEANING 9 ENVIRONMENT PROTECTION 12 ...

Page 3: ...ot be discharged into a flue that is used for exhausting fumes from appliances burning gas or other fuels Always to do Important Always switch off the electricity supply at the mains during installation and maintenance such as light bulb replacement The Rangehood must be installed in accordance with the installation instructions and all measurements followed All installation work must be carried o...

Page 4: ...an become hot during operation Be careful to avoid touching the heating elements Children younger than 8 years old should stay away unless they are under permanent supervision There shall be adequate ventilation of the room when the Rangehood is used at the same time as appliances burning gas or other fuels There is a fire risk if cleaning is not carried out in accordance with the instructions Reg...

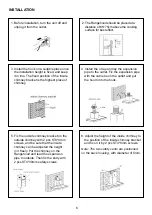
Page 5: ...ls and configuration To mount the V flap 1 you should Mount two half parts 2 into the body 6 A pin 3 should be top oriented The axis 4 should be inserted in the holes 5 on body Repeat all the operations for the 2nd half part diameter of 150mm INSTALLATION If you have an outlet to the outside your Rangehood can be connected as below picture by means of an extraction duct enamel aluminum flexible pi...

Page 6: ...nsion pipe to the outlet Fix the expansion pipe with the cable tie on the outlet and put the hood onto the hook 5 Fix the outside chimney bracket on the outside chimney with 2 pcs ST4 8mm screws and be sure that the inside chimney can be adjusted the height in it freely Put the chimney on the Rangehood and lead the expansion pipe to outside Then fix the body with 2 pcs ST4 30mm safety screws 6 Adj...

Page 7: ...ilation system which is being used for any other appliance such as warmer tube gas tube hot wind tube The angle of the bend of the expansion pipe should not be less than 120º you must direct the pipe horizontally or alternatively the pipe should go up from the initial point and should be led to an outer wall After the installation make sure that the Rangehood is level to avoid grease collection at...

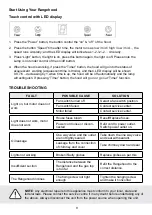
Page 8: ...es not work Fan switch turned off Select a fan switch position Fan switch failed Contact service center Motor failed Contact service center Light does not work motor does not work House fuses blown Reset Replace fuses Power cord loose or discon nected Refit cord to power outlet Switch power outlet on Oil leakage One way valve and the outlet are not tightly sealed Take down the one way valve and se...

Page 9: ...ne along with the grain of the stainless steel to prevent any unsightly crisscross scratching patterns from appearing CONTROL PANEL SURFACE The inlay control panel can be cleaned using warm soapy water Ensure the cloth is clean and well wrung before cleaning Use a dry soft cloth to remove any excess moisture left after cleaning IMPORTANT Using neutral detergents and avoid using harsh cleaning chem...

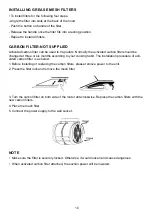
Page 10: ...hree or six months according to your cooking habit The installation procedure of acti vated carbon filter is as below 1 Before installing or replacing the carbon filters please remove power to the unit 2 Press the filter lock and remove the mesh filter NOTE Make sure the filter is securely locked Otherwise it would loosen and cause dangerous When activated carbon filter attached the suction power ...

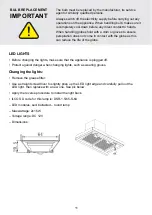
Page 11: ... in contact with the globe as this can reduce the life of the globe LED LIGHTS Before changing the lights make sure that the appliance is plugged off Protect against danger when changing lights such as wearing gloves Changing the lights Remove the grease filter Use a straight screwdriver to slightly prize up the LED light edge and carefully pull out the LED light then replace with a new one See pi...

Page 12: ...more information please contact your local or regional authorities NOTE The following shows how to reduce total environmental impact e g energy use of the cooking process 1 Install the Rangehood in a proper place where there is efficient ventilation 2 Clean the Rangehood regularly so as not to block the airway 3 Remember to switch off the Rangehood light after cooking 4 Remember to switch off the ...

Reviews: