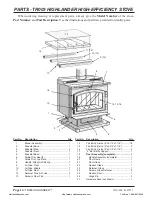
Vogelzang International Highlander TR003 Owner'S Manual Download Page 13

VGZ-028 / 030707.1 

TR003 HIGHLANDER™

 / 

Page 

ChImNEY mAINTENANCE

CREOSOTE – Formation and Removal

When wood is burned slowly, it produces tar 

and  other  organic  vapors  which  combine  with 
expelled moisture to form creosote. The creosote 
vapors  condense  in  the  relatively  cool  chimney 
flue  of  a  slow-burning  fire. As  a  result,  creosote 
residue accumulates on the flue lining. If ignited, 
this creosote creates an extremely hot fire which 
may  ignite  surrounding  materials  resulting  in  a 
building fire.

The  chimney  connector  and  chimney  should 

be inspected (at least) twice a month during the 
heating season to determine if a creosote buildup 
has occurred.

If  creosote  has  accumulated,  it  should  be 

removed.  Failure  to  remove  creosote  may  result 
in  ignition  and  may  cause  a  house/building  fire. 
Creosote may be removed using a chimney brush 
or other commonly available materials from your 
local hardware retailer.

Chimney  fires  burn  very  hot.  If  the  unit  or 

chimney connector should glow red,  reduce the 
fire by closing the inlet air control and immediately 
call the fire department.

Door gasket replacement Procedure:

1.  Ensure  appliance  is  not  in  operation  and  is 

thoroughly cooled.

2.   Remove old door gasket and clean channel.
3.  Using an approved, high temperature gasket ce-

ment, apply a thin coat in bottom of channel.

4.  Starting at hinge side of door, work gasket into 

channel around door unit, end butt and trim to 
length.

5.  Close door and allow three to four hours for 

cement to set before firing appliance.

SERvICE hINTS continued . . .

CAUTION: A CHImNEY FIRE mAY CAUSE IGNI-
TION  OF wALL  STUDS  OR  RAFTERS wHICH 
wERE  ASSUmED TO  BE  A  SAFE  DISTANCE 
FROm THE  CHImNEY.  IF  A  CHImNEY  FIRE 
HAS  OCCURRED,  HAVE YOUR  CHImNEY  IN-
SPECTED BY A qUALIFIED ExPERT BEFORE 
USING AGAIN.

A fire in the firebox may be smothered by pour-

ing a large quantity of coarse salt, baking soda, or 
cool ashes on top of the fire.

Continued in next column 

NorthlineExpress.com

http://www.northlineexpress.com

Toll-Free 1-866-667-8454

Summary of Contents for Highlander TR003

Page 1: ...on DO NOT use temporary or makeshift compromises during installation 3 DO NOT store wood flammable liquids or other combustible materials too close to the unit Refer to certification label on back of unit and reference figures 1 3 in this manual 4 Do not install this stove in a mobile home manufactured home trailer or tent NO EXCEPTIONS per HUD Federal Standard 24 CFR Ch XX 5 If any parts are miss...

Page 2: ...tic pets such as birds should take prudent precautions Open windows and doors as needed to clear smoke and odor If the stove SAFETY INSTRUCTIONS continued is overfired paint discoloration will occur 17 This stove has a painted surface which is durable but it will not stand rough handling or abuse When installing your stove use care in handling Clean with soap and warm water when stove is not hot D...

Page 3: ...place a lockwasher and thread a nut onto each bolt Tighten all pedestal hardware 7 Replace the pedestal assembly to the upright position 8 After properly locating floor protector fig 1 page 4 to accomodate minimum stove clear ances place pedestal in position on floor pro tector 9 Carefully position stove body onto base as sembly Angle brackets attached to bottom of stove must fit inside pedestal a...

Page 4: ...ot galvanized stove pipe Secure pipe sections with three 3 sheet metal screws in each stove pipe and or elbow joint to firmly hold the pipe sections together Do Not connectthis stovetoanyair distribution or duct system 5 Recheck clearances from the stove connector stove pipe and corner clearances using the illustrations in figures 1 3 and your local building codes or fire protection ordinances NOT...

Page 5: ...hat all firebricks are in their correct positions and have not become misaligned during shipping or assembly If removed for ease of locating stove firebrick must be replaced before firing See diagrams fig 4a 4c for proper positioning CAUTION NEVER OPERATE STOVE WITH MISSING OR CRACKED FIRE BRICKS Fig 4a Step 1 Bottom Firebrick Installation A A C B A A B Four 4 A Size Two 2 B Size One 1 C Size Fig ...

Page 6: ...ssible use only corrugated nonadjustable elbows These provide a better seal 7 The connector pipe must not pass through an attic or roof space closet or any concealed space or floor ceiling wall or combustible construction See Chimney Connector Sys tems Clearances page 17 A UL 103 HT Listed U S or ULC S629 CANADA chim ney must be used from the first penetration of ceiling or wall to the chimney cap...

Page 7: ...le for external factors leading to less than optimal drafting Should you have a problem with inadequate draft you should contact a licensed heating and cooling contractor for assistance in solving the problem IMPORTANT Installation Points 1 Size chimney flue to stove collar This stove requires a 6 diameter flue 2 Never connect this unit to a chimney serv ing another appliance 3 The chimney must me...

Page 8: ... listed above Be aware that not all manufactured chimney is of the UL 103 HT US or ULC S629 Canada type NOTE It is recommended that you contact a li censed heating and cooling contractor consult your local yellow pages for chimney installation Manufactured chimney with the proper required UL listing is available from most home centers hardware stores and HVAC supply stores If you have access to th...

Page 9: ...only approved method of installation This is a complicated and involved process and to insure safety should only by done by a qualified installer 1 An entry hole must be cut through the masonry and tile liner with minimal damage to the liner At least 8 of liner must remain below the entry position When locating the stove and stove pipe all minimum clearances must be observed from combustible surfa...

Page 10: ... Never build extremely large fires in this type of stove as damage to the stove or smoke leakage may result 3 Do not build fire too close to glass 4 Unit is HOT while in operation Keep children clothing and Furniture away Contact may cause skin burns Do not touch the stove after firing until it has cooled 5 Provide air intothe room for prop er combustion 6 Inspect stovepipe every 60 days Replace i...

Page 11: ...low ashes to pile up see Safety Instructions 11 on page 2 6 Properly dispose of hot ashes see Safety Instructions item 11 on page 2 7 Do not overfire the stove CAUTION DO NOT OVERFIRE appliance You are overfiring if the chimney connectors or stove glows red Close the door and shut damper immediately to reduce the air supply to the fire This will slow down the fire CAUTION Slow burning fires and ex...

Page 12: ...e sure that logs or other objects do not protrude to impact the glass 3 Do not build fires against or that might fall against the glass 4 Do not clean the glass with materials that may scratch or otherwise damage the glass Scratches on the glass can develop into cracks or breaks during operation 5 Never attempt to clean the glass while the unit is hot If deposits are not very heavy normal glass cl...

Page 13: ...are retailer Chimney fires burn very hot If the unit or chimney connector should glow red reduce the fire by closing the inlet air control and immediately call the fire department Door Gasket Replacement Procedure 1 Ensure appliance is not in operation and is thoroughly cooled 2 Remove old door gasket and clean channel 3 Using an approved high temperature gasket ce ment apply a thin coat in bottom...

Page 14: ...affle Support 1 18 Door Assembly complete 1 19 Handle Assembly complete 1 20 Door Frame 1 21 Door Glass 1 22 Gasket Glass 1 23 Retainer Glass 1 24 Screws Glass Retainer 8 25 Gasket Door 1 26 Hinge Pin 2 27 Hardware Pack not shown 1 1 Blower Assembly 1 2 Pedestal Back 1 3 Pedestal Side 2 4 Pedestal Front 1 5 Pedestal Base 1 6 Nickle Trim Hearth 1 7 Nickle Trim Top Plate 1 8 Handle Slide Draft Sprin...

Page 15: ... Part Description Use the illustrations and part lists provided to identify parts Part No Description Qty 18 Door Assembly complete 1 19 Handle Assembly complete 1 20 Door Frame 1 21 Door Glass 1 22 Gasket Glass 1 23 Retainer Glass 1 24 Screws Glass Retainer 8 25 Gasket Door 1 26 Hinge Pin 2 20 21 22 23 25 26 24 NorthlineExpress com http www northlineexpress com Toll Free 1 866 667 8454 ...

Page 16: ...ower Assembly When ordering missing or replacement parts always give the Model Number of the stove Part Number and Part Description Use the illustrations and part lists provided to identify parts NorthlineExpress com http www northlineexpress com Toll Free 1 866 667 8454 ...

Page 17: ...ulate R value of proposed material s b For multiple layers add R values of each layer to determine overall R value 3 If the overall R value of the floor protector system is equal to or greater than the floor protector specifications given the alternate is acceptable Definitions Thermal conductance C BTU W hr ft2 F m2 K Thermal conductivity k Btu inch W Btu hr ft2 F m K hr ft F Thermal resistance R...

Page 18: ...nch of glass fiber insulation Opening shall be covered and thimble supported with a sheet steel support minimum 24 gauge in thickness D Chimney Section Pass through Solid insulated listed factory built chimney length with an inside diameter 2 inch larger than the chimney con nector and having 1 inch or more of insulation serving as a pass through for a single wall sheet steel chimney connector of ...

Page 19: ...VGZ 028 030707 1 TR003 HIGHLANDER Page 19 NorthlineExpress com http www northlineexpress com Toll Free 1 866 667 8454 ...

Page 20: ...fe John 3 16 MADE IN CHINA ThisVogelzang heating appliance is safe when installed properly and will provide you with years of service However always exercise good judgement when you are using this stove You are dealing with FIRE Fire is inherently dangerous and must be treated with respect Stay warm and in good health Respectfully yours SteveVogelzang Proprietor Do NOT use this stove in a mobile h...

Reviews: