background image

15

��

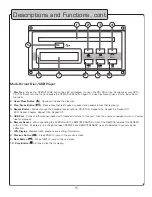
Multi-Format Disc/USB Player

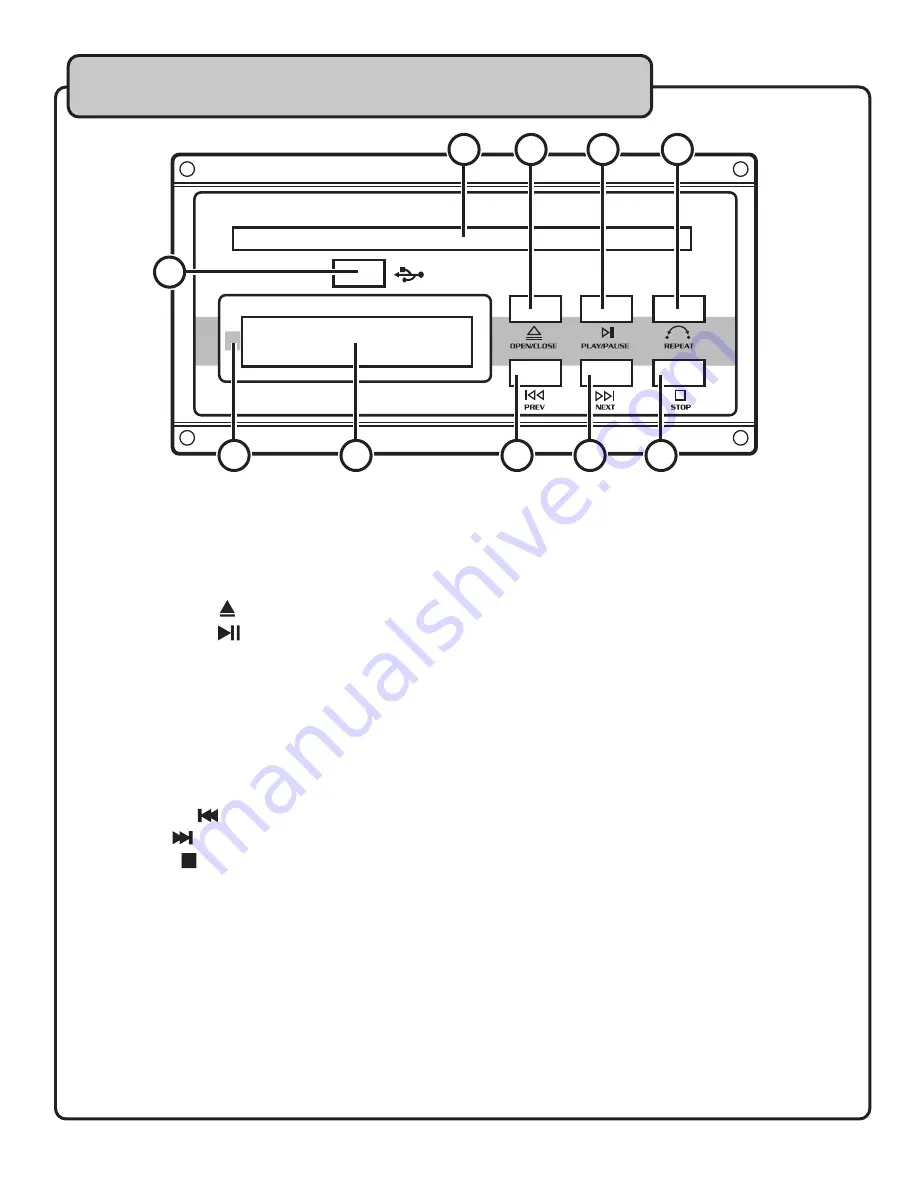
1. Disc Tray -

 Press the “OPEN/CLOSE” button (See #2 on diagram) to open the CD/CD+G tray. Carefully set your DVD/

CD/CD+G disc onto the tray and press the OPEN/CLOSE button again to close tray. Never push or force tray closed 

manually.

2. Open/Close Button ( ) - 

Opens and closes the disc tray

3. Play/Pause Button (

) - 

Plays a disc that is stopped or paused and pauses a disc that is playing.

4. Repeat Button - 

Cycles through the available repeat options: CD/CD+G: Repeat One, Repeat All, Repeat Off. 

    DVD: Repeat Chapter, Repeat Title, Repeat Off.

5. USB Port

 - Connect a thumbdrive loaded with tracks and videos to this port.  Use the onscreen navigation menu to select 

files for playback.

6. Remote Sensor - 

When operating the PA-MAN with the REMOTE CONTROL, direct the REMOTE towards this SENSOR 

within 23 feet.  Maintain a line of sight between REMOTE and REMOTE SENSOR clear of obstacles to prevent signal 

deflection. 

7. LCD Display - 

Displays track, playback and setting information.  

8. Previous Button (

) - 

Press PREV to jump to the previous track. 

9. Next Button (

) - 

Press NEXT to jump to the next track.

10. Stop Button ( ) - 

Stops a disc that is playing.

Descriptions and Functions, cont.

Summary of Contents for PA-MAN

Page 1: ...o w n e r s m a n u a l THE SINGER S ULTIMATE CHOICE TM R PA MAN All In One Four Channel Wireless P A System ...

Page 2: ...Connecting Speakers 10 Connecting a TV or Monitor 11 Connecting External Devices 12 Descriptions and Functions Front Panel 13 Rear Panel 14 UHF Modules 14 Disc USB player 15 MIC Channel controls 16 Microphone 17 Remote Control 18 19 General Operations 20 23 Media File Operations 24 Removing Modules 25 Setting up Preferences 26 28 Troubleshooting 29 30 Table of Contents ...

Page 3: ...eep it in a safe place for future reference 2 Install your unit in a cool dry clean place away from windows heat sources and too much vibration dust moisture or cold Avoid sources of hum transformers v motors To prevent fire or electrical shock do not expose to rain and water 3 Do not operate the unit upside down 4 Never open the cabinet If a foreign object drops into the set contact your dealer 5...

Page 4: ...dial and leave it there Pay attention to the different levels in various recordings Taking a minute to do this now will help to prevent hearing damage or loss in the future After all we want you listening for a lifetime Used wisely your new sound equipment will provide a lifetime of fun and enjoyment Since hearing damage from loud noise is often undetectable until it is too late this manufacturer ...

Page 5: ... other appliances including amplifiers that produce heat 10 Power Sources The appliance should be connected to a power supply only of the type described in the operating instructions or as marked on the appliance 11 Grounding or Polarization Precautions should be taken so that the grounding or polarization means of an appliance is not defeated 12 Power Cord Protection Power supply cords should be ...

Page 6: ...Curtiss Court La Verne CA 91750 Toll Free 800 678 5348 TEL 909 593 8893 FAX 909 593 8890 VocoPro Company Email Directory Customer Service General Information info vocopro com Tech Support techsupport vocopro com Remember Our Website Be sure to visit the VocoPro website www vocopro com for the latest information on new products packages and promos And while you re there don t forget to check out ou...

Page 7: ...der LED Level Indicators Conserve Power with Individual Component Power Switches All In One Mobility with Carrying Handles Specifications Maximal Power Output 2 x 100W 8ohm Total Harmonic Distortion 0 1 Frequency Response 50Hz 20KHz 3dB Power Voltage AC 110V 60Hz AC 220V 50Hz Built in Wireless Receiver UHF 740MHz 790MHz Weight 33lb 15kg Dimension 17 5 x 11 8 x 10 2 in 44 5 30 26 cm Features and Spe...

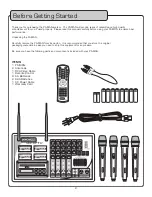
Page 8: ...erformance Unpacking the PA MAN Carefully remove the PA MAN from its carton It is recommended that you store the original packaging materials in case you need to ship this equipment for any reason Be sure you have the following parts and components included with your PA MAN ITEMS 1 PA MAN 2 Antennas 1 RCA Video Cable 1 Remote Control 8 AA Batteries 2 AAA Batteries 1 AC Power Cable 1 Warranty Card ...

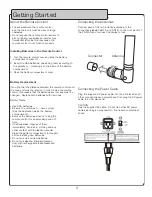
Page 9: ...s Battery Notes Use AAA batteries Be sure the polarities are correct See the illustration inside the battery compartment Remove the batteries when not using the remote control for an extended period of time If batteries leak dispose of them immediately Avoid skin clothing and any other contact with the leaked material Clean the battery compartment thoroughly before installing new batteries Do not ...

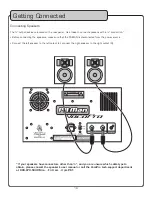
Page 10: ...PA MAN is disconnected from the power source Connect the left speaker to the left output L connect the right speaker to the right output R If your speakers have connectors other than and you are unsure which cable type to obtain please consult the speaker s user manual or call the VocoPro tech support department at 800 678 5348 Mon Fri 9 am 4 pm PST Getting Connected ...

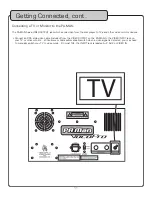
Page 11: ...tor devices Connect an RCA style video cable included from the VIDEO OUTPUT on the PA MAN to the VIDEO INPUT jack on your TV or other monitor While some models automatically switch when a video signal is detected you may need to manually switch your TV to video mode On most TVs the INPUT jack is labeled A V AUX or VIDEO IN Getting Connected cont ...

Page 12: ...ny microphone or instrument device with a mono connector to this line level connection XLR Balanced Microphone Input Connect a balanced XLR microphone cable here to add an additional mic input to the channel Connecting an External Effects Device Connect your effects device to the INSERT connection with the proper cables for your device The illustration below is an example of how an external effect...

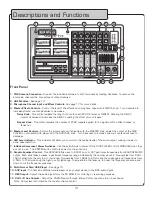
Page 13: ...icator will allow you to monitor the decibal levels of the audio output making it easier to avoid peak distortion 7 Individual Component Power Swtiches Use these switches to power off the DISC PLAYER or UHF MODULES when they are not in use The POWER button controls power for the entire unit 8 Graphic Equalizer Control This GRAPHIC EQ is used to BOOST and or CUT particular frequencies from SOURCE M...

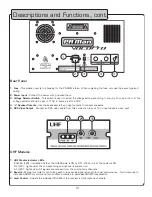
Page 14: ...Connect an RCA video cable from this connection to your TV or input device s video input UHF Modules 1 UHF Module indicator LEDs POWER LED Indicates whether the UHF Module is ON or OFF When it is lit the power is ON RF LED Lights when the corresponding microphone is powered on AF LED Lights when AF signals are received from the microphone channels 2 Squelch Manual controls for controlling each mic...

Page 15: ...One Repeat All Repeat Off DVD Repeat Chapter Repeat Title Repeat Off 5 USB Port Connect a thumbdrive loaded with tracks and videos to this port Use the onscreen navigation menu to select files for playback 6 Remote Sensor When operating the PA MAN with the REMOTE CONTROL direct the REMOTE towards this SENSOR within 23 feet Maintain a line of sight between REMOTE and REMOTE SENSOR clear of obstacle...

Page 16: ...ered vocal sound Rotate clockwise to increase the amount of ECHO effect applied to the signal and counter clockwise to decrease 5 Insert Effects Loop Output Input Connect an external effects processor to each channel with this input To ensure that your effects processor will properly function with the PA MAN s INSERT connection use a cable with a stereo TRS tip ring sleeve connector 6 Line Input C...

Page 17: ...ne by moving the switch to this position in the center 4 Off Turn microphone power off by moving the switch to the lowest position Handheld Microphone Battery Installation 1 To remove the lid press down on the tab and slide the lid down toward the bottom of the mic 2 Insert two fresh 1 5 volt AA alkaline batteries Make sure the batteries are inserted in the right direction according to polarity 3 ...

Page 18: ... CD G output modes for canceling the vocals This feature only works on multiplex CD G discs Mono L No Vocals Mono R Vocals 8 Mute Mutes all disc audio 9 Digital Key Control Adjusts the musical key of music to fit the singer s vocal range b Lowers the musical key Resets the music to the original or natural key Raises the musical key NOTE Digital Key Control changes the key of music but will not aff...

Page 19: ...les on a DVD with multiple angles available 21 Zoom For zooming in or out on the picture on DVDs JPEGs and VCDs 22 Arrow Keys For navigating through on screen menus 23 Volume Adjusts the disc player volume 24 A B For setting a section on a disc for continuous looping Press again to cancel Does not function on CD G discs 25 Title Accesses the title screen on a DVD 26 Repeat Cycles through the avail...

Page 20: ...control to adjust the sharpness or flatness of the music 5 Feel free to adjust any of these knobs further to make your sound even better After time you will know what settings are optimal for your individual sound Scanning through Tracks 1 Use the buttons on the remote control to scan through CD tracks 2 The button scans forwards through the current track and the backwards through the current track...

Page 21: ...playlist is complete example on next page To create a playlist in the following order 1 Track 14 2 Track 7 3 Track 3 4 Track 1 1 Press the PROGRAM button to enter Program mode 2 Press 14 and then ENTER 3 Press 7 and then ENTER 4 Press 3 and then ENTER 5 Press 1 and then ENTER 6 Move to the PLAY selection on the menu and press PLAY on the remote to begin playing in this order 7 Press STOP twice to ...

Page 22: ...n the remote control to set the starting point of the loop 2 Press the A B button again to set the ending point of the loop and to begin the loop 3 Press the A B button a third time to cancel the loop and resume normal playback Playing One Frame at a Time with the Step Function The Step function allows you to view one frame at a time on DVDs and VCDs NOTE The Step function does not work on CD Gs 1...

Page 23: ... Subtitles Use the SUBTITLE button on the remote control to cycle through the available subtitle languages on a DVD NOTE The available subtitles vary from each DVD and some may not have any at all Changing the Angle View Use the ANGLE button on the remote control to view multiple angles on a DVD with multiple angles available NOTE Not all discs have multiple angles available Accessing Additional D...

Page 24: ...t ARROW to select a file or press play on any file to begin slideshow Smaller thumbnail preview images will appear in the left pane Use the PREV NEXT buttons on the front panel or the remote to skip from one image to another Use the ARROW buttons on the remote to rotate the image and the ZOOM button to zoom in and out Press STOP to return to the menu Video Icon Display and playback your AVI MPEG Use...

Page 25: ...ver to nudge the module out of its compartment 3 To re insert slide the module into the compartment until it is completely secured Secure the module with the screws Removing the Disc Player Module The Multi Format Disc Player module on the PA MAN is designed in a way that allows it to slide out This is a convenient feature if ever this module needs to be repaired or replaced 1 Remove the four scre...

Page 26: ...to a normal 4 3 TV and a wide picture is shown on the full screen a portion may be cut off automatically 4 3 LB When the player is connected to a normal TV and a wide picture is shown on the screen black strips appear at the top and bottom of the screen 16 9 When the player is connected to a wide screen TV NOTE If you choose this setting and you don t have a wide screen TV the images on the screen...

Page 27: ...plifier with Dolby decoding select this option SPDIF PCM When using digital output for stereo playback 2 Key Adjusts the musical key of music to fit the singer s vocal range b Lowers the musical key Resets the music to the original or natural key Raises the musical key Video Setup 1 Brightness Adjust the brightness of the display using the up and down directional buttons 2 Contrast Adjust the contr...

Page 28: ... with Virtual Surround Sound Digital Setup 1 OP Mode LINE OUT This is the standard Digital Output setting RF REMOD When primarily using headphones 2 Dynamic Range This selects the Line Out ratio NOTE This can only be used when LINE OUT is chosen in the OP MODE options FULL The audio signal peak value will be the minimum OFF The audio signal peak value will be the maximum 3 Dual Mono Here you can c...

Page 29: ...Make sure everything is connected firmly and properly Make sure there are no defective cables Make sure all of your components are turned on Make sure all of the components amp mixer TV etc are set to the proper inputs Make sure the TV or monitor is working correctly The Disc Does Not Play Make sure the disc is inserted correctly label side up Make sure the disc is clean and not scratched If using...

Page 30: ...s RF AF signal LED s If they glow the problem is elsewhere in the sound system Received Signal is Noisy or Contains Extraneous Sounds with the Microphone s ON Make sure everything is connected firmly and properly Make sure there are no defective cables Make sure all of your components are turned on Make sure all of the components amp mixer TV etc are set to the proper inputs There is Noise Coming ...

Page 31: ...31 Notes ...

Page 32: ... PA MAN Owner s Manual VocoPro 2008 v1 0 www vocopro com ...

Reviews: