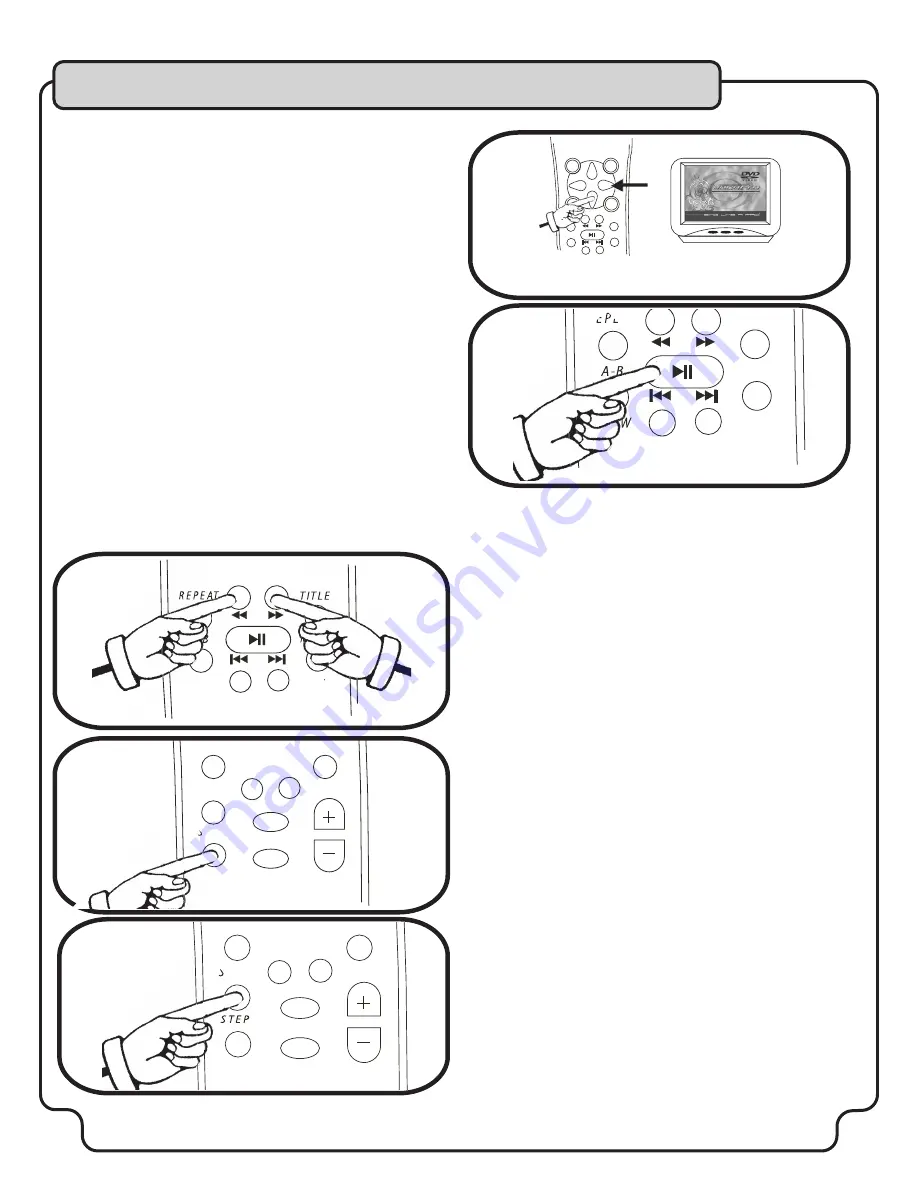
VocoPro DVX-680K Owner'S Manual Download Page 20

20

BASIC OPERATIONS

Playback

Getting ready to play

· Turn on the TV and set its video source (Video 1, Video 3, etc.) to the channel 

the DVX-680K is 

  connected to.

· Turn on the audio equipment connected to the unit. Set its input source to the 

channel that the DVX-680K is connected.

1) Press POWER

When the unit turns on you will see the LED glow red and see the VocoPro 

screens on your TV.

2) Press OPEN/CLOSE to load CD

3) Load a DISC label side up and press OPEN/CLOSE again to close tray

After the disc tray closes, the disc will automatically start playing. If it does not 

auto-start, press PLAY.

When loading a DVD, the menu screen may be displayed first for that disc.  

With CD+G, and other discs, use the <>^# buttons to select the TITLE/CHAPTER 

or other type of file you want to view, then press ENTER to start viewing or 

playback. 

To stop playback


Press the STOP button.

If the unit is left for 20 minutes without any operations, it will automatically enter 

STANDBY mode. 

If the screensaver is enabled in standby mode, any subsequent operation will 

cancel it and get you back to a menu.

Discs will continue to spin while the MENU screen is displayed. When you are 

finished using the unit, turn the power off.

REPEAT

TITLE

MENU

VOL

Pausing Playback

Pausing playback

Press the PLAY/PAUSE key during playback

To return to normal playback

Press PLAY/PAUSE again. 

SLOW

VOL

Fast Forward/Reverse

Frame Advance

SLOW

VOL

STOP

STEP

MUTE

Slow/Fast Playback

SLOW

VOL

STOP

P

MUTE

Fast forward/Reverse

Press the <</>> buttons.

Each time you press the << (REVERSE) or >> (FORWARD) button, the search 

speed increases.

To return to normal playback, press the PLAY button.  There is no audio during 

fast forward/reverse.

Frame advance

Press STEP during playback.

Each time you press the STEP button, the program advances one 

frame. There is no audio during STEP playback.

To return to normal playback

Press PLAY.

Slow/fast Playback

Press SLOW during playback.

Each time SLOW is pressed, the play speed changes. 
There is no audio during SLOW playback. Available SLOW playback 

speeds differ from DVD to VCD.  To return to normal playback, press 

PLAY.

SETUP

RETURN

ENTER

TITLE

A-B

MENU

SLOW

VOL

STOP

Initial Playback

BUTTONS FOR

TITLE/CHAPTER

SELECTION

Summary of Contents for DVX-680K

Page 1: ...s Dual microphone inputs with mixed LEVEL control Built in ECHO effect Digital Key Controller for changing the key of the music to t your vocal range Built in Dolby Digital AC 3 and Dolby DTS decoders...

Page 2: ...other appliances including amplifiers that produce heat 10 Power Sources The appliance should be connected to a power supply only of the type described in the operating instructions or as marked on t...

Page 3: ...eep it in a safe place for future reference 2 Install your unit in a cool dry clean place away from windows heat sources and too much vibration dust moisture or cold Avoid sources of hum transformers...

Page 4: ...1728 Curtiss Court La Verne CA 91750 Toll Free 800 678 5348 TEL 909 593 8893 FAX 909 593 8890 VocoPro Company Email Directory Customer Service General Information info vocopro com Tech Support techsup...

Page 5: ...dial and leave it there Pay attention to the different levels in various recordings Taking a minute to do this now will help to prevent hearing damage or loss in the future After all we want you liste...

Page 6: ...Dolby Pro Logic ampli er 13 Connecting to DTS receiver decoder 14 Connecting to both analog and digital audio 14 Connecting to a SCART jack for European TV 14 SETTING UP PREFERENCES General setup 15...

Page 7: ...discs Your new DVX 680K is designed with your multi purpose home entertainment in mind a player that can do it all You will see that creating DivX discs which compile volumes of your recordings and v...

Page 8: ...his button turns the unit ON OFF 2 DISPLAY WINDOW Shows disc tray status and time display a Disc type b Number of tracks or les total c Track number or le currently playing d Time display can be toggl...

Page 9: ...letely STOP playback While in AUTO STOP MODE playback pauses and the Vocopro splash screen appears Pressing PLAY will resume playback and exit AUTO STOP MODE 19 STEP Press this button to enter STEP mo...

Page 10: ...proximately 23 ft If this distance decreases it is time to replace the batteries NOTES When operating the remote control point the top of the remote control toward the player Keep the line of sight be...

Page 11: ...ollow the instructions provided with the RF modulator to connect the DVX 680K to your TV General model shown as an example Getting Started SL SR CENTER L R COAXIAL S VIDEO OPTICAL SUB Y Cb Cr VIDEO FR...

Page 12: ...ing VIDEO OUTPUT Connecting to a TV with Component Video Using 3 appropriate Component Video cables usually color coded red blue and green connect a set of plugs to the COMPONENT VIDEO OUT jacks Y Cb...

Page 13: ...interference If your Dolby Digital Receiver does not have a built in AC 3 decoder and has 5 1 channel RCA inputs you can use the 5 1 channel output jacks on the DVX 580G Either method will provide fo...

Page 14: ...output jacks on the DVX 580G Either method will provide for DTS decoding Refer to PREFRENCES page 19 5 for instructions on setting VIDEO OUTPUT Connecting both Analog and Digital Audio To do this you...

Page 15: ...tch the program from different angles See Advanced operations section for more information on this ANGLE MARK is only applicable to discs which offer changing viewing angle 4 Setting OSD LANGUAGE This...

Page 16: ...center speaker 3 REAR ON LS Left surround and RS right surround channels active OFF Standard stereo 4 SUBWOOFER Switch on for subwoofer speaker output 5 CENTER DELAY Center signal output can delay for...

Page 17: ...PCM When using stereo ampli er to play Dolby digital discs select this mode 3 LPCM OUTPUT Choose between 48KHz or 96KHz With Karaoke discs CD Gs it is suggested that you use 48KHz With 96KHz output m...

Page 18: ...ed To use this feature DOWNMIX must be OFF 6 DIVX R REGISTRATION Go here to nd registration code for www divx com Video On Demand services Your registration code is Please USE this code to register th...

Page 19: ...TPUT PASSWORD DEFAULTS SETUP MP3 MAIN PAGE SET TV STANDARD PREFERENCE PAGE TV TYPE ENGLISH AUDIO FRENCH SPANISH CHINESE JAPANESE GERMAN INDONISIA RUSSIAN SUBTITLE DISC MENU PARENTAL VIDEO OUTPUT PASSW...

Page 20: ...led in standby mode any subsequent operation will cancel it and get you back to a menu Discs will continue to spin while the MENU screen is displayed When you are nished using the unit turn the power...

Page 21: ...rea by using the direction keys To cancel the ZOOM function press ZOOM until it cycles back to a normal view The zoom function may not work with some discs and when used in conjunction with the SLOW o...

Page 22: ...n TITLE and CHAPTER repeat modes To cancel REPEAT mode Press the PLAY button or cycle through the REPEAT options until REPEAT OFF is initiated Programmed Playback Press PROGRAM in stop mode You can se...

Page 23: ...itself a false album or track which cannot by played on the unit may be displayed on a TV screen Notes on creating MP3 discs When converting audio data to MP3 create MP3 les with a sampling frequency...

Page 24: ...d folder until operation is stopped 5 DISC SCAN mode Plays the rst 10 seconds of all les on the disc Use the direction keys to select the MP3 le you want to start playback with Press STOP to cancel DI...

Page 25: ...At the bottom of the screen select OUTPUT PATH to your new folder as the destination 4 Select all tracks and click on CONVERT 5 Select EXTRACT TO BIN 6 Set default in QUICK OPTION to STEREO Do not cl...

Page 26: ...75 NTSC 0 3 Vp p 75 PAL 1 Mini Din 4 pin YUV Video Output Y 1 0 V rms z 75 ohms Unbalanced Cr 0 7 Vp p 75 Unbalanced Cb 0 7 Vp p 75 Unbalanced 3 RCA Jacks Audio System MPEG 1 2 Linear PCM Audio Dolby...

Page 27: ...www vocopro com...

Reviews: