VMS Touring 430 Quick Start Manual Download Page 28

TM

Quick Start Guide

Failure to avoid the following potentially 

hazardous situations could result in an accident 

or collision resulting in death or serious injury.

- When installing the unit in a vehicle, place the 

unit securely so it does not obstruct the driver’s 

view of the road or interfere with vehicle 

operating controls, such as the steering wheel, 

foot pedals, or transmission levers. Do not place 

in front of or above any airbag.

- When navigating, carefully compare information 

displayed on the unit to all available navigation 

sources, including information from street signs, 

visual sighting, and maps. For safety, always 

resolve any discrepancies or questions before 

continuing navigation and defer to posted road 

signs.

- Always operate the vehicle in a safe manner. 

Do not become distracted by the unit while 

driving, and always be fully aware of all driving 

conditions. Minimize the amount of time spent 

viewing the unit’s screen while driving and use 

voice prompts when possible. Do not input 

destinations, change settings, or access any 

functions requiring prolonged use of the unit’s 

controls while driving. Pull over in a safe and 

legal manner before attempting such 

operations.

- The unit is designed to provide route 

suggestions. It is not designed to replace the 

need for driver attentiveness regarding road 

closures or road conditions, traffic 

congestions, weather conditions, or other 

factors that may affect safety while driving.

9. IMPORTANT SAFETY AND PRODUCT INFORMATION

Battery Warnings:

If these guidelines are not followed, the internal, 

non-user-replaceable, rechargeable lithium-ion 

battery may experience a shortened life span or 

may present a risk of damage to the GPS unit, 

fire, chemical burn, electrolyte leak, and/or 

injury. 

- Do not incinerate.

- Contact your local waste disposal department 

to properly dispose of the unit/battery

- Do not leave the unit exposed to a heat source 

or in a high temperature location, such as in the 

sun in an unattended vehicle on a hot day. To 

prevent damage, remove the unit from the 

vehicle or store it out of direct sunlight.

- When storing the unit for a limited length of

time, store within the following temperature 

range:

-10˚  to 55˚C. When storing the unit for an 

extended time, store within the following 

temperature range: 

0˚ to 25˚C.

- Do not operate the unit outside the following 

temperature range: -20˚  to 55˚C.

- Do not remove or attempt to 

remove the 

battery.

Important Information

MAP DATA INFORMATION:  One of the goals of the 
VMS Touring GPS is to provide customers with the 
most complete and accurate cartography that is 
available to us at a reasonable cost. Along 

with 

VMS’ extensive field work, we use a 

combination of governmental and private data 

sources, which we identify in product literature

28

Summary of Contents for Touring 430

Page 1: ...TM QUICK START GUIDE Touring 430...

Page 2: ...ou can explore the most remote regions in complete confidence Street navigation uses the latest Where IS mapping for Australia Featuring spoken street names and easy to follow voice guidance the VMS T...

Page 3: ...Music browser 5 3 2 Music player 6 Street Navigation 6 1 Getting started with street navigation 6 2 Navigating to an Address 6 3 Using the on screen keyboard 6 4 Map View 6 7 Street nav settings 7 To...

Page 4: ...turn on 2 System Reset Resets the entire system when system is non responsive 3 Camera input Input for Reverse Camera cable 4 USB charger Car charger input USB type 5 LED indicator Red when charging...

Page 5: ...p mode Power on press the power button for 2 secs Power off press the power button until the unit displays POWER OFF MODE This mode powers down the system completely allowing long periods of storage w...

Page 6: ...el For paved road travel select street navigation For Off road travel select topographical navigation Tip Topographical Navigation is used where street navigation lacks accurate information Best used...

Page 7: ...Volume Indication Bar Enabled Disabled 4 4 Battery Management Settings Toggle auto sleep mode Automatically Enter Sleep Mode Always On 1 2 3 10 30 mins Battery level indicator Back to Settings Menu 4...

Page 8: ...stem Time Touch to enter time settings 4 6 1 System Time Settings or hour toggle Min Display Hour Display Back to Date Time Main Menu 4 6 2 System Date Settings or month toggle Day indicator Year Indi...

Page 9: ...e indicator Back to Settings Menu 4 8 System Information Settings Reset GPS receiver To calibrate the touchscreen tap this button follow the on screen instructions System Information Display Back to S...

Page 10: ...wser menu Files Back to Settings Menu 5 1 2 Photo Viewer Photo Display Area Zoom in or out of photo Back to Settings menu Photo browser Video browser Back to Photo Browser Menu Music browser Scroll up...

Page 11: ...5 3 1 Music Browser SD card content Back to Settings menu Back to Main Menu Video Display Vol indicator Scroll up or down Back to Settings Menu Scroll up or down Browse up one folder SD card content...

Page 12: ...ingle tap is sufficient VMS Navigation can plan routes throughout the entire installed map set When Street Navigation is started the first time you need to do the following 1 Select the written langua...

Page 13: ...Find Address Country Suburb Prev entered suburbs Go to city centre if street not required Find Address Menu Street Name Street No State Back to Prev menu Step 2 Enter Destination Go to Street Midpoin...

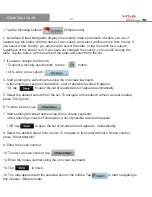
Page 14: ...een keyboard After entering a couple of characters a list of possible results will appear Or tap to open the list of results before it appears automatically 5 Select the desired suburb from the list T...

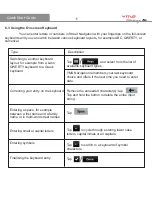
Page 15: ...character s tap Tap and hold the button to delete the entire input string Entering a space for example between a first name and a family name or in multi word street names Tap Entering small or capita...

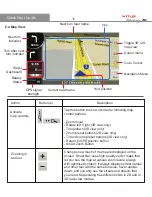
Page 16: ...ttons Zoom in out Rotate left right 3D view only Tilt up down 3D view only Zoom preset buttons 2D view only Tilt and zoom preset buttons 3D view only Return to GPS position button Smart Zoom Button Ch...

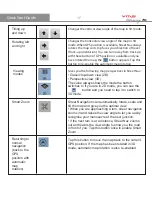
Page 17: ...ives you the following map perspectives in Street Nav Classic top down view 2D Perspective view 3D The value always shows the mode the button switches to If you are in 2D mode you can see the button a...

Page 18: ...ehicle Type Road types used for route planning Route calculation method Regional Settings Program language Voice profile Units km mile etc Set Date Time Format Time and Time zone settings Navigation S...

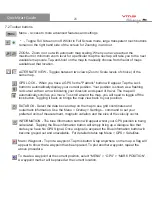
Page 19: ...D technique Tap and Hold is equivalent to a right mouse click on a PC Simply Tap on an object like a map mark or position symbol hold for a moment without moving then release A menu will appear that i...

Page 20: ...tomatically scroll as you move To scroll around the map you will need to toggle off the lock button Toggling it back on brings the map view back to your position DATA BOX Select the data box and tap o...

Page 21: ...p will automatically change to one of larger scale Large scale maps provide a better overview of a large area however with less detail To obtain more detail just zoom in and the map will automatically...

Page 22: ...sults For example typing in H will eliminate all the maps that do not begin with the letter H The more characters that are entered the shorter the list of possible maps 7 4 Planning a Route Scroll and...

Page 23: ...WP along the route E G if the nearest WP is WP3 once reached info on WP4 will appear automatically To reverse navigate a route select Reverse E G if the nearest WP is WP3 once reached info on WP2 will...

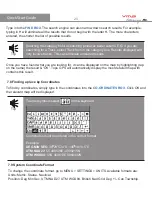
Page 24: ...All Hide All functions to choose which overlays to display on the map 7 7 Find Place Find Place can be used to find a place by name or find a track by name Find place menu can be found under MENU FIND...

Page 25: ...e displayed on the map by highlighting tap on the name the result OK Topo GPS will automatically display the most detailed map with contains this result 7 8 Finding a place by Coordinates To find by c...

Page 26: ...information the PC must have a SDHC compatible SD card reader If you do not have one these can be purchased at any good electronics retailer Install PC software 1 Insert the PC software DVD into a DVD...

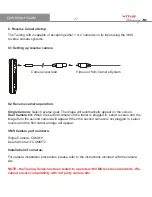
Page 27: ...amera kit When the second camera on the trailer is plugged in select reverse and the image from the second camera will appear When the second camera is not plugged in select reverse and the first came...

Page 28: ...ed for driver attentiveness regarding road closures or road conditions traffic congestions weather conditions or other factors that may affect safety while driving 9 IMPORTANT SAFETY AND PRODUCT INFOR...

Page 29: ...t 15 regulations 10 Limited Warranty This VMS product is warranted to be free from defects in materials or workmanship for one year from the date of purchase Within this period VMS will at its sole op...

Page 30: ...tralia or New Zealand must be returned to the VMS service centre in Australia 11 Caring for your VMS Touring Your VMS Touring GPS contains sensitive electronic components that can be permanently damag...

Page 31: ...the product Title owner ship rights and intellectual property rights in and to the software remains in VMS You acknowledge that the Software is the property of VMS and is protected under Australia cop...

Page 32: ...Number TOUR430GPS Printed in China VMS is a trademark of XIA GROUP PTY LTD registered in Australia and other countries and may not be used without the express permission of XIA GROUP Pty Ltd copyright...

Reviews: