VMI Air-Pro 08E W/P Installation Instructions & Use & Care Manual Download Page 13


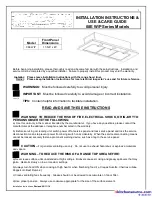
Installation Instructions, 

Revised 02/11/14 

13 


WARRANTY 

Air-Pro

 Brand Ventilation Products 


What is Covered 

VMI Inc. warrants its 

Air-Pro


brand products to the original user, to be free of defects in materials and 

workmanship for three (3) years from the date of purchase.   

 
VMI Inc., at its option, will repair or replace the complete unit or any defective component without charge providing 
that, if requested, the product or defective component is promptly returned, prepaid to the address below.  This 
warranty may be voided if any unauthorized service, alterations or repairs are made to the product.   


What is Not Covered 


Normal maintenance and service of any product that has been subject to misuse, negligence, accident or 
installation inconsistent with the recommended installation instructions 


Product used other than for normal in-home use or products used outside of the United States and Canada.   


Damage to the product caused by accident, fire, flood or other acts of God. 


Service calls to educate the customer in the proper use and care of the product, correct faulty installation, 
change fuses or reset breakers. 

 
VMI Inc. disclaims and excludes any liability for implied warranties or for incidental or consequential damages 
wherever permitted by law.  There are no implied warranties of merchantability or fitness for a particular use or 
purpose.  This warranty gives you specific legal rights and you may also have other rights, which vary from state to 
state. 
 

For Service 
If you need service, contact Customer Service at the address or phone number below.  Provide the model 
number, part identification and details of the problem.  Proof of purchase must be provided. 


Rev. 04/13 


Summary of Contents for Air-Pro 08E W/P

Page 1: ...in the manner intended by the manufacturer If you have any questions please contact the manufacturer at the address or telephone number listed in the warranty b Before servicing or cleaning unit swit...

Page 2: ...ct joints with high quality duct tape 4 Do not use this unit with any solid state speed control device 5 This unit must be grounded INSTALLATION INSTRUCTIONS WARNING TO REDUCE THE RISK OF FIRE ELECTRI...

Page 3: ...oof cap location To get the best result use a minimum number of transitions and elbows Be sure to attach a roof wall cap to avoid rain from entering the exhaust duct The range hood unit should be moun...

Page 4: ...t hold up the front panel Hold the front panel in place as you loosen the screws so that the front panel does not fall onto the cook top When putting back on the front panel and aluminum knob DO NOT o...

Page 5: ...een the screwheads and wall for mounting the range hood Hook the temporary fixing holes of the hanging bracket on the washer head wood screws prepared in previous step and tighten the screws Note Inse...

Page 6: ...08E P Ceiling Mounting Put 4 all thread rods 1 2 anchor bolt not supplied into the corner holes of the mounting bracket and secure them using washers spring washers and nuts Place the mounting bracket...

Page 7: ...side is impossible remove the exhaust pipe unit and insert the duct end to the range hood directly then make inside taping on the duct end Be sure to attach a roof wall cap with damper in this case AC...

Page 8: ...imension 2 8 Round Duct Exhaust Direction Vertical Discharge from top Horizontal with Elbow Installation At 4 places on flange of body use screws and nut plates for mounting to Liner Wall mount with b...

Page 9: ...distort and damage the liner and void the warranty Always install ventilation products with an approved wall or roof cap Duct performance is improved by using round smooth metal duct work instead of...

Page 10: ...nd the fit is too tight simply remove one or more of the shims to get a proper fit Note All the mounting holes should be used to ensure adequate installation CONNECTING TO THE VENT PIPE The 08E W P se...

Page 11: ...ipe across the grain After cleaning reinstall the filters carefully HALOGEN LIGHT BULBS Blowers are designed for 50 watt MR16 GU10 Halogen Lamp They can be purchased at most home or grocery stores e g...

Page 12: ...Speed Wiring Details Black 120 volt AC from electrical panel usually black White Neutral from electrical panel white Green Ground from electrical panel usually green Wiring Diagram 08E W P Series Mod...

Page 13: ...nsistent with the recommended installation instructions Product used other than for normal in home use or products used outside of the United States and Canada Damage to the product caused by accident...

Reviews: