background image


The aluminum filter, holding oil and dust from the air, is clogged and should be washed after being 
soaked in hot water with an effective detergent once every 1.5 to 2 months.


Changing the color of 

the filter after washing does not affect the quality of its work. 


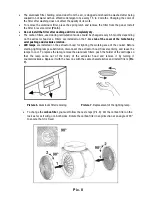
To remove the aluminum filter, press the spring latch and remove the filter from the panel. Install 
the filter in reverse order 

(Pic. 6).


Do not install the filter after washing until it is completely dry. 


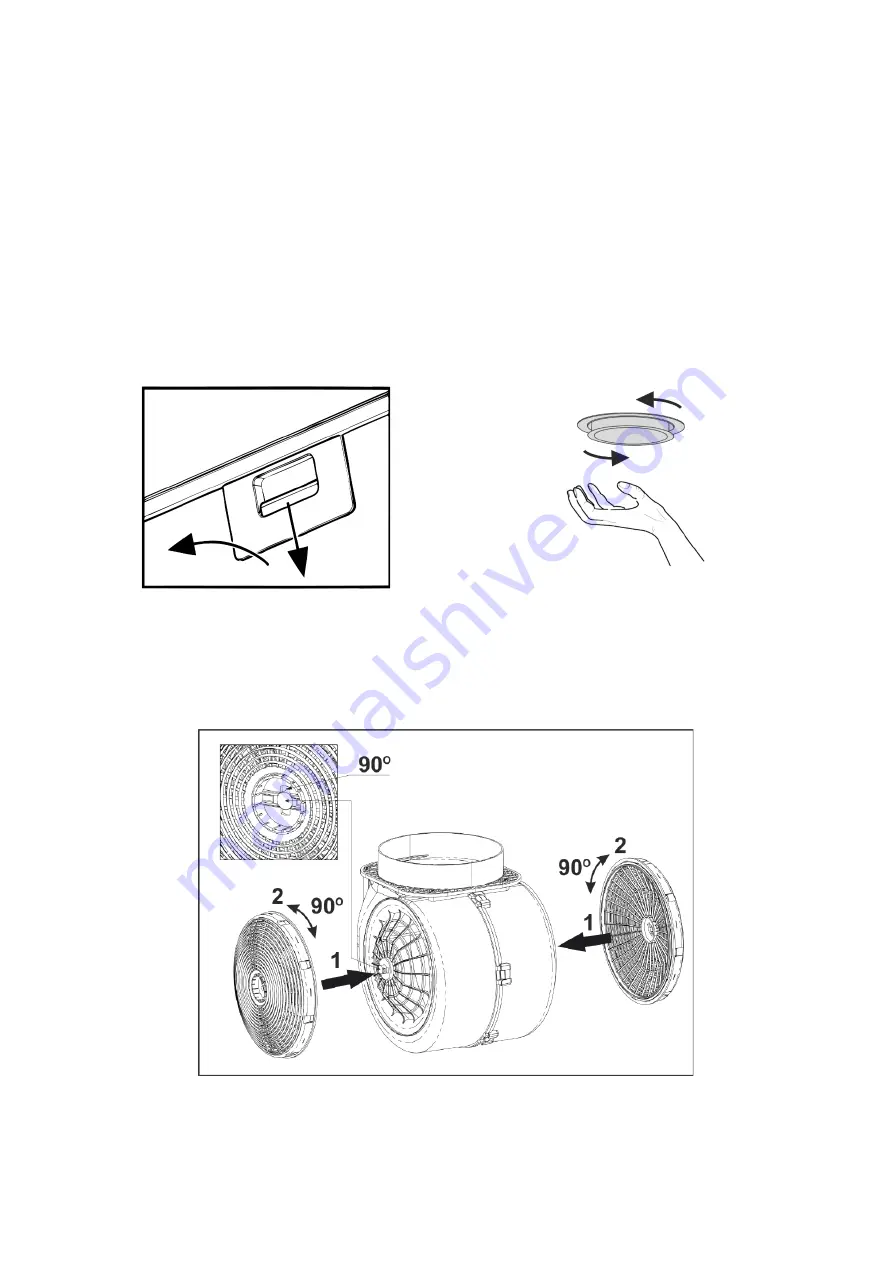
The carbon filters, used during recirculation mode should be changed every 3-6 months depending 
on the extractor hood use. Filters are installed on the T-like 

stab of the cover of the turbofan by 

axial pushing and clockwise rotation. 


LED lamps

 are installed on the extractor hood for lighting the working area of the cooker. Before 

starting  lighting lamps  substitution, disconnect the extractor  hood  from  electricity, and  leave the 
lamps to cool. To replace the lamp, remove the aluminum filters, push the holder of the cartridge so 
that  the  lamp  came  out  of  the  body  of  the  extractor  hood  and  remove  it  by  turning  it 
counterclockwise. Replace it with the new one with the same characteristics and install filters 

(Pic. 

7).


Picture 6.

 Aluminum filter removing


Picture 7.

 Replacement of the lighting lamp.


To change the 

carbon filter

, you must follow the next steps (Pic. 8): Put the carbon filter on the 

lock as far as it will go on both sides. Rotate the carbon filter in any direction at an angle of 90 ° 
to ensure that it is fixed. 


Pic. 8 

Summary of Contents for PLANET

Page 1: ...DUNSTABZUGSHAUBE KITCHEN EXTRACTOR HOOD PLANET HANDBUCH DE MANUAL EN ...

Page 2: ...ATUR GELAGERT WERDEN Warnung Sie müssen die geltenden Gesetze zur Emission von Dämpfen und zur Belüftung der Umwelt einhalten Schließen Sie die Haube nicht an eine andere Entlüftungsöffnung für Rauch Belüftung oder Heißluft an die bereits von anderen Geräten verwendet wird die mit Gas oder einem anderen Kraftstoff betrieben werden Für optimale und sichere Handhabung stellen Sie sicher dass der Dru...

Page 3: ...tung resultierten verantwortlich gemacht werden behält sich das Recht ein jegliche Änderungen am Gerät oder dieser Bedienungsanleitung vorzunehmen ohne vorherige Bekanntgabe Sollten Sie technische Assistenz oder zusätzliche Informationen über unsere Produkte benötigen kontaktieren Sie Ihren Verkäufer oder einen autorisierten technischen Service HERSTELLERGARANTIE Das Produkt entspricht den Europäi...

Page 4: ...chriften des Geräts durch den Verbraucher Verletzung der Vorschriften für die Steuerung des Geräts durch den Verbraucher Anschluss des Geräts an ein Stromnetz mit einer anderen Spannung als in der Betriebsanleitung angegeben ist Ausfall des Geräts infolge von Spannungssprüngen im Stromnetz Durchführung einer selbständigen Reparatur des Geräts durch nichtautorisierte Personen Reparaturen des Geräts...

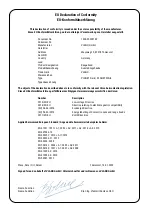
Page 5: ... Diese EU Konformitätserklärung erfüllt die einschlägigen Harmonisierungsvorschriften der Union Number Description 2014 35 EU Low voltage Directive 2014 30 EU Directive relating to electromagnetic compatibility EU No 66 2014 Ecodesign Directive EU No 65 2014 Energy labelling of domestic ovens and range hoods 2011 65 EU RoHS Direcitive Applied harmonised European Standard Angewandte harmonisierte E...

Page 6: ...das Gerät installiert ist für den ordnungsgemäßen Betrieb am Installationsort verantwortlich Das Gerät ist nur für den Hausgebrauch Zubereitung von Lebensmitteln bestimmt unter Ausschluss aller anderen haushältlichen gewerblichen und industriellen Zwecke Das Gerät darf nicht im Freien verwendet werden Überprüfen Sie den Zustand des Geräts und des Montagematerials sobald Sie es aus der Verpackung n...

Page 7: ... Ihr Gerät im Brandfall immer aus Löschen Sie brennende Fette niemals mit Wasser sondern decken Sie die Pfanne mit einem geeigneten Deckel oder einer Löschdecke ab Achtung bestimmte in Reichweite befindliche Teile des Geräts können während des Kochens heiß werden Gasbrenner können während des Betriebs sehr viel Wärme erzeugen Stellen Sie sicher dass diese Wärme in der Dunstabzugshaube nicht zu sta...

Page 8: ...lten Sie das Gerät und die Stromversorgung aus wenn Sie einen Defekt feststellen Die Reparaturen dürfen ausschließlich von Fachpersonal durchgeführt werden Öffnen Sie das Gerät niemals selbst Wenden Sie sich an Ihren Verkäufer oder einen autorisierten technischen Service UMWELTSCHUTZ Tipps zum Energiesparen Das neue Gerät ist besonders effizient und energiesparend Im Folgenden finden Sie einige Ti...

Page 9: ...ngungen Für das Recycling Ihres Geräts verweisen wir auf die geltenden europäischen Richtlinien für Elektro und Elektronik Altgeräte Erkundigen Sie sich bei Ihrer Gemeinde nach der nächstgelegenen Sammelstelle für Ihr Altgerät Stellen Sie sicher dass Altgeräte außerhalb der Reichweite von Kindern aufbewahrt werden Recycling von Batterien Entsorgen Sie Batterien nicht im normalen Hausmüll Erkundige...

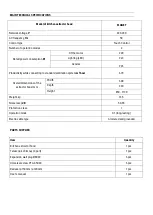
Page 10: ...tivität beim Anschluss an ein Standard Lüftungssystem m3 Std 679 Allgemeine Abmessungen der Dunstabzugshaube mm Breite 600 Tiefe 390 Höhe 850 1130 Gewicht kg 13 5 Geräuschpegel dB 50 65 Schutzklasse I Betriebsmodus S1 langanhaltend Elektrokabeltyp Gepanzert und geerdet LIEFERUMFANG Artikel Anzahl Dunstabzugshaube 1 Stk Teleskopkamin 2 teilig 1 Stk Dübel Ø8Х40 6 Stk Universalschraube PTG 4 5X40 6 S...

Page 11: ...ioniert die Haube in zwei Versionen siehe S 1 5 im Abluftmodus in den Küchenkamin Abb 1 im Umluftbetrieb geschlossene Luftzirkulation in der Küche Abb 2 Vorsicht Die Dunstabzugshaube sollte an einer Wand im Abstand von 650 750 mm über einem Elektroherd und im Abstand 750 850 mm über einem Gasherd montiert werden Abstand H Bis zum Elektroherd 65 75 cm Bis zum Gasherd 75 85 cm Die Dunstabzugshaube P...

Page 12: ...Schraubenköpfen einhängen und in den Punkten C D Korpus abschließend mit 2 PTH 4 5x40 Schrauben befestigen Luftkanaladapter Ø150 120 am Abluftauslass montieren und Luftkanal montieren Schornsteinverkleidung so in die Verkleidungsaussparung einführen dass sie den Lüftungskanal abdeckt und 2 Befestigungslöcher E und F entlang der Nuten des Verkleidungsstreifens markieren Abb 4 Bohren Sie 2 Löcher Ø7...

Page 13: ... diese zu aktivieren halten Sie die gewünschte Leistungsstufe für 5 Sekunden gedrückt Danach aktiviert sich der Timer und schaltet den Motor sowie die Beleuchtung nach 5 Minuten automatisch aus Steuerung über Fernbedienung optional Zum Einschalten der Haube Taste 1 4 oder 5 drücken Zum Ausschalten der Haube Taste 1 drücken Um die Betriebsgeschwindigkeit zu erhöhen oder zu verringern drücken Sie di...

Page 14: ...m T förmigen Steg des Deckels des Turbofans installiert Zur Beleuchtung des Arbeitsbereichs des Herdes sind an der Dunstabzugshaube LED Lampen angebracht Bevor Sie mit dem Austausch der Beleuchtungslampen beginnen trennen Sie die Dunstabzugshaube vom Strom und lassen Sie die Lampen abkühlen Um die Lampe auszutauschen entfernen Sie die Aluminiumfilter drücken Sie den Halter der Kartusche so dass di...

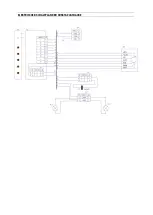
Page 15: ...ELEKTRISCHER SCHALTPLAN DER DUNSTAZUGSHAUBE ...

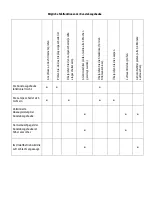
Page 16: ...lle 4 Wochen gereinigt werden Überprüfen Sie die Steckdose für den Stromanschluss Überprüfen Sie die Lampen Luftaustrittsrohr prüfen Aktivkohlefilter prüfen alle 3 4 Monate austauschen Die Dunstazugshaube funktioniert nicht Die Lampe schaltet sich nicht ein Verminderte Absaugleistung der Dunstabzugshaube Der Geräuschpegel der Dunstabzugshaube ist höher als vorher Im Umluftbetrieb wird die Luft sch...

Page 17: ...nother fuel are used at the same time the room ventilation system must be designed accordingly Connect the extractor hood to the power supply Warning Before you connect the extractor hood switch off the power supply and check that the voltage and frequency supply correspond to the information on the type plate If the device is equipped with a power plug plug it into a nearby socket that complies w...

Page 18: ... malfunctions in the device due to errors caused by the factory that occur within the warranty period the consumer is entitled to free repair of the device s defects by means of warranty repairs by the manufacturer The warranty repair includes in particular work to repair defects in the operation of the device in order to ensure that the device is used as intended within the warranty period Defect...

Page 19: ...o are not authorized by the manufacturer The device s warranty period has expired Violation of applicable regulations for the transport of the device by the consumer Violation of the regulations on the storage of the device by the consumer Unlawful acts by third parties in relation to the device Failure of the device as a result of force majeure fire flood earthquake war military action of any kin...

Page 20: ... Diese EU Konformitätserklärung erfüllt die einschlägigen Harmonisierungsvorschriften der Union Number Description 2014 35 EU Low voltage Directive 2014 30 EU Directive relating to electromagnetic compatibility EU No 66 2014 Ecodesign Directive EU No 65 2014 Energy labelling of domestic ovens and range hoods 2011 65 EU RoHS Direcitive Applied harmonised European Standard Angewandte harmonisierte E...

Page 21: ... mounting material as soon as you take it out of the packaging Take the device carefully out of the packaging Do not use a sharp knife to open the packaging If the device is damaged do not install it but contact your seller Keep these instructions in a safe place and pass them on to anyone who may use the device after you The manufacturer is not liable for damage caused by incorrect installation i...

Page 22: ...nstalled above the gas burners can be damaged or catch fire Only operate the gas burners with cookware on them Switch off the gas flame when you remove the cookware from the gas field Never operate large burners of more than 5 kW with the highest flame for more than 15 minutes e g for a wok Switch on the appliance a few minutes before the start of the cooking process in order to effectively remove...

Page 23: ...sary Only increase the speed of the appliance if the amount of steam requires it Keep the device s filter s clean to optimize the efficiency of filtering grease and odor If a lot of steam is generated switch to a higher power level in advance This is more efficient than trying to catch steam that has already spread around the kitchen by letting the appliance run for a long time Do not allow the ap...

Page 24: ...e that old devices are kept out of the reach of children Recycling of batteries Do not dispose of batteries with normal household waste Inquire at your local authority for the nearest collection point for batteries Make sure batteries are kept out of the reach of children Batteries and accumulators accumulators contain resources and pollutants Every consumer is therefore legally obliged to dispose...

Page 25: ...onnecting to standard ventilation system m3 hour 679 Overall dimensions of the extractor hood mm Width 600 Depth 390 Height 850 1130 Weight kg 13 5 Noise level dB 50 65 Protection class I Operation mode S1 long lasting Electro cable type Armoured and grounded PARTS SUPPLIED Item Quantity Kitchen extractor hood 1 pcs Telescopic chimney 2 part 1 pcs Expansion wall plug Ø8Х40 6 pcs Universal screw PT...

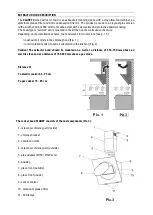
Page 26: ...two versions see p 1 5 in exhaust air mode in the chimney hood Fig 1 in recirculation mode closed air circulation in the kitchen Fig 2 Caution The extractor hood should be mounted on a wall at a distance of 650 750 mm above an electric stove and at a distance of 750 850 mm above a gas stove Distance H To electric cooker 65 75 cm To gas cooker 75 85 cm The cooker hood PLANET consists of the next co...

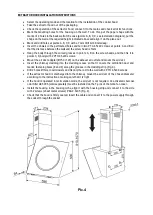
Page 27: ...ads and then fix it in points C D body with 2 PTH 4 5x40 screws Mount the air duct adapter Ø150 120 on the exhaust air outlet and mount the air duct Insert the chimney cladding into the cladding recess so that it covers the ventilation duct and mark 2 fastening holes E and F along the grooves in the cladding strip Fig 4 Drill 2 holes Ø7mm insert dowels and fix only the rod to the wall with 2 PTH 4...

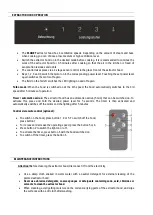
Page 28: ...e extractor hood has an automatic overrun 5 min that can be switched on To activate this press and hold the desired power level for 5 seconds The timer is then activated and automatically switches off the motor and the lighting after 5 minutes Control via remote control optional To switch on the hood press button 1 4 or 5 To switch off the hood press button 1 To increase or decrease the operating ...

Page 29: ...f the turbofan by axial pushing and clockwise rotation LED lamps are installed on the extractor hood for lighting the working area of the cooker Before starting lighting lamps substitution disconnect the extractor hood from electricity and leave the lamps to cool To replace the lamp remove the aluminum filters push the holder of the cartridge so that the lamp came out of the body of the extractor ...

Page 30: ...ELECTRICAL SCHEMATIC DIAGRAM ...

Page 31: ...num filter should be cleaned once every 1 5 2 months Check the socket For the power connection Check lamps Check air outlet pipe for the traction Check carbon filter replacement once every 3 4 months Extractor hood does not work The lamp does not light Reduced performance of the extractor hood The extractor hood began to work louder Air is poorly drawn in the recirculation mode ...

Page 32: ...VLANO GmbH Maysweg 10 47918 Tönisvorst Deutschland info vlano de www vlano de ...

Reviews: