

Installation order:
1. Make holes for the armature plate and guide pin.
2. Fix the armature plate on the inner door-side using mounting kit (Figure ).
Leave 4..5mm clearance between the plate and door surface.
3.
erminals
have no polarity. The example of wiring diagram is given on Figure . Requirements for wires
and more wiring examples are given in the controlling device operating instruction.
The controlling device can be a doorstation, control unit, TM- or RF-keys controller etc. Program lock type in the
controlling device
electromagnetic and its unlocked state duration (if the functions are supported) following the
corresponding operating instruction. The lock is released when the voltage across its terminals is off.
After installation and wiring complete, check all the connections.
Switch the power on. The electromagnet attracts the armature plate.
The door is locked. Check if locking is firm.
Perform unlocking according to the controlling device operating instruction.
Check if the electromagnet releases the armature plate.
1
CONNECTION AND FUNCTIONAL CHECK
T
of the lock
as
,
5
Fix
4.
.
5.
.
6.
7.
8.
.
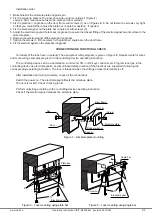
the plate bar / angle bar on the door frame with screws (1) as on Figures
. Do not fasten the screws very tight,
so that you could further adjust the plate bar / angle bar position, if needed.
Fix the electromagnet on the plate bar / angle bar with screws (3)
Adjust the electromagnet with plate bar / angle bar to ensure the closest fitting of the electromagnet’s work surface to the
armature plate
Remove the electromagnet off the plate bar / angle bar.
Tighten the screws (1, 2) to securely fix the plate bar / angle bar on the door frame.
Fix the electromagnet on the plate bar / angle bar
2, 3
Figure 2 – Lock mounting using plate bar
Figure 3 – Lock mounting using angle bar
Figure 1 – Armature plate mounting
Armature plate
Nut
Door
Door frame
Screw
Spacer
Washer
Rubber washer
www.
201 -
Operating Instruction VIZIT-ML400M-x (revision
6 06)
vizit.eu
2 3
/
2
3
1
2
Plate bar
Electromagnet
2
1
3
Angle bar
Electromagnet
Screw nut


