background image

VIZIO VU42L FHDTV10A User Manual 

Version 12/17/2007 

18 


www.VIZIO.com


For Cable or Satellite Boxes with DVI: 
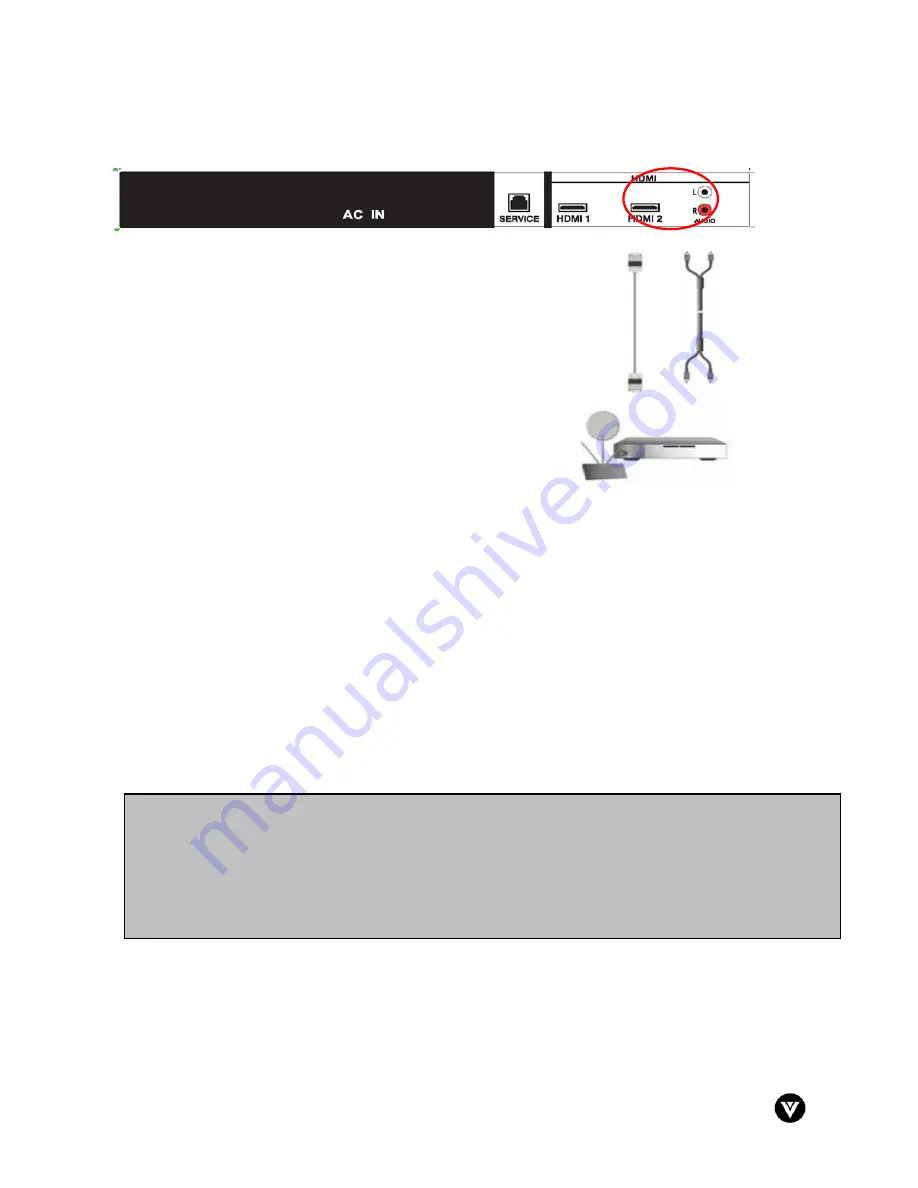


1. 

Turn off the power to the LCD HDTV and HDTV Set-Top 
Box. 

2. 

Using a HDMI-DVI cable, connect the DVI end to your HDTV Set-Top Box and the HDMI end 
to the HDMI Input (white color area) at the rear of the LCD HDTV. 

3. 

Using an audio cable (white and red connectors), connect the cable to the audio output 
connectors associated with the DVI output on your HDTV Set-Top Box and connect the other 
end to the audio connectors associated with the HDMI input (white area) at the rear of the 
LCD HDTV. 

4. 

Turn on the power to the LCD HDTV and HDTV Set-Top Box. 

5. 

Select HDMI using the INPUT button on the remote or side of the LCD HDTV, or directly by 
pressing the HDMI button on the Remote Control. 


Note

:  The HDMI Input is for HD Video and will only support 640x480 at 60Hz from a PC.  Use the RGB 

PC input for a greater selection of PC formats. 


Note: 

a) 

The HDMI input on the LCD TV supports High-bandwidth Digital Content Protection 
(HDCP).  HDCP encrypts the transmission between the video source and the digital display 
for added security and protection. 

b) 

Refer to your HDTV Set-Top Box user manual for more information about the video output 
requirements of the product or consult your cable or satellite operator. 

Summary of Contents for VU42L FHDTV10A

Page 1: ...l toll free at 888 VIZIOCE 888 849 4623 We recommend you register your VIZIO VU42L FHDTV10A either at our website www vizio com or fill in your registration card and mail it in For peace of mind and to protect your investment beyond the standard warranty VIZIO offers on site extended warranty service plans These plans give additional coverage during the standard warranty period Visit our website o...

Page 2: ...re If your outlet does not accommodate the three wire plug have an electrician install the correct outlet or use an adapter to ground the appliance safely Do not defeat the safety purpose of the grounded plug Do not overload power strips and extension cords Overloading can result in fire or electric shock The wall socket shall be installed near the equipment and shall be easily accessible Only the...

Page 3: ...and supporting structure grounding of the lead in wire to an antenna discharge unit size of the grounding conductors location of antenna discharge unit connection to grounding electrodes and requirements of the grounding electrode Lightning Protection For added protection of the TV during a lightning storm or when it is left unattended or unused for long periods of time unplug the TV from the wall...

Page 4: ... tall we strongly advise that you have at least 2 people to unpack and install the HDTV The glass surface can easily be scratched or broken so please handle the product gently and never place the HDTV with the glass facing downwards on a surface without protective padding IMPORTANT Save the carton and packing material for future shipping Package Contents VIZIO VU42L FHDTV10A VIZIO Remote Control b...

Page 5: ...LCD HDTV for Wall Mounting for additional information Avoid installing the TV in places with high humidity dust or smoke so as not to shorten the service life of the electronic components Install the TV in landscape orientation any 90 clockwise or counter clockwise installation may induce poor ventilation and excessive component damage VIZIO offers professional installation services Please contact...

Page 6: ...42L FHDTV10A 2 Place the VU42L FHDTV10A face down on a soft and flat surface blanket foam cloth etc to prevent any damage to the TV 3 Remove the eight 8 screws holding the base to the VU42L FHDTV10A 4 Carefully remove the stand base 5 Now the VU42L FHDTV10A can fit securely to a mount sold separately by utilizing the mounting holes in the center of the back panel of the TV Please make sure to read...

Page 7: ...nt Video 24 2 4 3 Using S Video AV2 25 2 4 4 Using Composite AV Video 26 2 5 Connecting Your VCR or Video Camera 27 2 6 Connecting an external Receiver Amp 28 2 7 Connecting a PC Computer 29 2 7 1 Preset PC Resolutions 30 Chapter 3 Setting Up to Watch Television 31 3 1 Basic LCD HDTV Start Up 31 3 2 Watching a TV Program 34 3 3 Adjusting Basic LCD HDTV Settings 34 3 4 Program Information 35 Chapte...

Page 8: ...ntal Control 53 4 15 PC Input Picture Adjustment 53 4 15 1 Auto Adjust 53 4 15 2 Backlight 53 4 15 3 Brightness 54 4 15 4 Contrast 54 4 15 5 Color Temperature 55 4 15 6 H SIZE 55 4 15 7 H Position 55 4 15 8 V Position 55 4 15 9 Fine Tune 55 4 16 PC Input Audio Adjustment 56 4 17 PC Input Setup 56 4 18 Understanding Viewing Modes 57 4 18 1 Picture In Picture PIP Mode 58 4 18 2 Adjusting Basic PIP P...

Page 9: ...menu is active pressing this button will return to the previous menu level Channel Use these buttons to step up or down the TV channels While the OSD is active these buttons function as up and down controls in the OSD menus Volume Use these buttons to increase or decrease to the speaker volume While the OSD is active these buttons function as left and right controls in the OSD menus Input Enter Re...

Page 10: ... source for digital video such as a DVD multimedia player or set top box through this all digital connector The white color band on the rear of the TV indicates this connection Your VIZIO Certified HDMI cables are available for purchase from www vizio com or by calling 888 VIZIOCE 888 849 4623 4 HDMI 2 Connect the secondary source for digital video such as a DVD multimedia player or set top box th...

Page 11: ...lor band on the rear of the TV indicates this connection 8 AV2 In Connect the secondary source for composite video devices such as a VCR or video game Use the white and red connectors to connect the external audio from the same source The orange color band on the rear of the TV indicates this connection 9 DTV TV Connect to an antenna or digital cable out of the wall not from Cable Box for Digital ...

Page 12: ...ycle through the inputs ENTER This button works as a DASH button in the DTV mode When selecting a digital channel directly use this button for the separation of main and sub channels For example channel 28 2 would be selected by the button sequence 2 8 ENTER 2 CH or These buttons change the channels up or down LAST This button recalls the previously viewed channel MUTE This button turns the sound ...

Page 13: ...see Section 4 6 3 Closed Caption for DTV on page 44 For DTV the options are Off CC1 CC2 CC3 CC4 and Service1 For TV the options are Off CC1 CC2 CC3 and CC4 For AV the options are On and Off Additionally this button stops the CD DVD or VCR when the component is activated with the remote control TV Previous Chapter Pressing of this button will take the TV set to the DTV TV input Note this button has...

Page 14: ...elect the channels within the PIP screen when DTV TV is the PIP input selected AUDIO Press this button to switch the audio from the main screen to the sub screen while in PIP or POP mode PIP INPUT Press the button to choose the PIP input Note The TV must be in PIP POP mode for this button to be functional For additional information regarding the PIP POP options see section 4 18 1 Picture In Pictur...

Page 15: ...Remote Control Range Point the remote control at the remote control sensor to transmit the commands Do not place any obstacles between the remote control and the receiver window The effective range of the remote control is approximately 30 feet 10 meters from the front of the receiver window 30 to the left and right 20 up and down 1 5 3 VIZIO Universal Remote Control Precautions The remote control...

Page 16: ...ng antenna or cable Best analog Blue RGB PC VGA This video input has separate red green and blue color components The signal carries horizontal and vertical sync information on the green signal This is most commonly used for PC input Better analog Green and Purple Component 1 2 The video signal is separated into three signals one containing the black and white information and the other two contain...

Page 17: ...the remote or side of the LCD HDTV or directly by pressing the HDMI button on the Remote Control Note To maintain the display quality use a VIZIO certified HDMI cable that is 10 meters or less See www vizio com or call 1 888 VIZIOCE 1 888 849 4623 for details Note c The HDMI input on the LCD TV supports High bandwidth Digital Content Protection HDCP HDCP encrypts the transmission between the video...

Page 18: ...put white area at the rear of the LCD HDTV 4 Turn on the power to the LCD HDTV and HDTV Set Top Box 5 Select HDMI using the INPUT button on the remote or side of the LCD HDTV or directly by pressing the HDMI button on the Remote Control Note The HDMI Input is for HD Video and will only support 640x480 at 60Hz from a PC Use the RGB PC input for a greater selection of PC formats Note a The HDMI inpu...

Page 19: ...ent 1 group green color area row of connectors nearest to you when viewing from the rear of the TV at the rear of the LCD HDTV 5 Using an audio cable white and red connectors connect the cable to the audio output connectors associated with the Component output on your HDTV Set Top Box and connect the other end to the audio connectors associated with the Component 1 input green color area at the re...

Page 20: ... 4 Select DTV using the INPUT button on the remote or side of the LCD HDTV or directly by pressing the TV button on the Remote Control Note a Not all digital TV broadcasts are High Definition HD Refer to the program guides or consult your cable satellite or TV station operator b Digital broadcasts are not available in all areas Refer to www antennaweb org for detailed information c Make sure the a...

Page 21: ...directly by pressing the TV button on the Remote Control 2 3 3 Using the Antenna or Cable through your VCR 1 Turn off the power to the LCD HDTV and VCR 2 Connect the Output to TV RF Out or Antenna Out connector on the rear of your VCR to the DTV TV CABLE ANTENNA connector at the rear of the LCD HDTV 3 Turn on the power to the LCD HDTV and VCR 4 Select TV using the INPUT button on the remote or sid...

Page 22: ...Connect a HDMI cable to the HDMI output of your DVD player and the other end to the HDMI Input white color area at the rear of the LCD HDTV 3 Turn on the power to the LCD HDTV and your DVD player 4 Select HDMI using the INPUT button on the remote or side of the LCD HDTV or directly by pressing the HDMI button on the Remote Control Note To maintain the display quality use a VIZIO certified HDMI cab...

Page 23: ...ectors connect the cable to the audio output connectors associated with the DVI output on your DVD player and connect the other end to the audio connectors associated with the HDMI input white area at the rear of the LCD HDTV 4 Turn on the power to the LCD HDTV and your DVD player 5 Select HDMI using the INPUT button on the remote or side of the LCD HDTV or directly by pressing the HDMI button on ...

Page 24: ... in the Component 1 group green color area row of connectors nearest to you when viewing from the rear of the TV at the rear of the LCD HDTV 5 Using an audio cable white and red connectors connect the cable to the audio output connectors associated with the Component output on your DVD player and connect the other end to the audio connectors associated with the Component 1 input green color area a...

Page 25: ...d red connectors connect the cable to the audio output connectors associated with the S Video output on your DVD player and connect the other end to the audio connectors associated with the AV1 input on the left hand side of the LCD HDTV 4 Turn on the power to the LCD HDTV and DVD player 5 Select AV1 using the INPUT button on the remote or side of the LCD HDTV or directly by pressing the AV button...

Page 26: ... white color audio input connectors in the AV2 input orange color area row of connectors at the rear of the LCD HDTV 4 Turn on the power to the LCD HDTV and DVD Player 5 Select AV2 using the INPUT button on the remote or side of the LCD HDTV or directly by pressing the AV button on the Remote Control Note a If you are already using the AV2 input for another component or you do not want to use the ...

Page 27: ...nectors connect the cable to the audio output connectors associated with the S Video output on your VCR or Video Camera and connect the other end to the audio connectors associated with the AV1 input at the left hand side panel of the LCD HDTV 4 Turn on the power to the LCD HDTV and VCR or Video Camera 5 Select AV1 using the INPUT button on the remote or side of the LCD HDTV or directly by pressin...

Page 28: ...5 Press the on the remote control to select the Audio menu 6 Press the on the remote control to select SPEAKERS 7 Press the on the remote control to select OFF so that the sound from the LCD HDTV will now be routed through your Receiver Amp system Optical Output of Audio received with HD Programs If your sound system has a SPDIF optical digital audio input you can connect it to the optical DIGITAL...

Page 29: ...r to the LCD HDTV and PC Computer 5 Select RGB using the INPUT button on the remote or side of the LCD HDTV or directly by pressing the RGB button on the Remote Control Note a For the best picture quality when connecting a pc computer through RGB PC set your pc computer timing mode to VESA 1360x768 at 60Hz Please refer to the pc or graphic card s user guide for additional information on how to set...

Page 30: ...iming mode Please see the table below for the factory preset resolutions Resolution Refresh Hz H Freq kHz V Freq Hz H Sync V Sync Pixel Freq MHz 640x480 60 31 5 59 94 N N 25 175 640x480 75 37 5 75 00 N N 31 500 720x400 70 31 46 70 08 N P 28 320 800x600 60 37 9 60 317 P P 40 000 800x600 75 46 9 75 P P 49 500 800x600 85 53 7 85 06 P P 56 250 1024x768 60 48 4 60 01 N N 65 000 1024x768 75 60 0 75 03 P...

Page 31: ...rce for the LCD HDTV by pressing the INPUT button on the side of the TV or using the Input button on the remote control Pressing this button will cycle you through the following options TV AV1 AV2 Component 1 Component 2 RGB HDMI 1 and HDMI 2 5 Using DTV and TV with an Antenna or Cable If an antenna or cable source is connected to the DTV TV input you will need to select TV using the INPUT button ...

Page 32: ...te to go to the next screen c The Tuner screen will be displayed default choice is Antenna If you are using Cable press the button to highlight CABLE Press the button on the remote to go to the next screen d The Channel Scan screen will be displayed default choice is Scan Press the OK button on the remote control to commence the search for available channels to be stored into memory If you do not ...

Page 33: ...s Refer to www antennaweb org to get information about availability in your area type of antenna and in which direction to point your antenna The channel availability through cable depends upon which channels your cable operator supplies in Clear QAM consult your cable operator for more information f When finished the Complete screen will be displayed to informed that the HDTV has completed the In...

Page 34: ...d by a Component YPbPr cable select Component 1 or Component 2 directly by pressing the Component button on the remote or by pressing the INPUT button on the remote or on the side of the LCD HDTV 3 When using option 2a press the Channel buttons on the remote or the C C buttons on the side of the LCD HDTV to change the channel Note The Channel buttons on the side of the LCD and on the remote contro...

Page 35: ... channel the program list will update with the program schedule for the channel and the window will show the live program for that channel Press the GUIDE button to exit this feature Information on HDTV Status When you change TV channels or inputs or press the INFO button on the remote an Information Banner is displayed for a few seconds to tell you the status of the LCD HDTV TV Channel Number Aud...

Page 36: ... Press the MENU button on the remote control or the side of the TV and the Picture menu will be shown on the screen Press the or button on the remote control or the VOL or VOL button on the side of the TV to select one of the other menu options 2 Press the or button on the remote control or the VOL or VOL button on the side of the HDTV to select one of the other menu options Picture Audio TV Setup...

Page 37: ... Picture adjustment available for you is for the Backlight the rest are preset 4 2 2 Backlight Press the button to highlight the Backlight selection Press the button to start adjusting the brightness of the Backlight and the menu page will disappear and be replaced by a small Backlight Indicator Bar so you can see the light level between the minimum and maximum available levels Use the or button t...

Page 38: ...s the black levels in the picture If the brightness is too low you will not be able to see the detail in darker parts of the picture and if the brightness is too high the picture will look washed out 4 2 5 Color Press the button to highlight the Color selection Press the button to start adjusting the color and the menu page will disappear and be replaced by a small Color Indicator Bar so you can s...

Page 39: ...re Press the button to highlight the option for Color Temperature selection Press the or button if you want to choose the Custom Cool Normal or Warm option The default is Cool which has a 9300k value setting If you choose the Custom option then a new menu will be displayed showing the primary color items Red Green and Blue Press the button to highlight the color you wish to adjust Press the button...

Page 40: ...r Transient Intensity Press the button to highlight CTI Color Transient Intensity This feature can be used to reduce the time taken to transition from one color to another The effect will be seen as sharpening the border between colors Press the or button to choose from the Off Low Medium or Strong setting 4 3 5 Flesh Tone Press the button to highlight Flesh Tone In some cases activation of this f...

Page 41: ...n Press the button to start adjusting the bass and the menu page will disappear and be replaced by a small Bass Indicator Bar as before so you can see the bass level between the zero and maximum available levels Use the or button to adjust for bass boost or attenuation 4 4 3 Treble Press the button to highlight the Treble selection Press the button to start adjusting the treble and the menu page w...

Page 42: ... appears on the PICTURE menu page Press the button to display the TV page Press the button to highlight the Tuner Mode selection Press the button to choose Cable or Antenna depending upon which equipment you have attached to the DTV TV Input 4 5 2 Auto Search Press the button to highlight the Auto Search selection Press the button to Auto Search for TV channels available The TV will automatically ...

Page 43: ...one for your area will ensure that the correct program times are shown after pressing the GUIDE button on the remote control Press the button to highlight the Time Zone selection Press the button to select your area 4 5 6 Daylight Saving As for Time Zone setting the daylight saving time for your area will ensure that the correct program times are shown after pressing the GUIDE button on the remote...

Page 44: ...he default is English Press the button to select Français or Español 4 6 2 Sleep Timer Press the button to highlight the Sleep Timer selection Press the button to select the timer to turn off the TV in 30 60 90 or 120 minutes 4 6 3 Analog Closed Caption When watching regular analog NTSC TV the Analog CC feature is available in the Setup menu Press the button to highlight the Analog CC selection Pr...

Page 45: ...acity to the quality of display of the Closed Caption you desire The combinations are multiple that is the reason to have Broadcast selected as default 4 6 6 PIP Picture in Picture Picture in Picture is a feature which allows you to watch two different signal inputs It could be two different channels simultaneously when selected Press the button and highlight the option Press the button to activat...

Page 46: ...lect the desired option Press the or button to choose either H or V position Press the or button to make the desired adjustment on your display 4 6 8 Reset All Settings Press the button to highlight the Reset All Settings selection Press the button to reset the TV to the default factory settings Note This does NOT reset the Parental Control Password ...

Page 47: ...he PARENTAL menu page The Password must be entered before the TV will continue with Parental settings The default password set in the factory is 0 0 0 0 If you are going to use the Parental Control feature you should change the password Press the button to highlight the Channel Block selection Press the button and a table shows up displaying scanned channels numbers in sequence with a figure of a ...

Page 48: ...splayed In the Block TV Rating panel you can customize the program blocking of the following TV ratings Y All children Y7 Older children G General audience PG Guidance suggested 14 Strongly cautioned MA Mature audience You can also customize the TV ratings for the following content A Sexual dialog D Sexual dialog L Adult language S Sexual situations V Violence FV Fantasy violence Press the or butt...

Page 49: ...ontrol feature in your TV to have the most current parental control database for a digital signal This option may be available in the future for activation This option works as follows Whenever you decide to use the Parental Control feature and this option has been activated in your area the Check for New DTV Rating will be a solid color indicating that an update is available for the TV Rating or ...

Page 50: ...or turn off the blocking of programming that does not have a rating 4 7 6 Change the Password Press the button to highlight the Access Code Edit selection Press the button and the new Password panel will be displayed Enter the new 4 digit password using the number buttons on the remote Enter it a second time to confirm you entered it correctly Note Make sure you write down and store the new passwo...

Page 51: ...rental Control adjustments 4 9 HDMI Input Audio Adjustment The Audio Adjust menu operates in the same way for the HDMI Input as for the DTV TV input in section 4 4 The menu difference is that there is no icon along the top for DTV TV or Parental Control adjustments 4 10 HDMI Input Setup The Setup menu operates in the same way for the HDMI Input as for the DTV TV input in Section 4 2 The menu diffe...

Page 52: ...he top for DTV TV adjustments 4 12 Video Input Audio Adjustment The Audio Adjust menu operates in the same way for Video Inputs Component and AV as for the DTV TV input in section 4 4 The menu difference is that there is no icon along the top for DTV TV adjustments 4 13 Video Input Setup The Setup menu operates in the same way for Video Inputs Component and AV as for the DTV TV input in Section 4 ...

Page 53: ...on is pressed the On Screen Display OSD appears on the PICTURE adjustment page Press the button to highlight the Auto Adjust selection Press the button for the LCD HDTV to adjust to the PC signal timing automatically 4 15 2 Backlight Press the button to highlight the Backlight selection Press the button to start adjusting the brightness of the Backlight and the menu page will disappear and be repl...

Page 54: ...o low you will not be able to see the detail in darker parts of the picture and if the brightness is too high the picture will look washed out 4 15 4 Contrast Press the button to highlight the Contrast selection Press the button to start adjusting the contrast and the menu page will disappear and be replaced by a small Contrast Indicator Bar so you can see the contrast level between the minimum an...

Page 55: ...or Press the OK button when finished Repeat the procedure to adjust the other colors if desired 4 15 6 H SIZE Press the button to highlight the H Size selection Press the button to start adjusting the horizontal size of the picture Use the or button to adjust the horizontal size 4 15 7 H Position Press the button to highlight the Horizontal Shift selection Press the button to start adjusting the h...

Page 56: ... TV input in section 4 4 The menu difference is that there are no icons along the top for DTV TV and Parental Control adjustments 4 17 PC Input Setup The Setup menu operates in the same way for the PC Input as for the DTV TV input in Section 4 2Error Reference source not found 1 The menu difference is that there is no icon along the top for TV adjustments and no Closed Caption ...

Page 57: ... movie there will still be black bars at the top and bottom When watching a standard definition 4 3 aspect ratio 1 33 1 source the picture will fill the screen but will be stretched horizontally people will look fatter than they are Zoom Mode When watching a widescreen 1 78 1 1 85 1 or 2 35 1 source program or movie the display image is zoomed proportionally to fill the width of the screen The top...

Page 58: ... When HDMI is used for the Sub Screen it cannot support 1080i NOTE When in PIP POP mode 1080P is not available in the sub screen display The sub screen will display a message to that effect 4 18 2 Adjusting Basic PIP POP Settings The PIP channel is independent of the main TV channel To change the PIP channel press the PIP CH or button on the remote control Repeated pressing of the PIP button will ...

Page 59: ...HDTV10A Listed below are the steps for programming your VCR Cable Box and DVD Player 4 19 1 Programming for VCR 1 Manually turn on the VCR 2 Press the VCR button on the remote control 3 Press and hold the SET button until the LED LIGHT flashes twice 4 Find the programming code for your VCR in the code list in the back of this book and enter it using the Number Buttons If the code is accepted the L...

Page 60: ...button on the remote control 3 Press and hold the SET button until the LED LIGHT flashes twice 4 Find the programming code for your DVD player in the code list in the back of this book and enter it using the Number Buttons If the code is accepted the LED flashes twice after the last digit is entered If the LED does not flash twice repeat Steps 2 through 4 with the next code listed for the componen...

Page 61: ...tion on how to program the remote If your cable or satellite remote uses a 5 digit code like most Direct TV units first try 11758 and then if that does not work 10178 If your cable or satellite remote uses a 4 digit code try 1758 and then 0178 as an alternative If your cable or satellite remote uses a 3 digit code Echostar or Dish Network for example use code 627 Note Some buttons may not function...

Page 62: ... be set to SAP min or speakers off Press the Volume Up key on your remote control Make sure that headphones are not connected If the screen is black Check your input connections Power is ON but no screen image Make sure the video cable supplied with the TV is secured to the correct video output port on the back of the VCR and the TV Make any cable you have attached to the TV is secured to the corr...

Page 63: ...digital broadcast signal the signal is up converted increased to match your TV s display capabilities Up converting can cause noise or trash You switch to a different input and the volume changes The TV remembers the volume level from the last time you adjusted it If the sound level is higher or lower from another source then the loudness will change You switch to a different input and the screen ...

Page 64: ...ccordance with the instructions may cause harmful interference to radio communications However there is no guarantee that interference will not occur in a particular installation If this equipment does cause harmful interference to radio or television reception which can be determined by turning the equipment off and on the user is encouraged to try to correct the interference by one or more of th...

Page 65: ... V Chip 3D Comb Filter Zoom Freeze Motion Adaptive De Interlace Picture Enhancement MPEG 2 Decoding via DTV input NTSC Video decoding via Video AV S Video or Component Progressive Scan Video via HDMI Component or RGB HDTV via HDMI Component or RGB Set Top Box required Computer 640x480 800x600 1024x768 1280x1024 1360x768 via RGB or 1920x1080 via HDMI Sound Enhancement Speakers Built in 2x 10W Left ...

Page 66: ...ines 720P or 1080 interlaced lines 1080i and Dolby digital surround sound HDTV provides 900 000 2 1 million pixels Integrated HDTV An HDTV that has the digital tuner built into the set It does not need a separate set top box to receive over the air DTV signals Interlace Scan A way to scan vertical lines onto a TV picture by scanning all the odd lines first then filling the in the even lines this h...

Page 67: ...Bass 41 Simulated Surround Sound 42 Speakers On Off 42 Treble 41 Volume 41 DTV Picture Adjust Advanced Picture Adjustments 40 Backlight 37 53 Brightness 38 54 Color 38 Color Temperature 39 55 Contrast 38 54 Picture Mode 37 Sharpness 39 Tint 38 DTV Special Features Closed Caption 43 45 Closed Caption Style 43 45 Language 42 Reset 46 Sleep Timer 44 DTV Tuner Setup Auto Search 44 DVI Connecting your ...

Page 68: ... PC 29 S S Video Connecting your DVD Player 25 26 T Technical Specifications 65 Troubleshooting Guide 62 TV Audio Adjustment 41 Parental Control 47 Picture Adjustment 37 Special Features 44 TV Audio Adjust Balance 41 Bass 41 Simulated Surround Sound 42 Speakers On Off 42 Treble 41 Volume 41 TV Picture Adjust Advanced Picture Adjustments 40 Backlight 37 53 Brightness 38 54 Color 38 Color Temperatur...

Page 69: ...35 20240 General 20045 Go Video 20432 GoldStar 20037 20209 20038 20225 Haojie 20240 Harman Kardon 20081 20038 Harwood 20072 Hewlett Packard 21972 HI Q 20047 Hitachi 20037 20042 20055 Howard Computers 21972 HP 21972 Hughes Network Systems 20042 20739 iBUYPOWER 21972 JVC 20045 20067 KEC 20037 20278 Kenwood 20067 20038 KLH 20072 Kodak 20035 20037 Kolin 20043 LG 20037 20045 20042 20209 20038 Logik 200...

Page 70: ...ouch 21972 Unitech 20240 Vector 20045 Vector Research 20038 Victor 20067 Video Concepts 20045 Videomagic 20037 Videosonic 20240 Viewsonic 21972 Wards 20060 20035 20048 20047 20081 20240 20042 20072 White Westinghouse 20209 20072 XR 1000 20035 20072 Yamaha 20038 Zenith 20039 20033 20209 20479 ZT Group 21972 Setup Code for Cable Converters ABC 00003 00008 00014 Americast 00899 Bell Howell 00014 Bell...

Page 71: ...9 00724 01076 00722 00099 01442 Proscan 00392 00566 Proton 01535 RadioShack 00869 RCA 00392 00566 00855 00143 01392 Samsung 01276 01109 01108 Sanyo 01219 SKY 00856 Sony 00639 01640 Star Choice 00869 Tivo 01142 01442 Toshiba 00749 01749 00790 01285 UltimateTV 01640 01392 Uniden 00724 00722 US Digital 01535 USDTV 01535 Voom 00869 Zenith 00856 01856 Setup Code for DVD Players Aiwa 20641 21912 Akai 20...

Page 72: ...123 20124 Urban Concepts 20503 Xbox 20522 Yamaha 20490 20539 20545 Zenith 20503 20591 20869 Setup Code for CD Players Aiwa 30157 Burmester 30420 California Audio Labs 30029 Carver 30157 30179 Denon 30873 DKK 30000 DMX Electronics 30157 Dynamic Bass 30179 Fisher 30179 Garrard 30420 Genexxa 30032 Harman Kardon 30157 30173 Hitachi 30032 Integra 30101 JVC 30072 Kenwood 30826 30626 30028 30037 30036 30...

Page 73: ...30014 30630 30531 Proscan 31254 Qisheng 31609 Quasar 30039 RadioShack 31263 RCA 31023 31609 31254 30531 31074 Sharper Image 31263 Silsonic 30176 Sony 31058 31441 31258 31759 Soundesign 30670 Stereophonics 31023 Sunfire 31313 Teac 31074 31267 Technics 31308 31518 30039 Thorens 31189 Victor 30074 Wards 30014 Yamaha 30176 31276 31176 Setup Code for TV s Addison 10092 Admiral 10093 10463 Setup Code fo...

Page 74: ...78 Hankook 10180 10030 10178 Harley Davidson 11904 Harman Kardon 10054 Harvard 10180 Havermy 10093 Helios 10865 Hello Kitty 10451 Hisense 10156 10748 10145 11156 Hitachi 10156 10030 10178 11145 10145 10092 11904 11156 Hongmei 10093 Huafa 10145 Huari 10145 Huodateji 10051 Imperial Crown 10661 Infinity 10054 Inteq 10017 JBL 10054 JCB 10000 Jean 10156 10051 10236 10092 Jensen 10761 Jiahua 10051 Jinfe...

Page 75: ...o 10017 10030 Sampo 10154 10093 10030 10178 10171 10700 10650 11755 10092 Samsung 10154 10156 10060 10812 10702 10030 10178 11060 10814 10092 11903 10090 10766 Sansui 10463 11904 11935 11929 11911 Sanyo 10154 10156 10180 10145 11907 Sanyuan 10093 Scotch 10178 Scott 10236 10180 10178 Sears 10047 10054 10154 10156 10178 10171 11926 11904 Shaofeng 10145 Sharp 10093 10030 10650 11917 Shen Ying 10092 S...

Page 76: ...64 Vector Research 10030 Victor 10250 10053 10650 Vidikron 10054 Setup Code for TV s Vidtech 10178 Viewsonic 11755 10885 10864 Wards 10054 10030 10178 10866 11156 Warumaia 10661 Waycon 10156 Setup Code for TV s White Westinghouse 10463 11909 10623 Yamaha 10030 Yapshe 10250 Zenith 10017 10463 10178 11904 11929 11911 11909 10092 ...

Reviews: