background image

VIZIO VO47L FHDTV10A User Manual 

Version 11/7/2007 

49 


www.VIZIO.com


4.7.5

4.7.5

4.7.5

4.7.5


Blocked Unrated Programming

Blocked Unrated Programming

Blocked Unrated Programming

Blocked Unrated Programming    

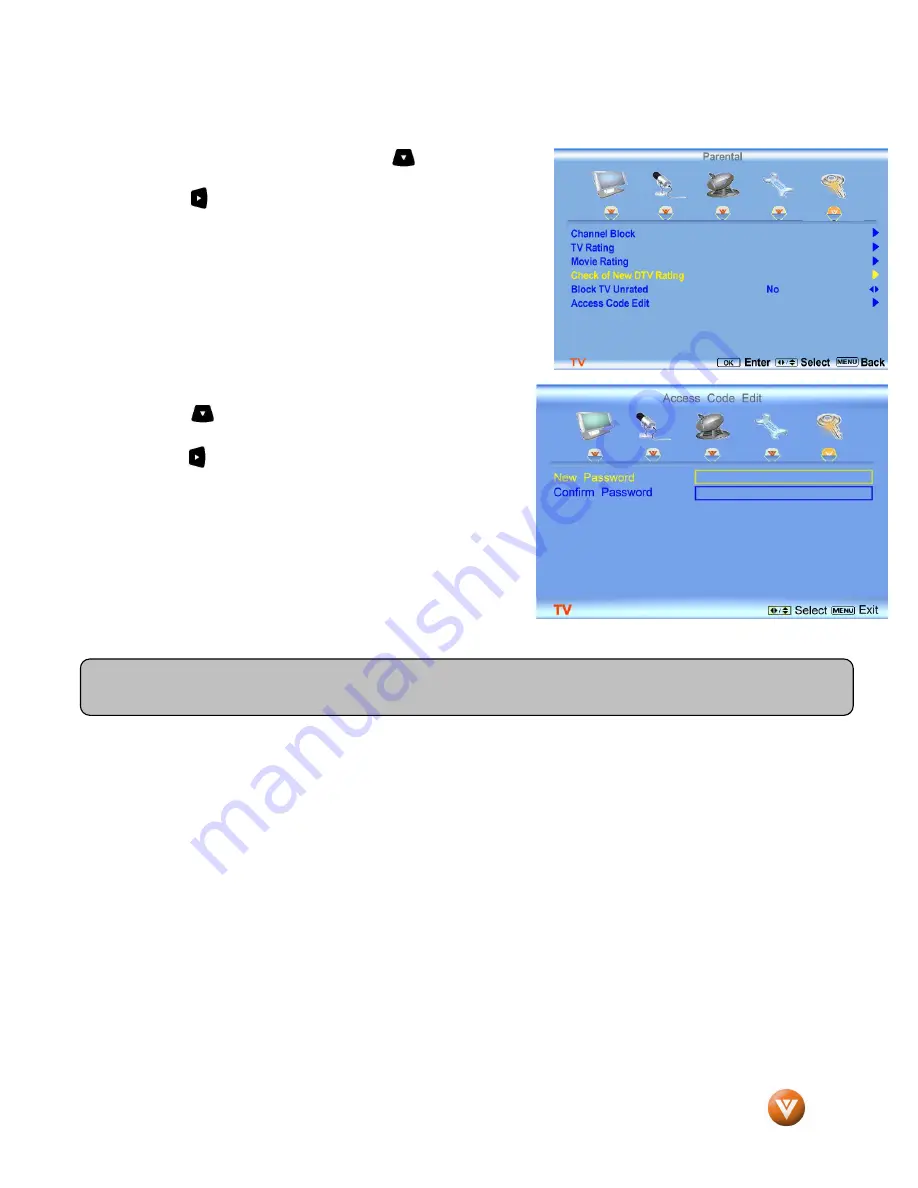
Follow the procedure in the previous section 4.7.1 to display the 
Parental Control menu and then press the       button to highlight 
the Block Unrated TV selection. 
Press  the          button  to  turn-on  or  turn-off  the  blocking  of 
programming that does not have a rating. 


4.7.6

4.7.6

4.7.6

4.7.6


C

C

C

Change the Password 

hange the Password 

hange the Password 

hange the Password     

Press  the            button  to  highlight  the  Access  Code  Edit 
selection. 
Press  the          button  and  the  new  Password  panel  will  be 
displayed. 
Enter the new, 4-digit password using the number buttons on 
the  remote.    Enter  it  a  second  time  to  confirm  you  entered  it 
correctly. 


Note: Make sure you write down and store the new password in a secure place.  The Reset All Settings feature 
(see page 45) does NOT reset the password. 

Summary of Contents for VO47LF - 47" LCD TV

Page 1: ...call toll free at 888 VIZIOCE 888 849 4623 We recommend you register your VIZIO VO47L FHDTV10A either at our website www vizio com or fill in your registration card and mail it in For peace of mind a...

Page 2: ...re If your outlet does not accommodate the three wire plug have an electrician install the correct outlet or use an adapter to ground the appliance safely Do not defeat the safety purpose of the groun...

Page 3: ...cle 810 of the National Electrical Code ANSI NFPSA 70 provides information with regard to proper grounding of the mast and supporting structure grounding of the lead in wire to an antenna discharge un...

Page 4: ...30 tall we strongly advise that you have at least 2 people to unpack and install the HDTV The glass surface can easily be scratched or broken so please handle the product gently and never place the HD...

Page 5: ...tween the back of the TV and the wall If you would like to mount your TV on the wall please see below Preparing Your LCD HDTV for Wall Mounting for additional information Avoid installing the TV in pl...

Page 6: ...down on a soft and flat surface blanket foam cloth etc to prevent any damage to the TV 3 Remove the four 4 screws holding the base to the VO47L FHDTV10A 4 Carefully remove the stand base Now the VO47...

Page 7: ...sing Composite AV Video 26 2 5 Connecting Your VCR or Video Camera 27 2 6 Connecting an external Receiver Amp 28 2 6 1 Optical Output of Audio received with HD Program 28 2 7 Connecting a PC Computer...

Page 8: ...15 2 Backlight 52 4 15 3 Brightness 53 4 15 4 Contrast 53 4 15 5 Color Temperature 54 4 15 6 H SIZE 54 4 15 7 H Position 54 4 15 8 V Position 54 4 15 9 Fine Tune 55 4 16 PC Input Audio Adjustment 55...

Page 9: ...g the button once Press the button again to the VO47L FHDTV10A off Menu This button activates the On Screen Display OSD If a sub menu is active pressing this button will return to the previous menu le...

Page 10: ...a DVI HDMI cable and connect the Analog Audio output of the device to the L R AUDIO here Your VIZIO Certified HDMI and HDMI DVI cables are available for purchase from www VIZIO com or by calling 888...

Page 11: ...13 ANALOG AUDIO OUT Connect the audio from the LCD HDTV to an external device such as a home theatre system external amplifier or stereo Speakers can not be connected directly to here The white color...

Page 12: ...programmed DVD player This button selects a programmed Audio Receiver Amp Home Theatre System This button selects a programmed cable TV set top box or a satellite TV set top box This button has been p...

Page 13: ...activated by pressing the MENU button Use the OK button to select your chosen option in On Screen Display OSD menus GUIDE This button displays program information Note this button is only functional...

Page 14: ...d pressing of this button will switch between Component 1 and Component 2 inputs Repeated pressing of this button will switch between HDMI 1 HDMI 2 HDMI 3 and HDMI 4 inputs This button cycles through...

Page 15: ...mote Control Range Remote Control Range Remote Control Range Point the remote control at the remote control sensor to transmit the commands Do not place any obstacles between the remote control and th...

Page 16: ...this input takes advantage of the High Definition content TV Coaxial RF This is the connection for standard NTSC TV using antenna or cable Best analog Blue RGB PC VGA This video input has separate red...

Page 17: ...Input white color area at the rear of the LCD HDTV 3 Turn on the power to the LCD HDTV and HDTV Set Top Box 4 Select HDMI using the INPUT button on the remote or side of the LCD HDTV or directly by pr...

Page 18: ...he LCD HDTV 4 Turn on the power to the LCD HDTV and HDTV Set Top Box 5 Select HDMI using the INPUT button on the remote or side of the LCD HDTV or directly by pressing the HDMI button on the Remote Co...

Page 19: ...the PrCr red color connector on your HDTV Set Top Box to the corresponding Pr Cr red color connector in the Component 1 group green color area row of connectors nearest to you when viewing from the r...

Page 20: ...ital cable to the DTV TV CABLE ANTENNA connector at the rear of the LCD HDTV 3 Turn on the power to the LCD HDTV 4 Select DTV using the INPUT button on the remote or side of the LCD HDTV or directly b...

Page 21: ...ssing the TV button on the Remote Control 2 3 3 2 3 3 2 3 3 2 3 3 Using the Antenna or Cable through your VCR Using the Antenna or Cable through your VCR Using the Antenna or Cable through your VCR Us...

Page 22: ...DVD Player Best your DVD Player Best your DVD Player Best 1 Turn off the power to the LCD HDTV and DVD player 2 Connect a HDMI cable to the HDMI output of your DVD player and the other end to the HDMI...

Page 23: ...other end to the audio connectors associated with the HDMI input white area at the rear of the LCD HDTV 4 Turn on the power to the LCD HDTV and your DVD player 5 Select HDMI4 using the INPUT button on...

Page 24: ...ct the PrCr red color connector on your DVD player to the corresponding PrCr red color connector in the Component 1 group green color area row of connectors nearest to you when viewing from the rear o...

Page 25: ...e S Video jack in the AV2 at the rear of the LCD HDTV 3 Using an audio cable white and red connectors connect the cable to the audio output connectors associated with the S Video output on your DVD pl...

Page 26: ...ideo yellow color connector in the AV1 input row yellow color area of connectors at the rear of the LCD HDTV 3 Connect the R red color and L white color audio connectors on your DVD player to the corr...

Page 27: ...k of the LCD HDTV 3 Using an audio cable white and red connectors connect the cable to the audio output connectors associated with the S Video output on your VCR or Video Camera and connect the other...

Page 28: ...control to select the Audio menu 6 Press the on the remote control to select SPEAKERS 7 Press the on the remote control to select OFF so that the sound from the LCD HDTV will now be routed through you...

Page 29: ...V and PC Computer 5 Select RGB using the INPUT button on the remote or side of the LCD HDTV Note a For a better picture quality when connecting a pc computer through RGB PC set your pc computer timing...

Page 30: ...N N 65 1024x768 70 56 5 70 07 N N 75 1024x768 75 60 0 75 03 P P 78 75 1360x768 60 47 7 60 00 P N 85 5 1920x1080 60 66 65 60 00 P P 136 5 NOTES N Negative P Positive In DOS Mode only Primary Mode Plea...

Page 31: ...or press the Power ON Red button on the remote control 4 Select Input Source Select the Input Source for the LCD HDTV by pressing the INPUT button on the side of the TV or using the Input button on th...

Page 32: ...to go to the next screen c The Tuner screen will be displayed default choice is Antenna If you are using Cable press the button to highlight CABLE Press the button on the remote to go to the next scr...

Page 33: ...Refer to www antennaweb org to get information about availability in your area type of antenna and in which direction to point your antenna The channel availability through cable depends upon which c...

Page 34: ...bPr cable select Component 1 or Component 2 directly by pressing the Component button on the remote or by pressing the INPUT button on the remote or on the side of the LCD HDTV 3 When using option 2a...

Page 35: ...channels Each time you pause at a channel the program list will update with the program schedule for the channel and the window will show the live program for that channel Press the GUIDE button to e...

Page 36: ...e Note Some of the main menu options may have additional submenus i e the TV Rating submenu for Parental 1 Press the MENU button on the remote control or the side of the TV and the Picture menu will b...

Page 37: ...or Game If Standard Movie or Game is chosen for the Picture Mode you will still be able to adjust the settings 4 2 2 4 2 2 4 2 2 4 2 2 Backlight Backlight Backlight Backlight Press the button to high...

Page 38: ...tness adjusts the black levels in the picture If the brightness is too low you will not be able to see the detail in darker parts of the picture and if the brightness is too high the picture will look...

Page 39: ...erature Color Temperature Color Temperature Color Temperature Press the button to highlight the option for Color Temperature selection Press the or button if you want to choose the Custom Cool Normal...

Page 40: ...nt Intensity Color Transient Intensity Color Transient Intensity Color Transient Intensity Press the button to highlight CTI Color Transient Intensity This feature can be used to reduce the time taken...

Page 41: ...ess the button to highlight the Bass selection Press the button to start adjusting the bass and the menu page will disappear and be replaced by a small Bass Indicator Bar as before so you can see the...

Page 42: ...MENU button is pressed the On Screen Display OSD appears on the PICTURE menu page Press the button to display the TV page Press the button to highlight the Tuner Mode selection Press the button to cho...

Page 43: ...tting the correct Time Zone for your area will ensure that the correct program times are shown after pressing the GUIDE button on the remote control Press the button to highlight the Time Zone selecti...

Page 44: ...lect Off CC1 CC2 CC3 or CC4 Note Closed Caption for regular TV is usually CC1 or CC2 4 6 4 4 6 4 4 6 4 4 6 4 Digital Closed Caption Digital Closed Caption Digital Closed Caption Digital Closed Caption...

Page 45: ...e size of the little box to watch the second signal and Position Where you want to place the little box with the second signal If POP Regularly called Picture by Picture is selected you will only have...

Page 46: ...On Screen Display OSD shows the PICTURE menu page Press the button to display the PARENTAL menu page The Password must be entered before the TV will continue with Parental settings The default passwo...

Page 47: ...ting panel will be displayed In the Block TV Rating panel you can customize the program blocking of the following TV ratings Y All children Y7 Older children G General audience PG Guidance suggested 1...

Page 48: ...viewed in your local or regional area It will allow the parental guidance control feature in your TV to have the most current parental control database for a digital signal This option may be availabl...

Page 49: ...turn on or turn off the blocking of programming that does not have a rating 4 7 6 4 7 6 4 7 6 4 7 6 C C C Change the Password hange the Password hange the Password hange the Password Press the button...

Page 50: ...4 9 4 9 4 9 HDMI Input Audio Adjustment HDMI Input Audio Adjustment HDMI Input Audio Adjustment HDMI Input Audio Adjustment The Audio Adjust menu operates in the same way for the HDMI Input as for th...

Page 51: ...4 12 4 12 4 12 4 12 Video Input Audio Adjustment Video Input Audio Adjustment Video Input Audio Adjustment Video Input Audio Adjustment The Audio Adjust menu operates in the same way for Video Inputs...

Page 52: ...erature 4 15 1 4 15 1 4 15 1 4 15 1 Auto Adjust Auto Adjust Auto Adjust Auto Adjust When the MENU button is pressed the On Screen Display OSD appears on the PICTURE adjustment page Press the button to...

Page 53: ...oo low you will not be able to see the detail in darker parts of the picture and if the brightness is too high the picture will look washed out 4 15 4 4 15 4 4 15 4 4 15 4 Contrast Contrast Contrast C...

Page 54: ...s before Use the or button to adjust the color Press the OK button when finished Repeat the procedure to adjust the other colors if desired 4 15 6 4 15 6 4 15 6 4 15 6 H H H H SIZE SIZE SIZE SIZE Pres...

Page 55: ...djustment PC Input Audio Adjustment PC Input Audio Adjustment The Audio Adjust menu operates in the same way for the PC Input as for the DTV TV input in section 4 4 The menu difference is that there a...

Page 56: ...a widescreen 1 85 1 or 2 35 1 source program or movie there will still be black bars at the top and bottom When watching a standard definition 4 3 aspect ratio 1 33 1 source the picture will fill the...

Page 57: ...is turned on you can display two pictures at one time One picture is displayed as the full screen main screen and the other picture is displayed in a small window sub screen The sub screen can be set...

Page 58: ...channel by pressing the CH or CH button Repeated pressing of the PIP button will turn on turn off the PIP mode Press the PIP SIZE button to alternate between Small Medium and Large PIP sizes Repeated...

Page 59: ...for Cable Set Programming for Cable Set Programming for Cable Set Programming for Cable Set Top Box Top Box Top Box Top Box 1 Manually turn on the Cable Box 2 Press the CBL button on the remote contr...

Page 60: ...n the remote control 3 Press and hold the SET button until the LED flashes twice 4 Press 9 9 1 The LED flashes twice 5 Point the remote control at the component and then alternate between pressing the...

Page 61: ...een Cleaning the Screen Cleaning the Screen Cleaning the Screen 1 Use the VIZIO soft cotton cloth included to gently clean the screen 2 The screen glass is very fragile Do not scrape it with any sharp...

Page 62: ...You see a distorted picture or hear unusual sound You may be getting interference from electrical appliances cars motorcycles or fluorescent lights If you have not mounted it on the wall try moving y...

Page 63: ...le among the available options 5 3 5 3 5 3 5 3 Telephone Technical Support Telephone Technical Support Telephone Technical Support Telephone Technical Support Products are often returned due to a tech...

Page 64: ...terference to radio communications However there is no guarantee that interference will not occur in a particular installation If this equipment does cause harmful interference to radio or television...

Page 65: ...put only SPDIF Optical 1x Stereo Audio RCA Features FULL HD PIP POP Noise Reduction CC V Chip 3D Comb Filter Zoom Freeze Motion Adaptive De Interlace Picture Enhancement MPEG 2 Decoding via DTV input...

Page 66: ...display with at least 720 progressively scanned lines 720P or 1080 interlaced lines 1080i and Dolby digital surround sound HDTV provides 900 000 2 1 million pixels Integrated HDTV An HDTV that has th...

Page 67: ...e 41 Bass 41 Simulated Surround Sound 42 Speakers On Off 42 Treble 41 Volume 41 DTV Picture Adjust Advanced Picture Adjustments 40 Backlight 37 52 Brightness 38 52 Color 38 Color Temperature 39 54 Con...

Page 68: ...our DVD Player 25 26 T Technical Specifications 65 Troubleshooting Guide 61 TV Audio Adjustment 41 Parental Control 46 Picture Adjustment 37 Special Features 44 TV Audio Adjust Balance 41 Bass 41 Simu...

Page 69: ...0045 20121 20043 20209 20002 20278 20479 10236 11928 11929 Fisher 20047 20104 Fuji 20035 20033 Fujitsu 20045 Gateway 21972 GE 20060 20035 20240 General 20045 Go Video 20432 GoldStar 20037 20209 20038...

Page 70: ...a 20045 20042 20067 20043 21503 21008 21972 Totevision 20037 20240 Touch 21972 Unitech 20240 Vector 20045 Vector Research 20038 Victor 20067 Video Concepts 20045 Videomagic 20037 Videosonic 20240 View...

Page 71: ...nasonic 00247 00701 Paysat 00724 Philips 01142 00749 01749 00724 01076 00722 00099 01442 Proscan 00392 00566 Proton 01535 RadioShack 00869 RCA 00392 00566 00855 00143 01392 Samsung 01276 01109 01108 S...

Page 72: ...90 Theta Digital 20571 Toshiba 20503 20695 V Inc 20123 20124 Urban Concepts 20503 Xbox 20522 Yamaha 20490 20539 20545 Zenith 20503 20591 20869 Setup Code for CD Players Aiwa 30157 Burmester 30420 Cali...

Page 73: ...1518 30039 Philips 31189 31269 Pioneer 31023 30150 30014 30630 30531 Proscan 31254 Qisheng 31609 Quasar 30039 RadioShack 31263 RCA 31023 31609 31254 30531 31074 Sharper Image 31263 Silsonic 30176 Sony...

Page 74: ...Haier 11034 Hallmark 10178 Hankook 10180 10030 10178 Harley Davidson 11904 Harman Kardon 10054 Harvard 10180 Havermy 10093 Helios 10865 Hello Kitty 10451 Hisense 10156 10748 10145 11156 Hitachi 10156...

Page 75: ...Rowa 10748 Runco 10017 10030 Sampo 10154 10093 10030 10178 10171 10700 10650 11755 10092 Samsung 10154 10156 10060 10812 10702 10030 10178 11060 10814 10092 11903 10090 10766 Sansui 10463 11904 11935...

Page 76: ...885 10864 Vector Research 10030 Victor 10250 10053 10650 Vidikron 10054 Setup Code for TV s Vidtech 10178 Viewsonic 11755 10885 10864 Wards 10054 10030 10178 10866 11156 Warumaia 10661 Waycon 10156 Wh...

Reviews: