Vizio VO32L HDTV10A User Manual Download Page 25

VIZIO VO32L HDTV10A User Manual 

Version 4/1/2008 

31 


www.VIZIO.com


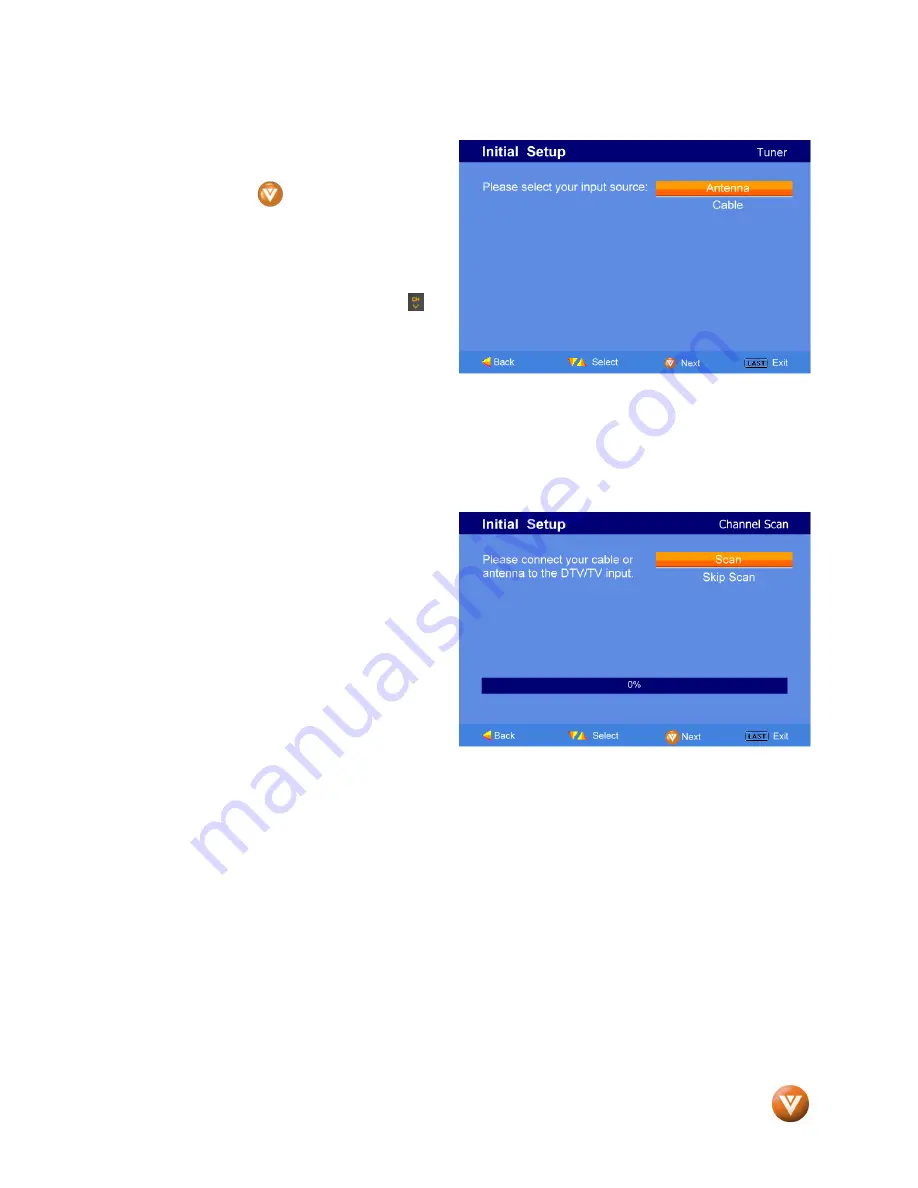
b.  The Channel Scan screen will be 

displayed; default choice is Scan.  

 
Press the         button on the remote 
control to commence the search for 
available channels to be stored into 
memory. 
 
If you do not want to scan for 
channels at this time, press the   


button on the remote to highlight Skip 
Scan and then press the     button. 


Note: 

If you select Skip Scan, next time that you decide to complete this procedure; you will need to 

select the TV as input (through the Input key) and then go through the Menu option to select the Tuner 
setup to get the option of scanning the channels 
again. 
  

Summary of Contents for VO32L HDTV10A

Page 1: ...I Input 21 2 5 2 Using Component Video 23 2 5 3 Using S Video AV1 S VIDEO 24 2 5 4 Using Composite AV Video Input 24 2 6 Connecting Your VCR or Video Camera 25 2 7 Connecting an external Receiver Amp...

Page 2: ...ent 62 4 10 Video Input Audio Adjustment 62 4 11 Video Input Setup 62 4 12 Video Input Parental Control 64 4 13 PC Input Picture Adjustment 64 4 13 1 Auto Adjust 64 4 13 2 Backlight 64 4 13 3 Brightne...

Page 3: ...ton once Press the button again to turn the VO32L HDTV10A off MENU This button activates the On Screen Display OSD If a sub menu is active pressing this button will return to the previous menu level C...

Page 4: ...YPb CbPr Cr with Audio L R Connect the source for component video devices such as a DVD Player or set top box here From left to right use white for left audio and red for right audio inputs green for...

Page 5: ...e side of the TV indicates this connection Note The red and white audio connectors are shared between AV2 and COMPONENT2 3 COMPONENT2 YPb CbPr Cr with Audio L R Connect the source for component video...

Page 6: ...ous menu screen or out to your program when you press it repeatedly AV Press this button to select AV either Composite or S Video input MENU Use this button for the On Screen Display OSD menu When it...

Page 7: ...the input sources in the following sequence TV AV1 S VIDEO AV2 Component 1 Component 2 RGB HDMI 1 HDMI 2 and HDMI 3 Once you have stepped through the entire sequence you will return to the beginning...

Page 8: ...ote Control Range Remote Control Range Remote Control Range Point the remote control at the remote control sensor to transmit the commands Do not place any obstacles between the remote control and the...

Page 9: ...is input takes advantage of the High Definition content TV Coaxial RF This is the connection for standard NTSC TV using antenna or cable Best analog Blue RGB PC VGA This video input has separate red g...

Page 10: ...the Antenna or Cable through your VCR Using the Antenna or Cable through your VCR Using the Antenna or Cable through your VCR 1 Turn off the power to the HDTV and VCR 2 Connect the Output to TV RF Out...

Page 11: ...DMI cable to the HDMI output of your HDTV Set Top Box and the other end to the HDMI Input white color area at the rear of the HDTV 3 Turn on the power to the HDTV and HDTV Set Top Box 4 Select HDMI us...

Page 12: ...h the DVI output on your HDTV Set Top Box and connect the other end to the audio connectors associated with the HDMI input white area at the rear of the HDTV 4 Turn on the power to the HDTV and HDTV S...

Page 13: ...connector on your HDTV Set Top Box to the corresponding Pr red color connector in the Component1 input green color area row of connectors nearest to you when viewing from the rear of the TV at the re...

Page 14: ...ut on your Set Top Box and connect the other end to the audio connectors associated with the AV1 input yellow color area at the rear of the HDTV 4 Turn on the power to the HDTV and Set Top Box 5 Selec...

Page 15: ...terface should be connected to the HDMI input of the VIZIO VO32L HDTV10A for optimal results Connecting Connecting Connecting Connecting your DVD Player Best your DVD Player Best your DVD Player Best...

Page 16: ...he HDTV 3 Connect an audio cable white and red connectors to the audio output connectors associated with the DVI output of the DVD player and connect the other end to the audio connectors by the HDMI...

Page 17: ...Pr red color connector on your DVD player to the corresponding Pr red color connector in the Component1 input green color area row of connectors nearest to you when viewing from the rear of the TV at...

Page 18: ...5 4 2 5 4 2 5 4 2 5 4 Using Composite AV Video Input Using Composite AV Video Input Using Composite AV Video Input Using Composite AV Video Input Connecting Connecting Connecting Connecting y y y your...

Page 19: ...rear of the HDTV 3 Connect an audio cable white and red connectors cable to the audio output connectors associated with the S Video output on your VCR or Video Camera and connect the other end to the...

Page 20: ...e to the audio input connectors on the Receiver Amp and connect the other end to the ANALOG OUT white area audio connectors at the rear of the LCD HDTV 3 Turn on the power to the LCD HDTV and Receiver...

Page 21: ...L OUT white area audio connectors at the rear of the LCD HDTV 3 Turn on the power to the LCD HDTV and Receiver Amp 4 Then press the button on the remote control to open the On Screen Display OSD menu...

Page 22: ...dio Out on your pc computer to the RGB PC Audio input blue area at the rear of the HDTV 4 Turn on the HDTV and PC Computer 5 Select RGB using the INPUT button on the remote or side of the HDTV Note a...

Page 23: ...mode Please see the table below for the factory preset resolutions Refresh Rate Resolution Hz Horizontal Frequency KHz Vertical Frequency Hz Horizontal Sync Polarity TTL Vertical Sync Polarity TTL Pi...

Page 24: ...e of the HDTV or press the Power ON Orange button on the remote control 4 Initial Setup After powering on the TV set the Initial Setup screen will come up please press the button on the remote control...

Page 25: ...ls to be stored into memory If you do not want to scan for channels at this time press the button on the remote to highlight Skip Scan and then press the button Note If you select Skip Scan next time...

Page 26: ...ble operator for more information d When finished the Complete screen will be displayed to inform you that the HDTV has completed the Initial Setup Press the button on the remote control to exit and b...

Page 27: ...eiver please refer to Owner or User s Manual of such equipment for details Note The TV set will be displaying any television station or program selected by the Cable Box VCR External Tuner or Satellit...

Page 28: ...wing to ensure that the correct program times are shown when pressing the Guide key Press the Menu key this will bring up the picture mode menu Press either or button scroll across to the icon showing...

Page 29: ...side of the HDTV b If you are watching broadcasts through a cable or satellite set top box connected by an HDMI cable select HDMI directly by pressing the HDMI button on the remote or by pressing the...

Page 30: ...H button on the side of the HDTV or remote control once for the next or previous channel or hold it depressed until the desired channel is reached Note Channel up and down will only operate in DTV and...

Page 31: ...ist will update with the program schedule for the channel and the window will show the live program for that channel Press the GUIDE button to exit this feature 3 5 3 5 3 5 3 5 Information on HDTV Sta...

Page 32: ...up and TV Tuner Setup The main menu options may very depending on your selected input source Note Some of the main menu options may have additional submenus i e the TV Rating submenu for Parental Cont...

Page 33: ...ents are completed press the LAST button repeatedly to exit the OSD completely 4 2 2 4 2 2 4 2 2 4 2 2 Backlight Backlight Backlight Backlight Press the button to highlight the Backlight selection Pre...

Page 34: ...u can see the contrast level between the minimum and maximum available levels Use the or button to adjust the level The Contrast adjusts the white levels in the picture If the contrast is too low the...

Page 35: ...adjustments are completed press the LAST button repeatedly to exit the OSD completely 4 2 8 4 2 8 4 2 8 4 2 8 Advanced Video Features Advanced Video Features Advanced Video Features Advanced Video Fe...

Page 36: ...more vivid or intense quality Press the or button to turn this feature On or Off Note Backlight setting would be disabled if this option is set to On Once the adjustments are completed press the LAST...

Page 37: ...t Picture Mode Reset Picture Mode Press the button to highlight the option for Reset Picture Mode selection Press button to return on Picture settings to factory default Once the adjustments are compl...

Page 38: ...lable for you to set them to your preferred settings Once the adjustments are completed press the LAST button repeatedly to exit the OSD completely 4 3 2 4 3 2 4 3 2 4 3 2 Equalizer Equalizer Equalize...

Page 39: ...ght the Digital Audio Out selection Press the or button to make the proper selection The options are OFF Dolby Digital and PCM Once the adjustments are completed press the LAST button repeatedly to ex...

Page 40: ...ey to bring up the OSD Using either the or button scroll across to the microphone icon the Audio menu will be displayed Press either or button to scroll either up or down to Lip Sync Press either or b...

Page 41: ...button is pressed the On Screen Display OSD appears on the PICTURE adjustment page Press the button to display the TV page Press the button to highlight the Tuner Mode selection Press the button to c...

Page 42: ...the channel you wish to remove press and buttons to open the TV TUNER SETUP menu and then press the button to highlight SKIP CHANNEL Press the button to select this channel to be skipped when using t...

Page 43: ...n Screen Display OSD appears on the PICTURE adjustment page Press the button until the SETUP page is displayed Press the button to highlight the Language selection The default is English Press the or...

Page 44: ...V Component RGB HDMI Indicates which inputs are available for PIP mode PIP Position When PIP is selected Press the button to highlight the PIP position selection Press the or button to choose where on...

Page 45: ...the OSD completely 4 5 4 4 5 4 4 5 4 4 5 4 Wide Wide Wide Wide The Wide option is the feature which allows you to select how your display would be size wise When in TV mode the selections are Normal...

Page 46: ...Press the key to go to the first space _ in the bracket Press either the or button and select either the letter or number belongs to this place Press the button to go to the next space _ and again Us...

Page 47: ...the CC feature is available in the Setup menu Press the button to highlight the CC selection Press the button to select CC1 CC2 CC3 or CC4 Once the adjustments are completed press the LAST button repe...

Page 48: ...n of the picture Use the or button to adjust the horizontal position Once the adjustments are completed press the LAST button repeatedly to exit the OSD completely V Position Press the button to highl...

Page 49: ...the button to highlight Parental then press the button The Password must be entered before the TV will continue with Parental settings The default password set in the factory is 0 0 0 0 If you are goi...

Page 50: ...TV Rating panel will be displayed In the Block TV Rating panel you can customize the program blocking of the following TV ratings Y All children Y7 Older children G General audience PG Guidance sugge...

Page 51: ...r 17 years of age Press the or button to navigate through the Movie rating options Press the button to block locked or allow unlocked 4 5 12 4 5 12 4 5 12 4 5 12 Canadian English Rating Canadian Engli...

Page 52: ...gs for programs being viewed in your local or regional area It will allow the parental guidance control feature in your TV to have the most current parental control database for a digital signal This...

Page 53: ...nts are completed press the LAST button repeatedly to exit the OSD completely 4 5 16 4 5 16 4 5 16 4 5 16 Change the Password Change the Password Change the Password Change the Password Press the butt...

Page 54: ...ettings Reset All Settings Reset All Settings Press the button to highlight the Reset All Settings selection Press the button to reset the TV to the default factory settings Once the adjustments are c...

Page 55: ...ss the LAST button repeatedly to exit the OSD completely 4 7 4 7 4 7 4 7 HDMI Input Audio Adjustment HDMI Input Audio Adjustment HDMI Input Audio Adjustment HDMI Input Audio Adjustment The Audio Adjus...

Page 56: ...eo Input Audio Adjustment Video Input Audio Adjustment Video Input Audio Adjustment Video Input Audio Adjustment The Audio Adjust menu operates in the same way for Video Inputs Component and AV as for...

Page 57: ...osition Press the button and the new H V Position submenu will be displayed Press the button to highlight Auto Phase Press the button to execute this option The TV will automatically look for the phas...

Page 58: ...button is pressed the On Screen Display OSD appears on the PICTURE adjustment page Press the button to highlight the Auto Adjust selection Press the button for the LCD HDTV to adjust to the PC signal...

Page 59: ...Contrast Contrast Press the button to highlight the Contrast selection Press the button to start adjusting the contrast and the menu page will disappear and be replaced by a small Contrast Indicator B...

Page 60: ...ion Press the button to start adjusting the horizontal size of the picture Use the or button to adjust the horizontal size Once the adjustments are completed press the LAST button repeatedly to exit t...

Page 61: ...14 PC Input Audio PC Input Audio PC Input Audio PC Input Audio Adjustment Adjustment Adjustment Adjustment The Audio Adjust menu operates in the same way for the PC Input as for the DTV TV input in s...

Page 62: ...4 3 Aspect Ratio Movies in 4 3 Aspect Ratio may be referred to as pan and scan or full frame These movies were originally filmed in 16 9 widescreen and then modified to fit a traditional TV screen 4 3...

Page 63: ...ed to gently clean the screen 2 The screen glass is very fragile Do not scrape it with any sharp object Do not press or tap the screen to avoid cracking When the screen is seriously contaminated use a...

Page 64: ...ghts If you have not mounted it on the wall try moving your TV to another location to see if this is the cause of the problem The picture has abnormal patterns Make sure that the input source cable is...

Page 65: ...ort Products are often returned due to a technical problem rather than a defective product that may result in unnecessary shipping charges billed to you Our trained support personnel can often resolve...

Page 66: ...ference to radio communications However there is no guarantee that interference will not occur in a particular installation If this equipment does cause harmful interference to radio or television rec...

Page 67: ...ilter Motion Adaptive De Interlace 3 2 or 2 2 Reverse Pull Down HDTV via HDMI or Component YPbPr HDMI with HDCP Dolby Digital decoding for ATSC MPEG 2 decoding via DTV input V Chip Progressive scan vi...

Page 68: ...n HDTV The best quality picture wide screen 16x9 display with at least 720 progressively scanned lines 720P or 1080 interlaced lines 1080i and Dolby digital surround sound HDTV provides 900 000 2 1 mi...

Page 69: ...Tuner Setup 47 DTV Audio Adjust Audio Out 45 Balance 45 Digital Audio Out 45 Equalizer 44 Lip Sync 46 Reset Audio Mode 46 Speakers 45 Surround 45 Volume 44 DTV Picture Adjust Advanced Video 41 Backlig...

Page 70: ...r 24 Connecting your VCR 25 Connecting your Video Camera 25 T Technical Specifications 73 Troubleshooting Guide 69 TV Audio Adjustment 44 Parental Control 55 Picture Adjustment 39 Special Features 49...

Reviews: