background image

VIZIO VA26L HDTV10T User Manual 


Version 6/5/2008 

www.VIZIO.com


Television Antenna Connection Protection 


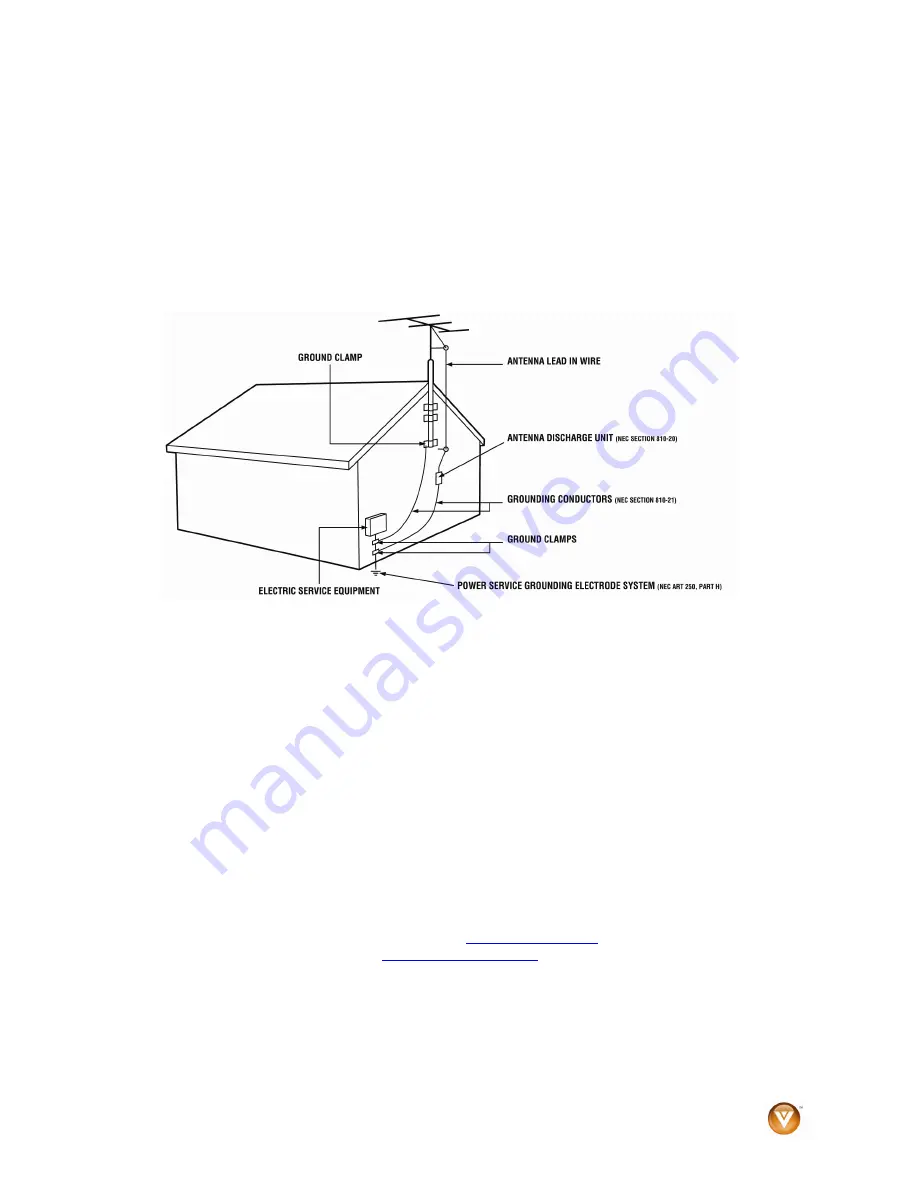
External Television Antenna Grounding 

If an outside antenna/satellite dish or cable system is connected to your HDTV, make sure that the 
antenna or cable system is electrically grounded to provide some protection against voltage surges and 
static charges. 
 
Article 810 of the National Electrical Code, ANSI/NFPSA 70, provides information with regard to proper 
grounding of the mast and supporting structure, grounding of the lead-in wire to an antenna discharge 
unit, size of the grounding conductors, location of antenna discharge unit, connection to grounding 
electrodes, and requirements of the grounding electrode. 


Lightning Protection 

For added protection of your HDTV during a lightning storm or when it is left unattended or unused for 
long periods of time, unplug your HDTV from the wall outlet and disconnect the antenna or cable system. 
 

Power Lines 

Do not locate the antenna near overhead light or power circuits, or where it could fall into such power 
lines or circuits. 
 
Remember, the screen of the coaxial cable is intended to be connected to earth in the building 
installation. 

FCC Bulletin for New TV Owners 

After February 17, 2009, a television receiver with only an analog broadcast tuner will require a converter 
box to receive full power over-the-air broadcasts with an antenna because of the Nation's transition to 
digital broadcasting. Analog-only TVs should continue to work as before to receive low power, Class A or 
translator television stations and with cable and satellite TV services, gaming consoles, VCRs, DVD 
players, and similar products. 
 
Information about the DTV transition is available from 

http://www.DTV.gov

 or this manufacturer at  

877 MY VIZIO (877-698-4946)

, and from 

http://www.dtv2009.gov

 or 

1-888-DTV-2009

 for information 

about subsidized coupons for digital-to-analog converter boxes. 
 
Your HDTV comes with a built-in tuner capable of processing digital broadcasts, making it easier for you 
to receive this type of signal without the need of an extra converter box. 

Summary of Contents for VA26L

Page 1: ...vestment beyond the standard warranty VIZIO offers on site extended warranty service plans These plans give additional coverage during the standard warranty period Visit our website or call us to purc...

Page 2: ...not cover user abuse or improper installations The power cord must be replaced when using different voltage than the voltage specified For more information contact your dealer Your HDTV is equipped w...

Page 3: ...used for an extended period of time unplug the power cord To reduce risk of electric shock do not touch the connector with wet hands Insert batteries in accordance with instructions Incorrect polariti...

Page 4: ...m Power Lines Do not locate the antenna near overhead light or power circuits or where it could fall into such power lines or circuits Remember the screen of the coaxial cable is intended to be connec...

Page 5: ...e Antenna or Cable through Your VCR 19 Connecting Your DVD Player 20 Using HDMI Best 20 HDMI Connections for DVD Players with DVI 21 Using Component Video Better 21 Using S Video Better 22 Using Compo...

Page 6: ...Movie Rating 54 Check for New DTV Rating 55 Blocked Unrated TV 55 Access Code Edit 56 Understanding Viewing Modes 57 Normal Mode 57 Wide Mode 57 Panoramic Mode 57 Maintaining and Troubleshooting 58 Ma...

Page 7: ...shipping Package Contents VIZIO VA26L VIZIO remote control AA batteries for the remote control 2 Power cord VIZIO screen cleaning cloth This user manual Quick Setup Guide Registration Card VIP Servic...

Page 8: ...mote control directly this sensor for the best response Right Side Panel Controls VOLUME Increases or decreases the speaker volume Moves left and right in the OSD menus MENU Activates the On Screen Di...

Page 9: ...VIDEO port and or the white red and yellow composite ports S VIDEO takes priority over the composite connection when both are connected HEADPHONE Connect your headphones here SERVICE For factory serv...

Page 10: ...AUDIO here VIZIO Certified HDMI and HDMI DVI cables are available for purchase from www VIZIO com or by calling 888 VIZIOCE 888 849 4623 4 RGB PC Connect the video and audio 1 8 in mini plug stereo c...

Page 11: ...annel For example to select sub channel 2 of main channel 28 press 2 press 8 press this button then press 2 CH or Press to step up or down through the TV channels LAST Press to recall the previously v...

Page 12: ...Control Range The effective range of the remote control is approximately 26 feet 8 meters from the front of the receiver window and 13 feet 4 meters when 30 to the left and right 20 up and down Point...

Page 13: ...ite Rear HDMI High Definition Multimedia Interface HDMI is the first and only industry supported uncompressed all digital audio video interface HDMI connects an AV device such as a set top box DVD pla...

Page 14: ...optimal results NOTE To maintain the display quality use a VIZIO certified HDMI cable Length is available up to up to 32 8 feet 10 meters See www VIZIO com or call 1 888 VIZIOCE 1 888 849 4623 for det...

Page 15: ...and red connectors from the DVI audio output jacks on the set top box to the adjacent HDMI 2 audio jacks on the back of your HDTV 4 Turn on your HDTV and set top box 5 Press HDMI repeatedly on the re...

Page 16: ...back or side of your HDTV 4 Turn on your HDTV and set top box 5 Press COMPONENT on the remote control to view the content You can also press INPUT on the remote control Using S Video Better 1 Turn off...

Page 17: ...back of your HDTV 4 Turn on your HDTV and set top box 5 Press AV on the remote control to view the content You can also press INPUT on the remote control NOTE If AV1 is being used connect to the AV2...

Page 18: ...roadcasts are high definition HD Refer to the program guides or consult your cable satellite or TV station operator Digital broadcasts are not available in all areas Refer to www antennaweb org for de...

Page 19: ...rs that have a digital interface such as HDMI should be connected to the HDMI input on your HDTV NOTE To maintain the display quality use a VIZIO certified HDMI cable Length is available up to 32 8 fe...

Page 20: ...nd set top box 5 Press HDMI repeatedly on the remote control to view the content You can also press INPUT on the remote control NOTE If HDMI2 is being used connect to the HDMI1 port instead Using Comp...

Page 21: ...ress AV on the remote control to view the content You can also press INPUT on the remote control Using Composite AV Video Good 1 Turn off your HDTV and DVD player 2 Connect the Video cable yellow from...

Page 22: ...ra user manual for more information about the video output requirements Connecting a Computer 1 Turn off your HDTV and computer 2 Connect the VGA cable from your computer to the RGB PC jack on the bac...

Page 23: ...the four 4 screws holding the neck to your HDTV 2 Mount your HDTV on the wall a Attach your HDTV to a wall mount sold separately using the mounting holes in the back panel of your HDTV b Read the inst...

Page 24: ...fire risk or lead to personal injury Inserting the batteries incorrectly may also result in cracking or leakage that may pose a fire risk or lead to personal injury Dispose of the batteries in accorda...

Page 25: ...opens 6 If you are using a cable or satellite set top box press LAST to skip to the channel scan and go to Step 9 Otherwise continue with Step 7 below 7 Press or to select your input source Antenna o...

Page 26: ...e screen opens 9 When the Complete screen opens press to exit NOTE DTV digital broadcast is not available in all areas Refer to www antennaweb org to get information about availability in your area an...

Page 27: ...atch the channel on the VCR cable box external TV tuner or satellite receiver Refer to the User s Manual of your equipment for details NOTE Your HDTV will display the television station or program sel...

Page 28: ...n the remote control The Picture menu opens 2 Press or to select Color Temperature then press The Color Temperature menu opens 3 Press or to change select Normal then press MENU twice to return to the...

Page 29: ...h time you pause at a channel the program list updates with the program schedule for the channel and the window shows the live program for that channel 5 Press GUIDE to exit the Electronic Programming...

Page 30: ...on the remote control or VOL on the side of your HDTV to adjust the item 5 Press OK when finished making adjustments 6 Press MENU to return to the previous screen or repeatedly to exit the OSD NOTE OS...

Page 31: ...OSD screens are available when you press MENU on the remote control The source you are viewing is displayed in orange text in the bottom left hand corner of the OSD Picture Mode 1 Press MENU on the r...

Page 32: ...disappears and is replaced by a Backlight Indicator Bar 4 Press or to adjust the level 5 Press EXIT to exit the OSD Brightness Brightness adjusts the black levels in the picture If the brightness is...

Page 33: ...Picture menu opens 2 Press or to select Contrast 3 Press to start adjusting Contrast The menu page disappears and is replaced by a Contrast Indicator Bar 4 Press or to adjust the level 5 Press EXIT t...

Page 34: ...replaced by a Tint Indicator Bar 4 Press or to adjust the level 5 Press EXIT to exit the OSD Sharpness The Sharpness setting adjusts the sharpness of the picture 1 Press MENU on the remote control or...

Page 35: ...or the side of your HDTV The Picture menu opens 2 Press or to select Color Temperature then press The Color Temperature menu opens 3 Press or to select Normal Warm Cool or Custom 4 If you choose Cust...

Page 36: ...y the digitizing of moving images 1 Press to select DNR 2 Press or to choose Off Low Medium or Strong 3 Press EXIT to exit the OSD Black Level Extender Black Level Extender extends grey levels to blac...

Page 37: ...EXIT to exit the OSD Flesh Tone Adjust flesh tones of the picture This may result in a more pleasing production of sky and flesh colors 1 Press to select Flesh Tone 2 Press or to choose Off or On 3 P...

Page 38: ...corner of the OSD Volume 1 Press MENU on the remote control or the side of your HDTV then press repeatedly until the Audio menu opens 2 Press or to select Volume 3 Press to start adjusting Volume The...

Page 39: ...eatedly until the Audio menu opens 2 Press or to select Treble then press or to start adjusting treble 3 Press EXIT to exit the OSD Balance 1 Press MENU on the remote control or the side of your HDTV...

Page 40: ...select Surround then press or to choose On or Off 3 Press EXIT to exit the OSD Speakers You may want to turn off the internal TV speakers when listening to the audio through your home theater system 1...

Page 41: ...the side of your HDTV then press repeatedly until the Audio menu opens 2 Press or to select Lip Sync 3 Press or to adjust Lip Sync 4 Press EXIT to exit the OSD AVL Auto Volume Leveling AVL reduces sud...

Page 42: ...on which equipment you have connected to the DTV TV Input 3 Press EXIT to exit the OSD Auto Search Your HDTV can scan for channels in your area and store the channel information in the channel list If...

Page 43: ...e channel list that you do not want to see You can still tune to deleted channels using the channel buttons on the remote control 1 Press MENU on the remote control or the side of your HDTV then press...

Page 44: ...opens 2 Press or to select MTS then press or to choose Mono Stereo or SAP 3 Press EXIT to exit the OSD Time Zone Setting the correct Time Zone for your area ensures that the correct program times are...

Page 45: ...time for your area will ensure that the correct program times are shown in the Electronic Program Guide 1 Press MENU on the remote control or the side of your HDTV then press repeatedly until the TV m...

Page 46: ...able Language Select the language displayed in the OSD menus 1 Press MENU on the remote control or the side of your HDTV then press until the Setup menu opens 2 Press or to select Language then press...

Page 47: ...opens 5 Press or to select Sleep Timer then press or to select 30 60 90 or 120 minutes 6 Press EXIT to exit the OSD Wide The Wide option lets you determine how the image appears on the screen 1 Press...

Page 48: ...mize the appearance 1 Press MENU on the remote control or the side of your HDTV then press until the Setup menu opens 2 Press to select Digital CC Style then press or to choose Broadcaster or Custom 3...

Page 49: ...menu opens 4 5 7 1 H Position Horizontal Position 1 Press to select H Position 2 Press or to adjust the horizontal position 3 Press EXIT to exit the OSD 4 5 7 2 V Position Vertical Position 1 Press t...

Page 50: ...ting 1 Press MENU on the remote control or the side of your HDTV then press until the Setup menu opens 2 Press or to select Reset All Setting then press The settings are reset to factory defaults 3 Pr...

Page 51: ...n restrict certain channel and program viewing by turning on parental controls Selected programs movies and channels can then be made available only after an authorized password has been entered Chann...

Page 52: ...opens 3 Press or and or to navigate through the TV rating options See the table below for TV Rating definitions 4 Press OK to block locked or unblock unlocked 5 Press EXIT to exit the OSD TV Rating D...

Page 53: ...press The Movie Rating menu opens 3 Press or and or to navigate through the movie rating options See the table below for movie rating definitions 4 Press OK to block locked or unblock unlocked 5 Pres...

Page 54: ...ont of DTV Rating no update is available or the option is not activated in your area To update the table 1 Press or to select Update DTV Rating then press The Update DTV Rating screen opens 2 Press OK...

Page 55: ...the side of your HDTV then press repeatedly until the Parental Control menu opens 2 Press or to select Access Code Edit then press The Access Edit Code menu opens 3 Enter the new 4 digit password usi...

Page 56: ...inally filmed in 16 9 widescreen and then modified to fit a traditional TV screen 4 3 Wide Mode When watching a standard broadcast or full frame movie in this mode the display image is stretched propo...

Page 57: ...ially dirty use a soft cloth moistened with diluted neutral cleaner to clean the display Squeeze water out of the cloth before cleaning to prevent water from penetrating into the housing Wipe the disp...

Page 58: ...is connected to your computer in RGB or HDMI mode press any key on your keyboard to wake your computer Power is ON but there is no screen image Check the connections on the back of your HDTV and on th...

Page 59: ...e is noise or trash on the screen When your HDTVs digital capabilities exceed a digital broadcast signal the signal is up converted increased to match your HDTVs display capabilities Up converting can...

Page 60: ...erence will not occur in a particular installation If this equipment does cause harmful interference to radio or television reception which can be determined by turning the equipment off and on the us...

Page 61: ...VI YES Color Equalizer YES Action Sensor Technology YES Reduced Pixel Noise Circuit YES Enhanced Contrast Technology YES Balanced Color YES Features AV at SIDE I O for Game access CC V Chip 3D Comb Fi...

Page 62: ...hart below Resolution through VGA Input for the best resolution that can be obtained through the RGB PC input when the video card supports 1366 x 768 Resolution Refresh Hz H Freq kHz V Freq Hz H Sync...

Page 63: ...nits provided under this limited warranty are warranted for the remaining portion of the original warranty period or for ninety 90 days from warranty service or replacement whichever is later How to O...

Page 64: ...N HOW LONG AN IMPLIED WARRANTY LASTS OR THE EXCLUSION OR LIMITATION OF INCIDENTAL OR CONSEQUENTIAL DAMAGES SO THE ABOVE LIMITATIONS OR EXCLUSIONS MAY NOT APPLY TO YOU This warranty gives you specific...

Page 65: ...tomer s location The total approximate time for the repair process which includes the repair diagnosis dispatching the technician shipping the replacement part s and arranging the appointment with the...

Page 66: ...one year limited warranty period and meets the terms and conditions of the VIZIO Limited Product Warranty The customer will be provided with instructions for packing and shipping the unit to the VIZIO...

Page 67: ...locking channels 52 brightness adjusting 33 C cable setting as TV signal source 43 cable TV component connection 17 composite connection 17 18 22 connecting 15 connecting through VCR 19 DVI connection...

Page 68: ...jack 10 I information banner 30 installation services 8 language selecting OSD 47 lip sync turning off and on 42 M maintaining 58 MENU button 9 movie ratings blocking 54 MTS Stereo SAP Mono 45 N Norm...

Page 69: ...pness adjusting 35 side panel controls 9 10 AV2 10 channel buttons 9 headphone jack 10 MENU button 9 power button 9 S Video 10 volume buttons 9 sleep timer setting 48 source selecting 47 speakers turn...

Page 70: ...w VIZIO com adaptive luma 37 adjusting 37 CTI 37 DNR 37 flesh tone 37 white peak limiter 37 viewing modes descriptions 57 volume adjusting 39 volume buttons 9 W wall mounting 24 warranty services 8 wa...

Reviews: