background image

4

19

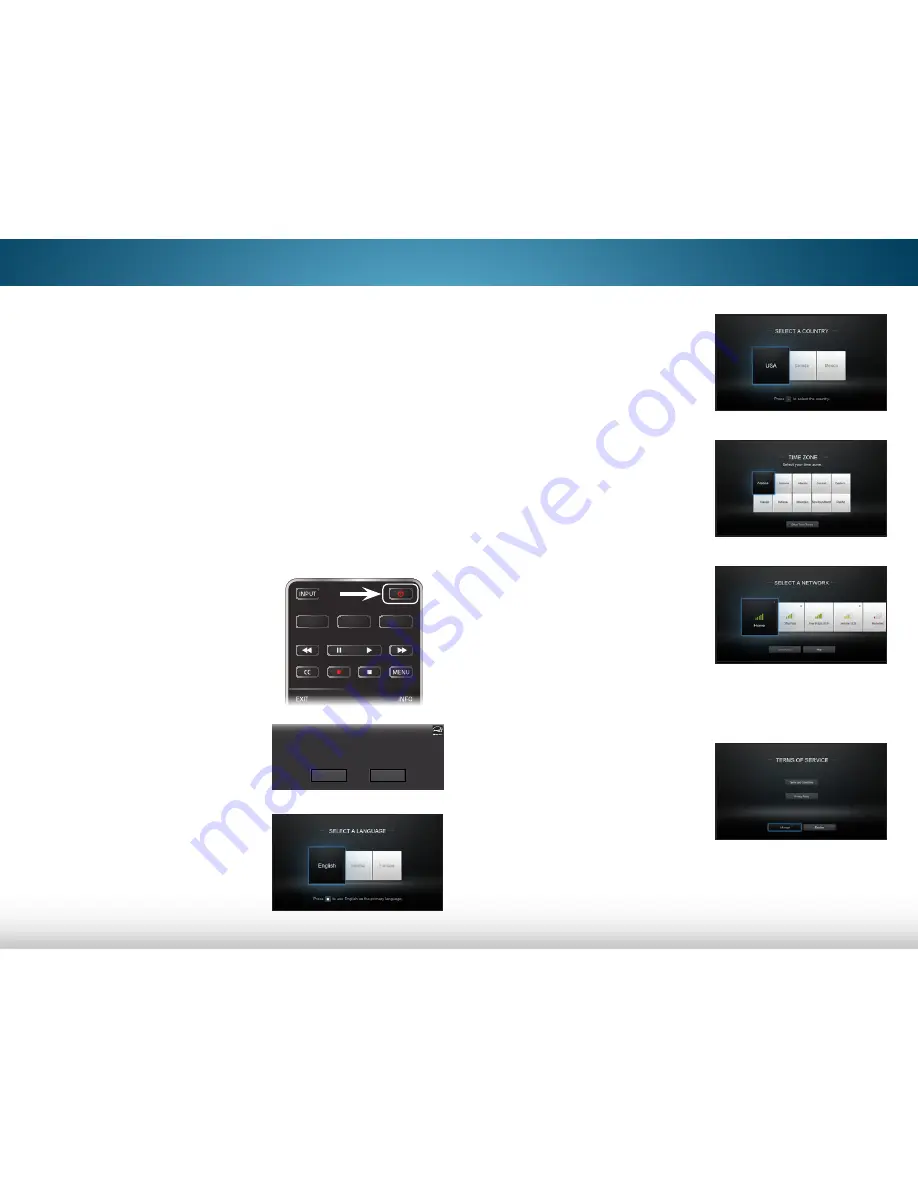
The first time you turn on the TV, the Setup App will guide 

you through each of the steps necessary to get your TV 

ready for use.

Before you begin the first-time setup:

•  Your TV should be installed and the power cord 

should be connected to an electrical outlet.

•  Your devices should be connected.
•  If you have a wireless network, have the network 

password ready.

•  If you are connecting to your network with an 

Ethernet cable, connect it to the Ethernet port on 

the TV. 

To complete the first-time setup:

1.   Press the 

Power 

button on the 

remote. The TV powers on and 

the Setup App starts. 


2.  Use the 

Arrow

 buttons on 

the remote to highlight 

Home Use

 and press 

OK


3.  Use the 

Arrow

 buttons on 

the remote to highlight your 

language of preference 

and press 

OK

.

Choose your mode.

Select Store Demo for in-store display.

Select Home Use for in-home use.

Seleccione "Home Use" por Modo de Casa o "Store Demo" por Demostración de Tienda.

Choisissez "Home Use" pour Mode Domicile ou "Store Demo" pour Démonstration en Magasin.

Store Demo

Home Use

Completing the First-Time Setup

4.  Use the 

Arrow

 buttons on 

the remote to highlight your 

country, and then press the 

OK

 button.  


5.  Use the 

Arrow

 buttons on 

the remote to highlight your 

time zone, and then press 

OK

.  


6.  Select the name of your 

wireless network from the list 

of available networks and 

press 

OK


Enter the network password 

using the keyboard on 

the remote, then highlight 

Connect

 and press 

OK

7.  Use the 

Arrow

 and 

OK


buttons on the remote 

to review the Terms and 

Conditions and Privacy 

Policy. When you are finished, 

highlight 

I Accept

 and  

press 

OK

.

The images are for illustrative purposes only, the actual number of ports may vary.

Summary of Contents for M492i-B2

Page 1: ...VIZIO USER MANUAL Models M492i B2 M552i B2 M652i B2...

Page 2: ...ERGY STAR rating Manufactured under license from Dolby Laboratories Dolby and the double D symbol are trademarks of Dolby Laboratories HDMI the HDMI logo and High Definition Multimedia Interface are t...

Page 3: ...ns should be observed for the installation use and maintenance of your TV Read the following safety instructions before operating your TV Keep these instructions in a safe place for future reference T...

Page 4: ...penetrates into Use only with the cart stand tripod bracket or table specified by the manufacturer or sold with the apparatus When a cart is used use caution when moving the cart apparatus combination...

Page 5: ...shock do not touch the connector with wet hands Insert batteries in accordance with instructions Incorrect polarities may cause the batteries to leak which can damage the remote control or injure the...

Page 6: ...to grounding electrodes and requirements of the grounding electrode Ground Clamp Antenna Lead In Wire Antenna Discharge Unit NEC Section 810 20 Grounding Conductors NEC Section 810 21 Ground Clamps P...

Page 7: ...icture Settings 24 Adjusting the Advanced Picture Settings 25 Adjusting the Professional Picture Settings 26 Adjusting the Color Tuner Settings 26 Creating a Custom Picture Mode 29 Renaming a Custom P...

Page 8: ...Restoring the TV to Factory Default Settings 49 Using the Guided Setup Menu 49 Using Guided Setup 49 Using the Info Window 50 Using the USB Media Player 51 Using the USB Media Player 51 Preparing You...

Page 9: ...package contents Use the images below to ensure nothing is missing or damaged Power Cord VIZIO LED HDTV with Stand Quick Start Guide PACKAGE CONTENTS M492i B2 M552i B2 4 x M6 18mm Phillips Screws M65...

Page 10: ...ox and inspecting the package contents you can begin installing the TV Your TV can be installed in two ways On a flat surface using the included stand On a wall using a VESA standard wall mount not in...

Page 11: ...ack of the TV M652i B2 Use a Phillips screwdriver to insert and tighten the four 4 included M6 x 16mm Phillips screws into the holes on the back of the TV 5 When you are finished place the TV on a sta...

Page 12: ...ve the correct mount for your TV you can begin the installation To install your TV on a wall 1 Disconnect any cables connected to your TV 2 Place the TV face down on a clean flat stable surface Be sur...

Page 13: ...audio device such as home audio receiver Stereo Audio Out Connect RCA audio device such as sound bar Component Composite Connect component or composite device HDMI Connect HDMI device REAR PANEL USB C...

Page 14: ...ATOR When using the remote aim it directly at this sensor The power indicator flashes on when the TV turns on then goes out after several seconds To keep the power indicator on as long as the TV is on...

Page 15: ...IZIO Internet Apps Plus V I A Plus dock CHANNEL UP DOWN Change the channel LAST Return to the channel last viewed DASH Use with number pad to manually enter a digital sub channel For example 18 4 or 1...

Page 16: ...ss and hold while pressing another key to enter a capital letter ALT Press and hold while pressing another key to enter a blue character For example press ALT and W to enter a character DO NOT COVER T...

Page 17: ...the button on the rear of the remote 2 Remove the battery cover 3 Insert two AAA batteries into the remote control Make sure that the and symbols on the batteries match the and symbols inside the batt...

Page 18: ...Component etc 2 Turn the TV and your device off 3 Connect the appropriate cable not included to the TV and the device 4 Turn the TV and your device on Set the TV s input to match the connection you us...

Page 19: ...ite cables are the traditional way of connecting your devices to your TV Video signals are sent over the yellow connector while audio is sent over the red and white connectors GOOD BETTER COMPONENT VI...

Page 20: ...mponent cables are designed to carry high definition video signals along with additional audio connections Colors are delivered with color information split up three different ways over three connecto...

Page 21: ...n available port on the TV Optical RCA etc 2 Turn the TV and your audio device off 3 Connect the appropriate cable not included to the TV and the device 4 Turn the TV and your device on BEST HDMI CABL...

Page 22: ...are digitally transmitted between devices RCA CABLE RCA cables or Composite cables are the traditional way of connecting your devices to your audio device Audio signals are sent over the red and whit...

Page 23: ...your TV and Home Audio Receiver can be removed The HDMI cable will transmit audio signal to and from your TV with an all digital audio video connection Without an HDMI ARC setup your TV will transmit...

Page 24: ...ur router and to the Ethernet port on the back of the TV See below 2 Use the Guided Network Setup to configure the TV See Using Guided Setup on page 49 Connecting to a Wireless Network 1 Ensure you ha...

Page 25: ...erence and press OK Choose your mode Select Store Demo for in store display Select Home Use for in home use Seleccione Home Use por Modo de Casa o Store Demo por Demostraci n de Tienda Choisissez Home...

Page 26: ...a cable from the wall 10 If the TV Signal channel scan screen appears the TV will need to scan for channels which takes several minutes Use the arrow buttons on the remote to highlight Begin Scan and...

Page 27: ...g Name Inputs Adjust TV settings Access the Guided Setup Access the User Manual Help VIZIO Network Sleep Timer Input CC ABC Audio Wide Normal Picture Settings Panoramic Wide Zoom 2D 3D Exit TV SETTING...

Page 28: ...ves the content s original aspect ratio Since the 4 3 aspect ratio is not large enough to fill the TV s screen black bars are added to the left and right of the display image Stretch expands the displ...

Page 29: ...d mode To reduce video delay lag when gaming use Game mode Help VIZIO Network Sleep Timer Input CC ABC Audio Wide Normal Picture Settings Panoramic Wide Zoom 2D 3D Exit PICTURE Picture Mode Standard B...

Page 30: ...vivid picture Game mode reduces throughput delays and optimizes the picture settings for displaying game console output Computer mode optimizes the picture settings for displaying computer output 4 T...

Page 31: ...LED Zones On Smooth Motion Effect Medium Motion Blur Reduction Off Reduce Signal Noise Low Reduce Block Noise Low Picture Size Picture Position Film Mode Auto Wide Select Off Low Medium or High Motio...

Page 32: ...lete Picture Mode Delete a custom picture mode Inputs assigned to that custom picture mode will be set to Calibrated picture mode Help VIZIO Network Sleep Timer Input CC ABC Audio Wide Normal Picture...

Page 33: ...the color channels press the EXIT button Color Tuner Red Green Blue Cyan Magenta Yellow Hue 0 0 0 0 25 14 Saturation 1 5 4 0 2 0 Brightness 24 0 22 0 0 0 Offset 0 0 0 Gain 0 0 0 To adjust the 11 Point...

Page 34: ...highlight Off 3 When you are finished press the EXIT button To show or hide the Flat Test Pattern 1 From the Color Tuner menu use the Arrow buttons to highlight Color Tuner and then press the Left Ri...

Page 35: ...tons to enter a name for your custom picture mode using the keyboard on the remote 3 Highlight Done and press OK 4 Make any desired changes to the picture settings 5 Press the EXIT button to exit the...

Page 36: ...buttons to highlight Lock Picture Mode and then press OK The LOCK PICTURE MODE menu is displayed 2 Use the Number Pad on your remote to enter a unique 4 digit PIN 3 Highlight Save and press OK 4 Press...

Page 37: ...highlight Delete Picture Mode and then press OK The DELETE PICTURE MODE window is displayed 2 Use the Left Right Arrow buttons to highlight Delete and press OK 3 Press the EXIT button to exit the menu...

Page 38: ...mer Input CC ABC Audio Wide Normal Picture Settings Panoramic Wide Zoom 2D 3D Exit AUDIO TV Speakers On Surround Sound On Volume Leveling On Balance 0 Lip Sync 0 Digital Audio Out PCM Analog Audio Out...

Page 39: ...AUDIO menu is displayed 3 Use the Arrow buttons to highlight Equalizer Settings and press OK The Audio Mode and equalizer settings screen appears 4 Use the Left and Right Arrow buttons to select any a...

Page 40: ...button on the remote SETTING TIMERS Setting the Sleep Timer When activated the TV s sleep timer will turn the TV off after a set period of time 1 Press the MENU button on the remote The on screen men...

Page 41: ...er Input CC ABC Audio Wide Normal Picture Settings Panoramic Wide Zoom 2D 3D Exit NETWORK Wired Connection Disconnected Wireless Access Points More Access Points WPS Manual Setup Hidden Network Test C...

Page 42: ...ork whose network name SSID is not being broadcast 1 From the NETWORK menu highlight Hidden Network and press OK The ENTER ACCESS POINT NAME screen is displayed 2 Using the keyboard on the remote ente...

Page 43: ...or Cable Out of the wall connections 1 From the TUNER menu highlight Tuner Mode and press OK The TUNER MODE menu displays 2 Highlight Antenna or Cable and press OK Press EXIT Scanning for Channels The...

Page 44: ...te to enter the channel 4 Highlight To Channel and enter the channel where you want to end the scan Use the Left Arrow button to backspace Use the Number Pad on the remote to enter the channel 5 Highl...

Page 45: ...d use the parental controls See Locking and Unlocking Channels on page 45 To remove a channel 1 From the TUNER menu highlight Skip Channel and press OK The SKIP CHANNEL menu is displayed 2 For each ch...

Page 46: ...English Espa ol Fran ais LISTENING TO ALTERNATE AUDIO Changing the Analog Audio Language Some analog over the air free and cable channels broadcast programs in more than one language The TV s Analog A...

Page 47: ...e displayed according to your preference See the diagram on the next page for an explanation of the parts of the closed caption area To change the appearance of digital closed captions 1 From the CLOS...

Page 48: ...ance of the closed captions press the EXIT button on the remote Typical choices include Opaque background transparent window Only a strip of background appears behind the text expanding as the text ap...

Page 49: ...ress OK 4 To use a preset input name a Highlight the Input Port row and press OK b Highlight the input name you want to use and press OK or To enter a custom name a Enter your custom label using the k...

Page 50: ...ystem Information Menu Language English Time Local Settings Parental Controls CEC Power Indicator Off Reset Admin View status information for the TV current input and your network Viewing System Infor...

Page 51: ...If you have not set a PIN enter the default 0000 The PARENTAL CONTROLS menu is displayed To set a custom parental passcode see Changing the Parental Control PIN on page 46 Enabling or Disabling Progr...

Page 52: ...and all higher ratings cannot be viewed 4 When the rating type is unblocked the Lock icon appears unlocked Content with this rating and all lower ratings can be viewed If you want to block all unrate...

Page 53: ...ton on the remote The on screen menu is displayed 2 Use the Arrow buttons on the remote to highlight System and press OK The SYSTEM menu is displayed 3 Use the Arrow buttons on the remote to highlight...

Page 54: ...tting CEC To use CEC you must select On System Audio Control When system audio control is on you can control your device s audio using the TV s remote control Device Discovery Use this function to det...

Page 55: ...is displayed 4 Highlight Reset TV to Factory Defaults and press OK 5 If you have changed the default parental control PIN enter it now The TV displays Select Reset to restore all TV settings to facto...

Page 56: ...nformation and the start and end times of the program DIGITAL EPISODE GUIDE INFO WINDOW Oliver s Holiday Surprise 1080p 6 15pm 11 00AM 12 00PM TV PG V Dolby Digital Stereo Oliver wakes up one morning...

Page 57: ...to the USB port on the side of the TV 2 Press the V button on the remote 3 Use the Arrow buttons to highlight the Multimedia app in the V I A Plus Dock and press OK The highlighted App is in the cente...

Page 58: ...Current Folder Playback Controls Use to control audio playback Highlight Play Pause Previous or Next and press OK Toggle Music Photos Toggle between viewing all content and only viewing folders MUSIC...

Page 59: ...ed USB devices Current Folder View All or View Folders VIDEO PLAYER Folders File Date Duration Family Vacation California 00 23 43 1 26th Birthday Party 00 38 18 2 Summer 2012 00 41 08 3 Greatest Trip...

Page 60: ...humbnails Folders Adjust Slideshow Settings Start Fullscreen Slideshow PHOTO VIEWER Browse Music View Music Files Back Button Highlight this button and press OK to return to the previous screen Folder...

Page 61: ...ne content See Using the Network Connection Menu on page 35 if your TV is not yet connected to your home network USING THE V I A PLUS APP DOCK TheV I A Plus App Dock is where all of yourV I A Apps are...

Page 62: ...Highlight an App by using the Arrow buttons on the remote My Apps Tab Displays the apps installed on your TV Installed Apps The Apps displayed here are also available in the V I A Plus App Dock 3 Pre...

Page 63: ...Latest Displays apps that were most recently added to the library of apps Apps with a small lock icon in the right hand corner cannot be deleted All Apps Displays every app that is available for down...

Page 64: ...A PLUS APPS WINDOW You can add delete and move apps around on your My Apps tab for a custom look and feel Adding an App to the My Apps Tab To add an app to your TV 1 Use the Arrow buttons on the remot...

Page 65: ...button The following options appear 3 Use the Arrow buttons to move the app to the desired location and press OK to place the app When you can move the app it appears as shown below Note App location...

Page 66: ...ems Product Updates And More Your can also contact our award winning support team at Phone Email 877 878 4946 TOLL FREE techsupport VIZIO com Hours Of Operation Monday Friday 5 am to 8 pm PST Saturday...

Page 67: ...nput source There is no sound Press Volume Up on the remote control Press the MUTE button on the remote to ensure mute is off Check the audio settings See Adjusting the Audio Settings on page 32 Check...

Page 68: ...uct and do not constitute a defective product I see noise or static on the screen When your TV s digital capabilities exceed a digital broadcast signal the signal is up converted improved to match you...

Page 69: ...Effective Refresh Rate 240 Hz Effective Refresh Rate 240 Hz Effective Refresh Rate Maximum Resolution 1920 x 1080 1920 x 1080 1920 x 1080 Pixel Pitch 559 mm H x 559 mm V 630 mm H x 630 mm V 744 mm H x...

Page 70: ...ish French Ambient Light Sensor Yes Yes Yes Remote Control Model XRT500 XRT500 XRT500 Certifications UL CUL FCC Class B HDMI 1 4b Dolby Digital Plus UL CUL FCC Class B HDMI 1 4b Dolby Digital Plus UL...

Page 71: ...of customer misuse modifications or adjustments as well as installation and set up issues or any repairs attempted by anyone other than by aVIZIO authorized service center Products with unreadable or...

Page 72: ...not expressly approved by the party responsible for compliance with the FCC Rules could void the user s authority to operate this equipment Caution Always use an AC DC power adapter that is properly g...

Page 73: ...SE AGREEMENT The following terms and conditions govern the use of any software on your VIZIO HD TV 1 General The software documentation and any fonts accompanying this License Agreement whether on dis...

Page 74: ...nce and you acknowledge and agree that VIZIO does not guarantee their accuracy You understand that by using any of the VIA Services you may encounter content that may be deemed offensive indecent or o...

Page 75: ...NAL INJURY OR OF INCIDENTAL OR CONSEQUENTIAL DAMAGES SO THIS LIMITATION MAY NOT APPLY TO YOU In no event shall VIZIO s total liability to you for all damages other than as may be required by applicabl...

Page 76: ...2014 VIZIO INC ALL RIGHTS RESERVED 140403OC US NC...

Reviews: