background image

VIZIO M160MV User Manual 

Version 6/15/2010 

23 


www.VIZIO.com


COMPUTER

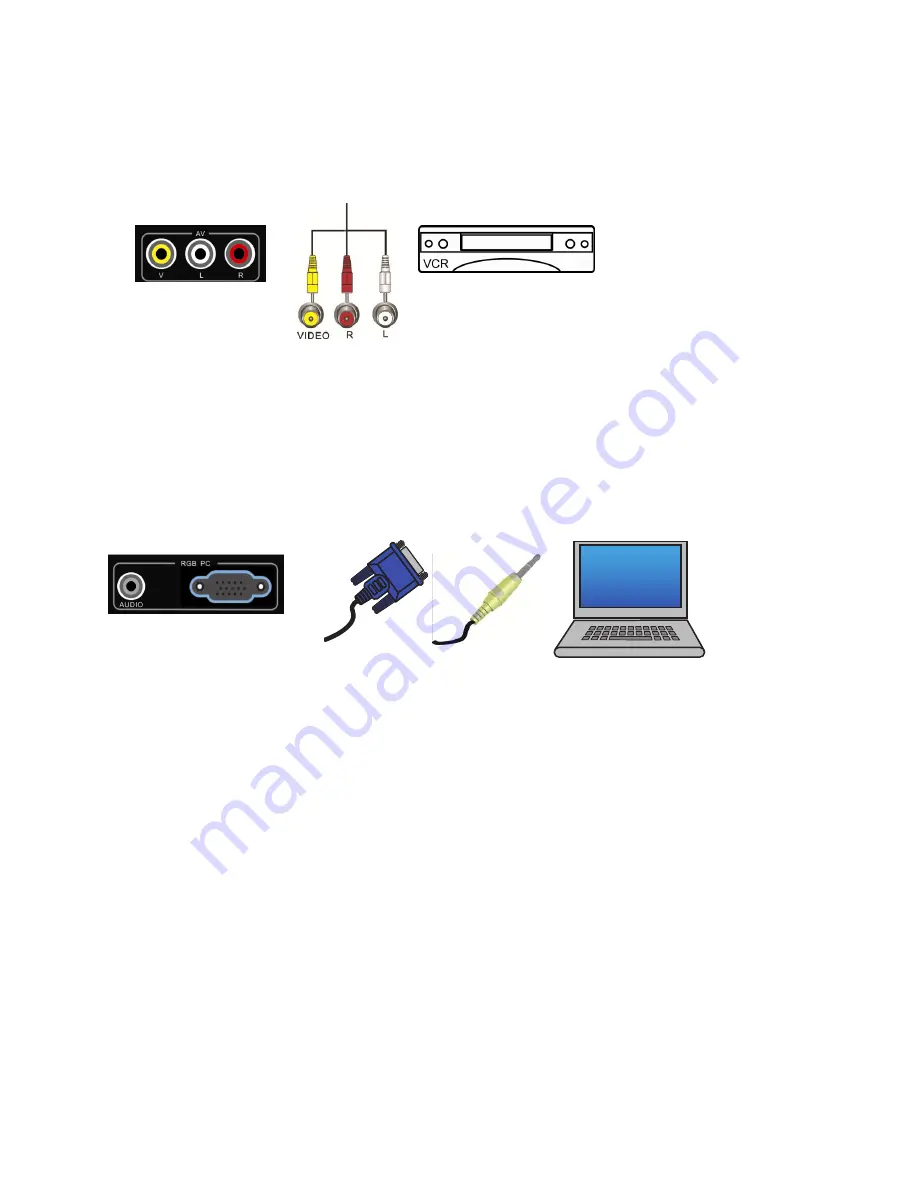
Connecting Your VCR or Video Camera  

Using AV 


1.  Turn off the power to your HDTV and VCR or Video Camera. 
2.  Connect the yellow AV cable from your VCR or video camera to the 

V

 jack on your HDTV. 

3.  Connect the audio cables on your VCR or video camera to the corresponding 

L

 and 

R


AUDIO

 jacks on your HDTV. 

4.  Turn on the power to your HDTV and VCR or Video Camera. 
5. Select 

AV

 using the 

INPUT 

button on the remote control or side of the TV. 


Connecting a Computer  


1.  Set computer to a resolution supported by your HDTV. If your computer supports it, we 

recommend 1360 x 768. (See 

Preset PC Resolutions

 on page 43.) 

2.  Turn off the power to your HDTV and Computer. 
3.  Connect the VGA cable from your computer to the 

RGB PC

 jack on your HDTV. 

4.  Connect the 1/8-inch audio cable from your computer to the 

RGB PC Audio

 jack on your 

HDTV. This step is optional and only needed to transmit audio from the computer through 
the TV. 

5.  Turn on the power to your HDTV and computer. 
6. Select 

VGA

 using the 

INPUT 

button on the remote control or side of your HDTV. 

 
Note:

 Refer to your PC computer user manual for more information about the video output 

requirements. 
 

Summary of Contents for M160MV

Page 1: ...al number located on the back of your HDTV for easy reference when obtaining warranty support Serial _____________________ Purchase Date _____________________ VIZIO is a registered trademark of VIZIO...

Page 2: ...e Operating your HDTV close to smoke or moisture may cause fire or electric shock Slots and openings in the back and bottom of the cabinet are provided for ventilation To ensure reliable operation of...

Page 3: ...ower cord and contact your dealer immediately Do not try to repair your HDTV yourself Avoid using dropped or damaged appliances If your HDTV is dropped and the housing is damaged the internal componen...

Page 4: ...cable is intended to be connected to earth in the building installation Advisory of the DTV Transition The nationwide switch to digital television broadcasting will be complete on June 12 2009 but you...

Page 5: ...l TV Program Information 16 CHAPTER 6 CONNECTING EQUIPMENT 17 Which Video Connection Should I Use 17 Connecting Your Cable or Satellite Box 18 Using HDMI Best 18 HDMI Connections for Cable or Satellit...

Page 6: ...ers 32 Reset Audio Mode 33 Picture Settings Menu 33 Picture Mode 33 Backlight 33 Brightness 33 Contrast 33 Color 33 Tint 33 Sharpness 33 Noise Reduction 34 More 34 Photo Menu 35 Sort By 35 Thumbnail S...

Page 7: ...b screw VIZIO remote control VR9AAA batteries for the remote control 2 Power adapter This user manual Cleaning cloth Quick Setup Guide Registration Card HDTV Accessories and Services Additional certif...

Page 8: ...IZIO logo at the bottom to prevent poor ventilation and excessive component damage If you want to mount your HDTV on the wall see below for additional information Read this user manual carefully befor...

Page 9: ...r HDTV 2 Place your HDTV face down on a soft flat surface to prevent damage to the screen 3 Flip the base 90 degrees The stand neck will be out of view after the base is removed 4 Loosen the wing scre...

Page 10: ...ive this button will proceed to the next level 3 CH Press to change the channels up or down While the menu is active these buttons function as up and down controls 4 VOL Press to increase or decrease...

Page 11: ...the sound to come from the HDTV speakers 5 DTV TV Connect to an antenna or digital cable source For digital TV stations in your area visit www antennaweb org For Cable and Satellite Set Top boxes we...

Page 12: ...Range Point the remote control directly at this sensor for the best response to the remote signal Do not place any obstacles between the remote control and the remote control sensor The effective ran...

Page 13: ...d on and off LAST Press to recall the previously viewed channel When the Menu is active press repeatedly to go to the previous level or out of the On Screen Menu completely Number Button Pad Press to...

Page 14: ...ack of your HDTV and then plug into a wall outlet 3 Connect your devices to your HDTV see Basic Controls and Connections on page 10 for detailed steps 4 Turn on your TV The Setup App will automaticall...

Page 15: ...Before you start watching TV make sure that any cable satellite or off air antenna connections are secure Also verify that the power adapter is plugged into a correctly grounded electrical outlet or...

Page 16: ...rogram Information INFO Button When the channel is changed or when you press the INFO button an information header is shown over the picture for a few seconds Each press of the INFO button will displa...

Page 17: ...ble box or right out of the wall Best analog The RGB VGA port allows you to connect your computer so you can use the TV as your monitor Better analog Component consists of three cables for transmittin...

Page 18: ...andwidth Digital Content Protection HDCP HDCP encrypts the transmission between the video source and the digital display for added security and protection Refer to your Cable Satellite Set Top Box use...

Page 19: ...atellite Box 5 Select Comp using the INPUT button on the remote control or directly by pressing the COMP button on the remote control Using Composite Video Compatible 1 Turn off your HDTV and Cable Sa...

Page 20: ...l results To maintain image quality use a VIZIO certified HDMI cable This cable is available in 6 15 and 30 foot lengths Visit www VIZIO com or call 877 MYVIZIO 877 698 4946 for details 1 Turn off you...

Page 21: ...th the RGB input on your HDTV 4 Turn on the power to your HDTV and your DVD player 5 Select HDMI using the INPUT button on the remote control or directly by pressing the HDMI button on the remote cont...

Page 22: ...t AV using the INPUT button on the remote control or directly by pressing the AV button on the remote control Connecting Coaxial RF Using Your Antenna or Digital Cable for Standard TV or Digital TV 1...

Page 23: ...TV Connecting a Computer 1 Set computer to a resolution supported by your HDTV If your computer supports it we recommend 1360 x 768 See Preset PC Resolutions on page 43 2 Turn off the power to your HD...

Page 24: ...with photos into the USB port on your HDTV A screen will appear listing the number of files found on your USB device 3 Browse photos or start slideshow a In Browse Photos state The Photo menu opens gi...

Page 25: ...ubmenus for example the TV Rating submenu for Parental Controls 1 Press the OK button on the remote control The HDTV Settings App opens 2 Use the navigation keys around the OK button to select one of...

Page 26: ...ull Full mode allows you to view the entire picture Recommended for HDMI and RGB VGA Computer viewing so you can see the complete picture without the image overstretching beyond the viewing area Stret...

Page 27: ...is selected then you can customize the way Closed Caption is displayed The options available are Caption Style custom or as broadcast Note the following options will only be available if Caption Style...

Page 28: ...red all of the available digital channels in memory you will find that some channels are too weak to watch comfortably or they may be channels you do not want to see Press OK to select the channel to...

Page 29: ...Controls If you want to restrict certain channel and program viewing you can do this by turning on the Parental Control Selected programs movies and channels can then be made available only after an a...

Page 30: ...e When Rating Enable is OFF USA Movie Rating adjustments are not available Press the OK button to block locked or allow unlocked channels by the following US Movie ratings G General audience PG Parent...

Page 31: ...rogramming that does not have a rating Change the PIN Password Enter a new 4 digit password using the number buttons on the remote control Enter it a second time to confirm you entered it correctly No...

Page 32: ...urround sound process Choose from On or Off Note When SRS TruSurround HD is ON Equalizer adjustments are not available SRS TruSurround HD creates an immersive feature rich surround sound experience fr...

Page 33: ...o see the detail in darker parts of the picture and if the brightness is too high the picture will look washed out Note Brightness is only available when Picture Mode is set to Custom Contrast Adjust...

Page 34: ...a computer display 9300K Each preset may also be adjusted for a customized setting Color Enhancement This feature increases the picture reproduction performance of the picture by reducing oversaturati...

Page 35: ...peed This option sets the speed of slideshow Choose from Fast or Slow Show Info Display information about current picture such as current picture name and resolution Help Menu System Info Display info...

Page 36: ...ion which can be purchased at any major retailer 3 Wring liquid out of the cloth before cleaning to prevent water from penetrating into the housing 4 Wipe the TV and remote control with a dry cloth af...

Page 37: ...es that may be connected to your HDTV If you are using an antenna the signal strength of the channel may be low Make sure your antenna is connected securely to the TV and move the antenna around the r...

Page 38: ...other location to see if this is the cause of the problem The picture has abnormal patterns Check the connections of external devices that may be connected to your HDTV Make sure the specifications of...

Page 39: ...ity will be achieved by HDMI The next best is Component followed by Composite Due to variances in broadcast practices it is possible some image distortions can occur Tips for Letterbox Content Users S...

Page 40: ...ts of VIZIO s commitment to service excellence For technical assistance contact our VIZIO Technical Support Department via email or phone Email techsupport VIZIO com 877 698 4946 Fax 949 585 9563 Hour...

Page 41: ...eception which can be determined by turning the equipment off and on the user is encouraged to try to correct the interference by one or more of the following measures 1 Reorient or relocate the recei...

Page 42: ...reverse pull down ATSC with 8VSB QAM demodulation ATSC with MPEG 2 decoding NTSC video decoding via Video AV S Video or Component Progressive Scan Video via HDMI Component or VGA Built in speakers x 2...

Page 43: ...this timing mode See the table below for the factory preset resolutions Preset Pixel Format Horz Freq kHz Horz Polarity Vert Freq Hz Vert Polarity Pixel Clk MHz 1 640 x 480 60Hz 31 469 59 94 25 175 2...

Page 44: ...hip Items not covered include but are not limited to cosmetic damage normal wear and tear misuse signal issues power surges and damages from shipping acts of God any sort of customer misuse installati...

Page 45: ...ounding 4 HDMI 17 Help Menu Reset All Settings 35 Setup Wizard 35 System Info 35 Help Menu 35 INFO Button 16 Input Source Choosing 15 Inputs Antenna 4 Connectors 17 Maintenance of TV 36 Menu Language...

Page 46: ...Wide Menu 26 TV Settings Menu Menu Language 31 Parental Controls Menu 29 PC Settings Menu 29 Time Local Settings 32 Tuner Menu 28 TV Stand Attaching 8 VCR Connecting 23 Video Camera Connecting 23 View...

Reviews: