Vizio L15 User Manual Download Page 8

VIZIO L15 User Guide 

Version - 4/5/2005 

www.vizioce.com 

8

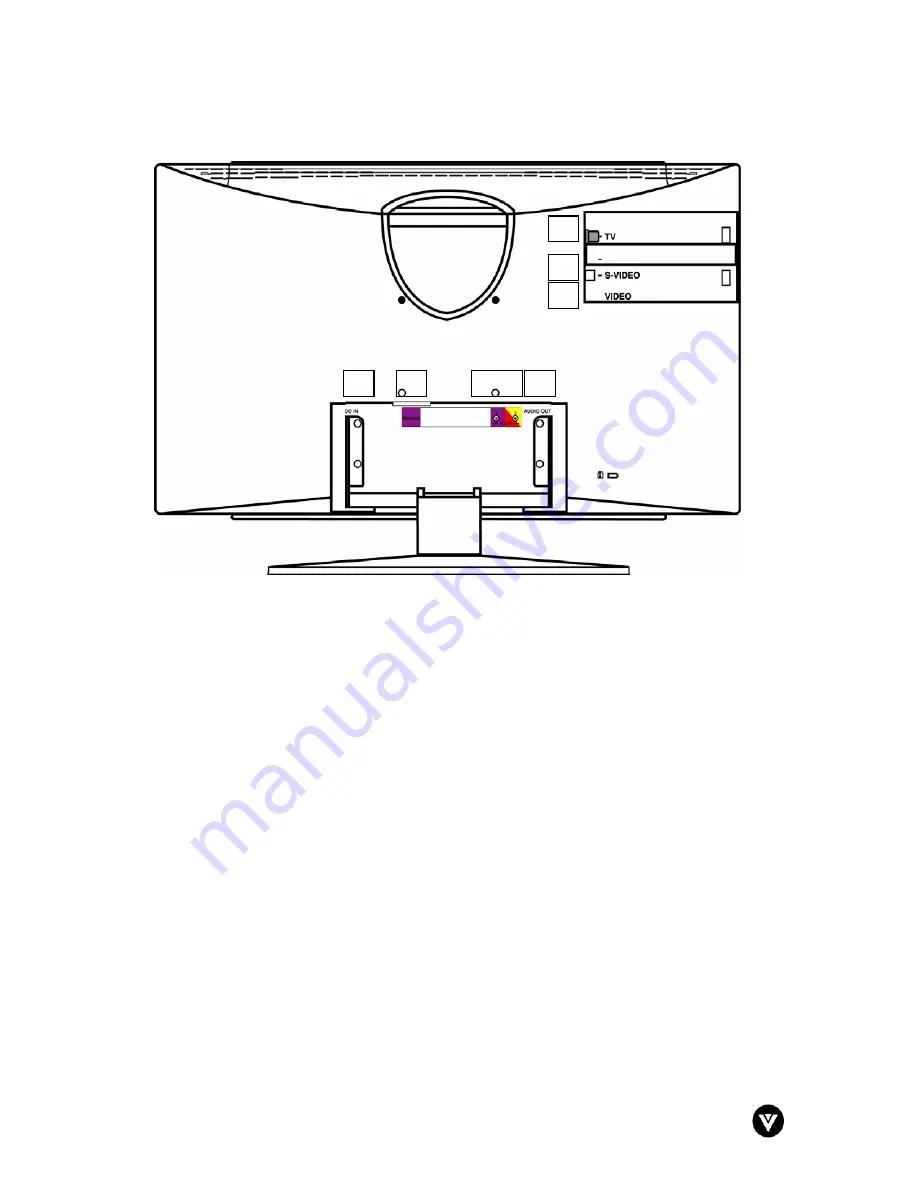
1.9 - Rear Panel Connections 


1. 

DC In

 – Connect one end of the DC Adapter here and connect the power cord to a 

properly grounded outlet.  

 
2. 

Analog (RGB) 

– Connect the analog (RGB) input to external video source such as a PC. 


3. Audio 

Input 


a) Audio 1


– Connect the external audio from a PC source. 

b) Audio 2


– Connect the external audio from the video source such as a DVD player or 

set-top box. 

Note: Please use the audio cable adapter supplied by VIZIO when connecting external 

audio to the L15 LCD TV. 


4. 

Audio Out 

– Connect the internal audio to an external amplifier or receiver.  


5. 

TV 

– Connect to the antenna, satellite or cable service source. 

 
6. 

S-Video 

– Connect the S-Video input to external video device such as VCR, DVD and 

video games. 


7. 

AV 

– Connect the composite video input to external video device such as VCR, DVD and 

video games. 


3a 3b 

Summary of Contents for L15

Page 1: ...S Video 12 2 2 2 Using Composite Video 13 2 3 Connecting Your VCR or Video Camera 13 2 4 Connecting Coaxial RF 14 2 4 1 Using an Antenna 14 2 4 2 Connecting Basic Cable Directly to the TV 15 2 4 3 Using Your Cable Box Connections 15 2 5 Connecting the Computer 16 Chapter 3 Getting Started 17 3 1 Turning your LCD TV On and Off 17 3 2 Installation of Wall Mount Optional 17 3 3 Adjusting Basic LCD TV...

Page 2: ...ector for internal NTSC Tuner 1 x Composite Video 1 x RCA 1 x RGB D Sub 1 x analog RGB 1 x S Video 1xDIN plus 2 x Audio 2 x RCA L R Features CC V Chip Comb Filter Scalar and De Interlacer NTSC Video Decoding via RF Antenna Cable or Satellite Set Top Box may be required Speakers Built in 2 x 2 W Lamp Life 50 000 hours typical Operating Environment Temperature 5 35 C 41 95 F Humidity 10 90 no conden...

Page 3: ... the user manual carefully before performing the installation The power consumption of the display is approximately 60 Watts Please use the power cord designated for the product When an extension cord is required use one with the correct power rating The cord must be grounded and the grounding feature must not be defeated The product should be installed on a flat surface to avoid tipping Space sho...

Page 4: ...t accommodate the three wire plug have an electrician install the correct outlet or use an adapter to ground the appliance safely Do not defeat the safety purpose of the grounded plug Do not overload power strips and extension cords Overloading can result in fire or electric shock The wall socket shall be installed near the equipment and shall be easily accessible Only the marked power source can ...

Page 5: ... connection to grounding electrodes and requirements of the grounding electrode See figure below for proper configuration Lightning Protection For added protection of the LCD TV during a lightning storm or when it is left unattended or unused for long periods of time unplug the LCD TV from the wall outlet and disconnect the antenna or cable system Power Lines Do not locate the antenna near overhea...

Page 6: ...ol Power Cord and DC Adapter Audio Cable and adapter Video Adapter Quick Set up Guide Registration Card Warranty Information This User Guide IMPORTANT Save the original box and all the packing material for future shipping needs Note Your product may also include various other accessories depending on region of purchase ...

Page 7: ...nu is displayed it will exit the sub menu and go back to the last menu 4 Audio This button switches between the available audio sources in the following sequence TV Audio 1 PC or Audio 2 AV 5 Input This button switches between the available input sources in the following sequence AIR TV PC Mode RGB and Video AV or S Video 6 Power Switch the TV on by pressing the button once Press the button again ...

Page 8: ...io 2 Connect the external audio from the video source such as a DVD player or set top box Note Please use the audio cable adapter supplied by VIZIO when connecting external audio to the L15 LCD TV 4 Audio Out Connect the internal audio to an external amplifier or receiver 5 TV Connect to the antenna satellite or cable service source 6 S Video Connect the S Video input to external video device such...

Page 9: ...lable with the TV programming Mono Stereo and SAP Please see Section 3 4 2 3 Sound page 21 for additional details 7 Mute Press this button to eliminate or restore the LCD TV Monitor sound Mute on will appear on the screen when the sound is muted 8 VOL Press these buttons to decrease or increase the sound Also press to select or adjust items in the OSD on screen display menu 9 CH UP DN Press these ...

Page 10: ...ntrol Range Point the remote control at the remote control sensor to transmit the commands Do not place any obstacles between the remote control and the receiver window The effective range of the remote control is approximately 6 feet 2 meters from the front of the receiver window 30º to the left and right 20º up and down 1 10 4 Precautions for the VIZIO Remote Control Remote control should be kep...

Page 11: ... the only way you can connect it to the LCD TV If you have a VCR you can connect your antenna cable to the VCR RF Input and connect the VCR RF Output to this connector Basic Composite The complete video signal is carried through this single pin connector This is the most commonly used video connection Good S Video The video signal is separated into two signals one containing the black and white in...

Page 12: ...DVD player to the S Video jack on the back of your LCD TV 3 Connect the audio cables red and white to the AUDIO OUT left and right jacks on the DVD player 4 Connect the other end of the cables to the audio cable adapter provided 5 Connect the audio cable adapter to the AUDIO 2 jack on the rear of the LCD TV Monitor 6 Turn on the power to the LCD TV and DVD player 7 Select Video using the Video Sou...

Page 13: ...control 2 3 Connecting Your VCR or Video Camera Installation 1 Turn off the power to the LCD TV and VCR or video camera 2 Connect the S Video jack on your VCR or video camera to the S Video jack on the back of your LCD TV 3 Connect the audio cables red and white to the AUDIO OUT left and right jacks on the VCR or video camera 4 Connect the other end of the cables to the audio cable adapter provide...

Page 14: ... adapter 3 Connect the antenna or adapter to the TV jack on the rear of the LCD TV Monitor If the end of the antenna wire is threaded screw it down tightly 4 Turn on the power to the LCD TV 5 Select AIR using the Video Source button on the remote control Select TV using the Audio Source button on the remote control 2 4 1 2 Connecting the Antenna through Your VCR Installation 1 Turn off the power t...

Page 15: ...he Cable Box will be monaural single channel not left and right Installation 1 Turn off the power to the LCD TV 2 Connect the Cable TV signal to the IN jack i e RF IN or CABLE IN on the Cable Box 3 Connect the RF coaxial cable to the OUT jack i e TO TV or RF OUT of the Cable Box 4 Connect the other end of the coaxial cable to the LCD TV Monitor s TV jack Screw it down tightly 5 Turn on the power t...

Page 16: ... end of the cables to the audio cable adapter provided 6 Connect the audio cable adapter to the AUDIO 2 jack on the rear of the LCD TV Monitor 7 Turn on the power to the LCD TV 8 Select Video using the Video Source button on the remote control Then Select Audio 2 AV using the Audio Source button on the remote control 2 5 Connecting the Computer Installation 1 Turn off the power to the LCD TV and C...

Page 17: ...ealer to obtain the appropriate wall mounting kit To convert your LCD TV from a desk mounted to a wall mounted display follow the instructions below 1 Turn off the LCD TV and disconnect the DC adapter from the back of the LCD TV 2 Lay the LCD TV face down on a towel or blanket to protect the screen from damage 3 Unscrew the 4 set screws see Figure 3 2 a that hold the stand to the bottom of the LCD...

Page 18: ...s reached TV Channels To step up through the available TV channels press the CH button on the front panel or remote control once for the next channel or hold it depressed until the desired channel is reached To step down through the available TV channels press the CH button on the front panel or remote control once for the previous channel or hold it depressed until the desired channel is reached ...

Page 19: ...featured opposite with the TV Install Menu highlighted 4 Use the c d buttons again on the remote control to highlight the feature you wish to select within the OSD menu 5 Use the e fbuttons on the remote control to make the necessary adjustments 6 Press the MENU button on the remote control to confirm the desired selection 7 Repeat steps 3 and 6 to adjust additional options within the selected OSD...

Page 20: ...ner Mode Allows the user to change the signal input to Cable or Air antenna Note when cable is selected channels 1 125 are available When AIR antenna is selected channels 2 69 are available Auto Program Automatically sets the LCD TV for local area or cable TV channels Note an antenna or cable TV signal must first be connected to the LCD TV Store Allows the user to edit the channel listing by manua...

Page 21: ...eme to enhance picture quality Choose from the following options Normal VIVID1 or VIVID2 3 4 2 2b Picture for PC Mode Note The below options are only applicable for PC Mode Auto Contrast Automatically adjusts the horizontal phase of the image for the best contrast Contrast Adjusts to sharpen the picture quality The black portions of the picture become richer in darkness and the white become bright...

Page 22: ...within the OSD menu Note after freezing a picture on the screen when the Freeze control is turned off the normal signal programming will be shown at present time The signal that was being shown while the picture was frozen will not be viewable Language Allows for the user to change the OSD Menu language Options include either English or Spanish Factory Settings Resets the TV back to the factory se...

Page 23: ...position of the picture Vertical Adjusts the vertical position of the picture Clock Adjusts the color when patterns appear Phase Adjusts the picture to remove the noise or fuzziness Sharpness Adjust to improve detail 3 4 2 6 Color Note This is only available in PC mode Color Temp Choose from Normal Warm Cool or User preferences Red Adjusts the red color of the picture Green Adjusts the green color...

Page 24: ...m the selection Note For more information about setting a password see Setting a Password page 25 5 The Block Enable option will already be highlighted Press the button to select YES 6 Press ENTER to confirm 7 Once you are back into the Parental Controls press the button to highlight the MOVIE Rating menu Then press the ENTER button on the remote control to select this option 8 Using the e fbutton...

Page 25: ...atings press the MENU button repeatedly to exit the OSD 3 4 4 Setting a Password You control access to the Parental Control Menu features with a password The default password is 9 2 0 3 You can change the password to any four digit number To change the password 1 Press the Input button on the remote control and select TV as the input source 2 Press the MENU button on the remote control so that the...

Page 26: ...the screen is seriously contaminated use a soft cloth moistened with diluted neutral cleaner to clean the display Wring water out of the cloth before cleaning to prevent water from penetrating into the housing Wipe the display with a dry cloth after cleaning 4 2 Troubleshooting Guide If the display fails or the performance changes dramatically check the display in accordance with the following ins...

Page 27: ...nsor TV displays wrong channel or no channels Repeat channel selection Add the channel number s into the TV s memory Use STORE Details are on page 20 Make sure TUNER MODE is set correctly Details are on page 20 Then activate AUTO PROGRAM to set up all available channels Details are on page 20 4 3 Telephone Technical Support Products are often returned due to a technical problem rather than a defec...

Page 28: ...ot occur in a particular installation If this equipment does cause harmful interference to radio or television reception which can be determined by turning the equipment off and on the user is encouraged to try to correct the interference by one or more of the following measures 1 Reorient or relocate the receiving antenna 2 Increase the separation between the equipment and receiver 3 Connect the ...

Page 29: ...grated in the set Integrated HDTV An HDTV that has the digital tuner built into the set It does not need a separate set top box to receive over the air DTV signals Plug and Play or Digital Cable Ready A DTV or other device for digital cable customers that plugs directly into the cable jack and does not require a separate set top box Plug and Play TV owners must obtain a CableCARD from their cable ...

Page 30: ...er servicing tampering or normal wear and tear or TVs on which the serial number has been removed or defaced Image Sticking caused by operating at excessive brightness levels for extended periods or mishandling are not covered by this warranty ANY IMPLIED WARRANTIES INCLUDING ANY IMPLIED WARRANTY OF MERCHANTABILITY AND FITNESS FOR A PARTICULAR PURPOSE SHALL BE LIMITED IN DURATION TO THE PERIOD OF ...

Reviews: