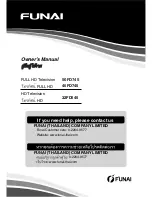
background image

2

10

REMOTE CONTROL

REMOTE CONTROL

INPUT

EXIT

GUIDE

BACK

1

4

7

WIDE

MENU

OK

VOL

VOL

CH

CH

3

6

9

2

5

8

0

INPUT 

Change the currently-displayed input.

ARROW


Navigate the on-screen menu.

EXIT 

Close the on-screen menu.

WIDE 

Switch the display mode.

MUTE 

Turn the audio off or on.

BACK 

Go to the previous on-screen menu.

MENU 

Display the on-screen menu.

DASH 

Use with number pad to manually 

enter a digital sub-channel.  

(For example, 18-4 or 18-5.)

CHANNEL UP/DOWN 

Change the channel.

GUIDE 

Display the info window.

LAST


Return to the channel last viewed.

NUMBER PAD 

Manually enter a channel.

VOLUME UP/DOWN 

Increase or decrease loudness of  

the audio.

OK 

Select the highlighted menu option.

V BUTTON


Open the USB photo viewer.

POWER


Turn TV on or off.

Summary of Contents for E231-B1

Page 1: ...VIZIO USER MANUAL Model E231 B1 E241 B1 ...

Page 2: ...NERGY STAR rating Manufactured under license from Dolby Laboratories Dolby and the double D symbol are trademarks of Dolby Laboratories HDMI the HDMI logo and High Definition Multimedia Interface are trademarks or registered trademarks of HDMI Licensing LLC For DTS patents see http patents dts com Manufactured under license from DTS Licensing Limited DTS the Symbol DTS and the Symbol together are ...

Page 3: ...uctions should be observed for the installation use and maintenance of your TV Read the following safety instructions before operating your TV Keep these instructions in a safe place for future reference To reduce the risk of electric shock or component damage switch off the power before connecting other components to your TV Read these instructions Keep these instructions Heed all warnings Follow...

Page 4: ... penetrates into Use only with the cart stand tripod bracket or table specified by the manufacturer or sold with the apparatus When a cart is used use caution when moving the cart apparatus combination to avoid injury from tip over Unplug this apparatus during lightning storms or when unused for long periods of time Refer all servicing to qualified service personnel Servicing is required when the ...

Page 5: ...c shock do not touch the connector with wet hands Insert batteries in accordance with instructions Incorrect polarities may cause the batteries to leak which can damage the remote control or injure the operator Do not expose batteries to excessive heat such as sunshine fire or the like If any of the following occurs contact the dealer The power cord fails or frays Liquid sprays or any object drops...

Page 6: ...n to grounding electrodes and requirements of the grounding electrode Ground Clamp Antenna Lead In Wire Antenna Discharge Unit NEC Section 810 20 Grounding Conductors NEC Section 810 21 Ground Clamps Power Service Grounding Electrode System NEC ART 250 part H Electric Service Equipment Lightning Protection For added protection of the TV during a lightning storm or when it is left unattended or unu...

Page 7: ... Adjusting the Color Temperature 24 Resetting the Color Temperature Settings 24 Resetting the Picture Settings 25 Adjusting the Audio Settings 26 Resetting the Audio Settings 27 Activating the Sleep Timer 27 Setting the Auto Power Off Feature 28 Setting Up the Tuner 28 Selecting a Tuner Input 29 Scanning for Channels 29 Adding New Channels 29 Skipping Channels 30 Changing the Audio Language 31 Set...

Page 8: ...t Settings 40 Using the Guided Setup Menu 41 Using Guided Setup 41 Using the Info Window 42 Using the USB Media Player 43 Using the USB Media Player 43 Connecting a USB Thumb Drive to the TV 43 Playing USB Media 43 Troubleshooting Technical Support 45 Specifications 48 Limited Warranty 50 Legal Compliance 51 ...

Page 9: ...face using the included stand On a wall using a VESA standard wall mount not included Installing the TV Stand Your TV includes a stand designed to support the weight of the TV and keep it from falling over However the TV can still fall over if It is placed on an uneven unstable or non level surface It is pushed pulled or otherwise improperly moved An earthquake occurs and the TV is not properly se...

Page 10: ...TV screen down on a clean flat surface To prevent scratches or damage to the screen place the TV on a soft surface such as a blanket To install the base 2 Align the stand and hook it into the bottom of the TV as shown ...

Page 11: ...ghten four 4 T4 12mm screws into the base to secure it to the TV When you are finished place the TV on a stable level surface To ensure proper ventilation leave at least 1 of space between the back of the TV and any other objects walls etc ...

Page 12: ...u have determined that you have the correct mount for your TV you can begin the installation To install your TV on a wall 1 Disconnect any cables connected to your TV 2 Place the TV face down on a clean flat stable surface Be sure the surface is clear of debris that can scratch or damage the TV 3 Remove the base by loosening and removing the screws 4 Attach your TV and wall mount to the wall caref...

Page 13: ...sound bar or headset USB Connect USB thumb drive to play photos REAR PANEL RGB Connect VGA cable from PC PC Audio In Connect 3 5mm audio cable from PC HDMI Connect HDMI device Component Composite Connect component or composite device Coaxial Connect coaxial cable from cable satellite or antenna ...

Page 14: ...2 8 SIDE PANEL SIDE PANEL POWER Press and hold to turn TV on or off INPUT Press to change input source ...

Page 15: ...sing the remote aim it directly at this sensor The power indicator flashes on when the TV turns on then goes out after several seconds To keep the power indicator on as long as the TV is on see Turning the Power Indicator On or Off on page 37 FRONT PANEL ...

Page 16: ...f or on BACK Go to the previous on screen menu MENU Display the on screen menu DASH Use with number pad to manually enter a digital sub channel For example 18 4 or 18 5 CHANNEL UP DOWN Change the channel GUIDE Display the info window LAST Return to the channel last viewed NUMBER PAD Manually enter a channel VOLUME UP DOWN Increase or decrease loudness of the audio OK Select the highlighted menu op...

Page 17: ...the Batteries 1 Remove the battery cover 2 Insert two batteries into the remote control Make sure that the and symbols on the batteries match the and symbols inside the battery compartment 3 Replace the battery cover ...

Page 18: ...nent etc 2 Turn the TV and your device off 3 Connect the appropriate cable not included to the TV and the device 4 Turn the TV and your device on Set the TV s input to match the connection you used HDMI Component etc BETTER COMPONENT CABLE ANALOG HD VIDEO 1080i STEREO AUDIO BEST HDMI CABLE DIGITAL HD VIDEO 1080p HD AUDIO GOOD AV CABLE ANALOG VIDEO 480i STEREO AUDIO Maximum Resolution BACK OF TV BE...

Page 19: ...site cables are the traditional way of connecting your devices to your TV Video signals are sent over the yellow connector while audio is sent over the red and white connectors GOOD BETTER COMPONENT VIDEO Y L R HD Video Resolutions up to 1080i Analog Connection Audio and Video Signals Video Resolutions up to 480i Analog Connection Audio and Video Signals CONNECTING A DEVICE AUDIO AND VIDEO CABLE T...

Page 20: ...omponent cables are designed to carry high definition video signals along with additional audio connections Colors are delivered with color information split up three different ways over three connectors for video separated into Red Blue and Green signals and the left and right audio connectors Red and White BETTER COMPONENT VIDEO R L Pr Cr Pb Cb Y HDMI HDMI HD Video Resolutions up to 1080p HD Aud...

Page 21: ... a VGA cable not included to your PC and the RGB port on the back of the TV This cable transmits video 2 Connect a 3 5mm cable not included to your PC and the PC Audio In port on the back of the TV This cable transmits audio 3 Set your PC s resolution to match the resolution of your TV See Appendix B Specifications VGA Cable VIDEO 3 5mm Cable AUDIO ...

Page 22: ...ur device has an audio port that matches an available port on the TV HDMI RCA etc 2 Turn the TV and your audio device off 3 Connect the appropriate cable not included to the TV and the device 4 Turn the TV and your device on BEST HDMI CABLE ARC 2 WAY COMMUNICATION 2 0 5 1 DIGITAL AUDIO PCM DTS DOLBY DIGITAL GOOD 3 5mm CABLE ANALOG STEREO CONNECTION 2 0 CHANNEL ...

Page 23: ...DMI HDMI OPTICAL SPDIF CABLE Optical SPDIF cables transmit audio signals as pulses of light through a cable made of plastic fibers Audio signals are digitally transmitted between devices BETTER PCM Stream Lossless Dolby Digital 5 1 Channel DTS 5 1 Channel Digital Connection Audio Signal Only Optical SPDIF DIGITAL OPTICAL AUDIO CONNECTING AN AUDIO DEVICE AUDIO CABLE TYPES 3 5mm CABLE AV cables or C...

Page 24: ...HDMI ARC setup the audio connection between your TV and Home Audio Receiver can be removed The HDMI cable will transmit audio signal to and from your TV with an all digital audio video connection Without an HDMI ARC setup your TV will transmit audio signal from the built in tuner to your home audio receiver through a separate audio connection Built in Tuner Built in Tuner 3 5mm Audio Your TV ...

Page 25: ...nd Arrow buttons on the remote to highlight your time zone and press OK INPUT EXIT GUIDE BACK 1 4 7 WIDE MENU OK VOL VOL CH CH 3 6 9 2 5 8 0 Choose your mode Select Store Demo for in store display Select Home Use for in home use Seleccione Home Use por Modo de Casa o Store Demo por Demostración de Tienda Choisissez Home Use por Modo de Casa o Store Demo pour Démonstration de Magasin Store Mode Hom...

Page 26: ... Setup Help VIZIO Network Sleep Timer Input CC ABC Audio Wide Normal Picture Settings Panoramic Wide Zoom 2D 3D Exit SETTINGS Picture Audio Timers Tuner Closed Captions Devices System Guided Setup CC While navigating the on screen menu you can press the BACK button at any time to return to the previous menu screen The EXIT button will close the on screen menu NAVIGATING THE ON SCREEN MENU To open ...

Page 27: ...l the TV s screen black bars are added to the left and right of the display image Stretch expands the display image to fill the screen Images may appear wider than intended If you are watching widescreen 1 85 1 or 2 35 1 content black bars will still appear on the top and bottom of the display image This option is only available when the TV is displaying a 720p 1080i source Panoramic expands the d...

Page 28: ...picture Backlight cannot be adjusted when starting from some picture modes Brightness Adjusts the black level of the picture When this setting is too low the picture may be too dark to distinguish details When this setting is too high the picture may appear faded or washed out Contrast Adjusts the white level of the picture When this setting is too low the picture may appear dark When this setting...

Page 29: ...twork Sleep Timer Input CC ABC Audio Wide Normal Picture Settings Panoramic Wide Zoom 2D 3D Exit ADVANCED PICTURE Color Temperature Black Detail Off Backlight Control On Reduce Signal Noise Low Reduce Block Noise Low Picture Size Picture Position Film Mode Auto Reset Picture Mode Picture Size Increase or decrease the vertical and horizontal size of the displayed picture Use the Left Right Arrow bu...

Page 30: ... the Arrow buttons to highlight Color Temperature then press OK 2 Use the Arrow buttons on the remote to highlight Color Temperature then use the Left Right Arrow buttons to change the color temperature preset Cool produces a blue hued picture Computer optimizes the picture for use as a PC monitor Normal is optimized for television viewing Custom allows you to manually change each of the color tem...

Page 31: ... Reset to restore factory default picture settings Highlight Reset and press OK 3 Press the EXIT button on the remote Help VIZIO Network Sleep Timer Input CC ABC Audio Wide Normal Picture Settings Panoramic Wide Zoom 2D 3D Exit ADVANCED PICTURE Color Temperature Black Detail Off Backlight Control On Reduce Signal Noise Low Reduce Block Noise Low Adjust Picture Position Adjust Picture Size Film Mod...

Page 32: ... increases making it difficult to hear dialog or flattening sudden noises If this occurs turn volume leveling off Help VIZIO Network Sleep Timer Input CC ABC Audio Wide Normal Picture Settings Panoramic Wide Zoom 2D 3D Exit AUDIO TV Speakers On Surround Sound On Volume Leveling On Balance Lip Sync Digital Audio Out PCM Equalizer Settings Reset Audio Mode Balance Adjusts the loudness of the audio o...

Page 33: ...n activated the TV s sleep timer will turn the TV off after a set period of time To use the sleep timer 1 Press the MENU button on the remote The on screen menu is displayed 2 Use the Arrow buttons on the remote to highlight Timers and press OK The TIMERS menu is displayed 3 Use the Arrow buttons on the remote to highlight Sleep Timer 4 Use the Left Right Arrow buttons on the remote to highlight t...

Page 34: ...l turn off If you don t want the TV to turn off when there is no signal change the setting to Off Otherwise select 10 minutes 3 When you have finished setting the auto power off time press the EXIT button on the remote SETTING UP THE TUNER You can use the TV s Tuner menu to Select a Tuner Input Perform an Auto Channel Scan Perform a Partial Channel Scan Manually Add Channels Select Channels to Ski...

Page 35: ...ep Timer Input CC ABC Audio Wide Normal Picture Settings Panoramic Wide Zoom 2D 3D Exit CHANNEL SCAN Channels Found Digital Channels 0 Analog Channels 0 13 Complete Cancel Cancel the channel scan Adding New Channels Occasionally you may need to add a new range of channels or add a new analog channel You can do this by using the Partial Channel Search and Add Analog Channel options To add a range o...

Page 36: ...rtably There may also be some channels you do not want to view You can remove these channels from the TV s memory with the Skip Channel feature Channels that have been removed with the Skip Channel feature can still be viewed if the channel is entered using the Number Pad If you wish to completely block a channel from being viewed use the parental controls See Locking and Unlocking Channels on pag...

Page 37: ...dio Programming SAP SAP allows you to listen to broadcasts in multiple languages Analog Audio works with analog channels Digital Language works with digital channels Not all programs are broadcast in multiple languages The Analog Audio and Digital Language features only works when the program being viewed is being broadcast in the language you select To use the Analog Audio feature 1 From the TUNE...

Page 38: ... 2D 3D Exit CLOSED CAPTIONS Analog Closed Captions CC1 Digital Closed Captions CS1 Digital Caption Style Changing the Appearance of Digital Closed Captions Digital closed captions can be displayed according to your preference See the diagram on the next page for an explanation of the parts of the closed caption area To change the appearance of digital closed captions 1 From the CLOSED CAPTIONS men...

Page 39: ...reen the background is black and the window is red In the example below the closed caption text is green the background is black and the window is red Background Opacity Change the transparency of the background directly behind the text Window Color Change the color of the closed captioning box Window Opacity Change the opacity of the closed captioning box 4 When you are satisfied with the appeara...

Page 40: ...s OK 4 To use a preset input name a Highlight the Input Port row and press OK b Highlight the input name you want to use and press OK or To enter a custom name a Enter your custom label using the on screen keyboard b Highlight OK and press OK c The Input Name changes to show the custom name that you created 5 When you have finished naming your input press the EXIT button on the remote Help VIZIO N...

Page 41: ... SYSTEM System Information Menu Language English Time Local Settings Parental Controls CEC Power Indicator Off Reset Admin Displaying System Information To display a summary of the TV settings 1 Press the MENU button on the remote The on screen menu is displayed 2 Use the Arrow buttons on the remote to highlight System and press OK The SYSTEM menu is displayed 3 Highlight System Information and pr...

Page 42: ...ge 37 Enabling or Disabling Program Ratings To manage program content according to its rating you must enable the Program Rating feature To enable or disable the Program Rating feature 1 From the PARENTAL CONTROLS menu highlight Locks and press OK The LOCKS menu is displayed 2 Select On or Off and press OK Locking and Unlocking Channels When a channel is locked it will be inaccessible Locking a ch...

Page 43: ...ings cannot be viewed 4 When the rating type is unblocked the Lock icon appears unlocked Content with this rating and all lower ratings can be viewed If you want to block all unrated content highlight Block Unrated Shows and use the Arrow buttons on the remote to select On 5 When you are finished adjusting the rating level blocks press the EXIT button on the remote Changing the Parental Control Pa...

Page 44: ...ENU LANGUAGE English Español Français Setting the Time Zone To ensure the correct time is displayed when you press the GUIDE button set the TV s time zone 1 Press the MENU button on the remote The on screen menu is displayed 2 Use the Arrow buttons on the remote to highlight System and press OK The SYSTEM menu is displayed 3 Use the Arrow buttons on the remote to highlight Time Local Settings and ...

Page 45: ...etting CEC Function To use CEC you must select On System Audio Control When system audio control is on you can control your device s audio using the TV s remote control Device Discovery Use this function to determine if your device is connected and supports CEC 5 Press the EXIT button on the remote Turning the Power Indicator On or Off The Power Indicator on the front of your TV normally does not ...

Page 46: ...ings will be lost To restore the TV to its factory default settings 1 Press the MENU button on the remote The on screen menu is displayed 2 Use the Arrow buttons on the remote to highlight System and press OK The SYSTEM menu is displayed 3 Highlight Reset Admin and press OK The RESET ADMIN menu is displayed 4 Highlight Reset TV to Factory Defaults and press OK 5 Enter your parental control passcod...

Page 47: ... displayed 2 Highlight Guided Setup and press OK The GUIDED SETUP menu is displayed 3 Highlight the guided setup you want to use and press OK Tuner Setup Set up the TV tuner 4 Follow the on screen instructions When finished press the EXIT button on the remote Help VIZIO Network Sleep Timer Input CC ABC Audio Wide Normal Picture Settings Panoramic Wide Zoom 2D 3D Exit GUIDED SETUP Tuner Setup ...

Page 48: ... rating audio information and the start and end times of the program DIGITAL EPISODE GUIDE WINDOW Oliver s Holiday Surprise 1080p 6 15pm 11 00AM 12 00PM TV PG V Dolby Digital Stereo Oliver wakes up one morning only to discover that his pals are missing In this hour long holiday special Oliver goes on a journey in search of his pals Who knows what he ll encounter on the way Program Description Prog...

Page 49: ... thumb drive Remember The USB thumb drive must be formatted as FAT32 Files on the USB thumb drive must end in a supported file extension jpg To play your USB media 1 Connect your USB thumb drive to the USB port on the side of the TV 2 Press the V button 3 Highlight your USB device in the list and press OK 4 Highlight the type of media you wish to display Photo Press OK 5 Use the Arrow buttons to h...

Page 50: ...folder path Page Information If your USB thumb drive has more files than can be displayed on a single screen the page information is displayed here Back Button Highlight and press OK to return to left column Connected Sources Displays connected USB devices To change source highlight it and press OK Current Folder Back Button Highlight this button and press OK if you would like to return to the pre...

Page 51: ... FREE techsupport VIZIO com www VIZIO com support Hours of operation Monday Friday 5 AM TO 8 PM PST Saturday Sunday 7 AM TO 4 PM PST The VIZIO support team is highly trained and is based in the United States We can help with New Product Setup Connecting Your Devices Technical Problems And More We speak English Se habla Español Nous parlons Français 45 ...

Page 52: ...ce There is no sound Press Volume Up on the remote control Press the MUTE button on the remote to ensure mute is off Check the audio settings See Adjusting the Audio Settings on page 26 Ensure the speakers are set to On Ensure no headphones are connected to the TV Check the audio connections of external devices Blu ray player game console cable satellite box that are connected to the TV If you are...

Page 53: ...e inherent to this type of product and do not constitute a defective product I see noise or static on the screen When your TV s digital capabilities exceed a digital broadcast signal the signal is up converted improved to match your TV s display capabilities This up converting can sometimes cause irregularities in the image If you are using an antenna the signal strength of the channel may be low ...

Page 54: ...6 83 lbs TV Type LED LED Refresh Rate 60 Hz 60 Hz Maximum Resolution 1366 x 768 1920 x 1080 Pixel Pitch 372 mm x 372 mm 271 mm x 271 mm Response Time 8 ms 5 ms Brightness 250 nits 250 nits Viewing Angle 170 H 160 V 178 H 170 V HDMI Inputs 1 1 Component Video Inputs 1 1 Composite Inputs 1 Shared with Component 1 Shared with Component RF Antenna Input 1 1 USB 2 0 Ports 1 1 Audio Outputs Stereo 3 5mm...

Page 55: ...glish Spanish French Remote Control Model XRT020 XRT020 Certifications UL FCC Class B HDMI Dolby Digital UL FCC Class B HDMI Dolby Digital Compliance Energy Star Energy Star Voltage Range 120V 60 Hz 120V 60 Hz Power Consumption 22 77W 25 77W Standby Power 1W 1W ...

Page 56: ... of customer misuse modifications or adjustments as well as installation and set up issues or any repairs attempted by anyone other than by aVIZIO authorized service center Products with unreadable or removed serial numbers or requiring routine maintenance are not covered This one year limited warranty does not cover Products sold AS IS FACTORY RECERTIFIED or by a non authorized reseller THERE ARE...

Page 57: ...eceiver 3 Connect the equipment into an outlet on a circuit different from that to which the receiver is connected 4 Consult the dealer or an experienced radio TV technician for help This device complies with Part 15 of the FCC Rules Operation is subject to the following two conditions 1 this device may not cause harmful interference and 2 this device must accept any interference received includin...

Page 58: ... 2013 VIZIO INC ALL RIGHTS RESERVED 131220OC NC ...

Reviews: