background image

English - iv

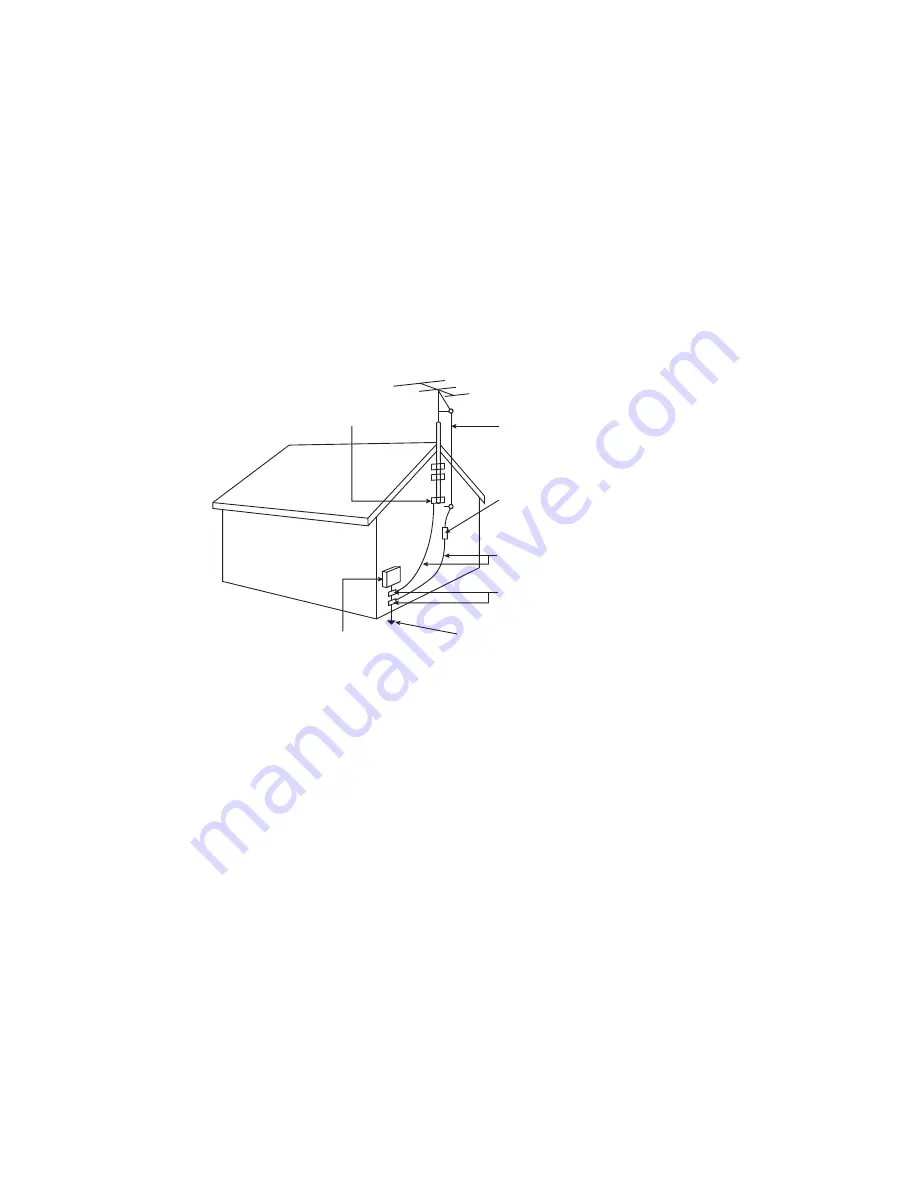
Ground Clamp

Antenna Lead In Wire

Antenna Discharge Unit  

(NEC Section 810-20)

Grounding Conductors 

(NEC Section 810-21)

Ground Clamps

Power Service Grounding Electrode System 

(NEC ART 250, part H)

Electric Service Equipment

•  If an outside antenna/satellite dish or cable system is to 

be connected to the TV, make sure that the antenna or 

cable system is electrically grounded to provide some 

protection against voltage surges and static charges.

•  Article 810 of the National Electrical Code, ANSI/NFPSA 

70, provides information with regard to proper grounding 

of the mast and supporting structure, grounding of 

the lead-in wire to an antenna discharge unit, size 

of the grounding conductors, location of antenna 

discharge unit, connection to grounding electrodes, and 

requirements of the grounding electrode.

TV antenna connection protection

•  Lightning Protection: For added protection of the TV 

during a lightning storm or when it is left unattended or 

unused for long periods of time, unplug the TV from the 

wall outlet and disconnect the antenna or cable system.

•  Power Lines: Do not locate the antenna near overhead 

light or power circuits, or where it could fall into such 

power lines or circuits. Remember, the screen of the 

coaxial cable is intended to be connected to earth in the 

building installation.

Summary of Contents for D24-D1

Page 1: ...INSTALLATION GUIDE VIZIO Please read this guide before using the product D24 D1 D28h D1 ...

Page 2: ...amaged in any way such as the power supply cord or plug is damaged liquid has been spilled or objects have fallen into the apparatus the apparatus has been exposed to rain or moisture does not operate normally or has been dropped Unplug the power cord before cleaning your TV When moving your TV from an area of low temperature to an area of high temperature condensation may form in the housing Wait...

Page 3: ...V will not be used for an extended period of time unplug the power cord To reduce risk of electric shock do not touch the connector with wet hands Insert batteries in accordance with instructions Incorrect polarities may cause the batteries to leak which can damage the remote control or injure the operator Do not expose batteries to excessive heat such as sunshine fire or the like If any of the fo...

Page 4: ...r grounding of the mast and supporting structure grounding of the lead in wire to an antenna discharge unit size of the grounding conductors location of antenna discharge unit connection to grounding electrodes and requirements of the grounding electrode TV antenna connection protection Lightning Protection For added protection of the TV during a lightning storm or when it is left unattended or un...

Page 5: ...STRATION Why register Customized Support Get assistance quickly with your information on hand News and Offers Take advantage of the latest news and special offers from VIZIO Safety and Satisfaction Stay up to date with important product updates and notifications ...

Page 6: ...tands 10 First Time setup 12 Connecting to the Internet with Wi Fi 16 Getting Started with VIZIO Internet Apps Plus 18 Viewing the on screen user manual 20 Wall mounting the TV 21 Additional connections 22 Connecting a computer 22 Connecting an audio device 24 Legal information 29 Regulatory information 30 Limited warranty 32 ...

Page 7: ...DTV Multi Language Quick Start Guide INSTALLATION GUIDE VIZIO Please read this guide before using the product D24 D1 D28h D1 4 x Phillips Screws For D28h D1 Power Cable Basic Remote w Batteries Display Stands 4 x Phillips Screws For D24 D1 ...

Page 8: ...ct the highlighted option 11 Back Go to the previous on screen menu 12 Guide Display the info window 13 Volume Up Down Increase or decrease the loudness of the audio 14 V Button Open the VIZIO Internet Apps Plus V I A Plus dock 15 Channel Up Down Change the channel 16 Mute Turn the audio on or off 17 Wide Change the display mode 18 PIC Opens the Picture Mode menu 19 Last Return to the last viewed ...

Page 9: ... included for you to use with the basic remote control To insert replace the batteries 1 Press on the arrow and slide the battery cover off 2 Insert two AAA batteries included Be sure to align the and signs on the batteries and remote 3 Replace the battery cover 1 2 ...

Page 10: ... on an uneven unstable or non level surface It is pushed pulled or otherwise improperly moved If an earthquake occurs and the TV is not properly secured Remove any plastic wrapping from the TV and stands Place the TV screen down on a clean flat surface To prevent scratches or damage to the screen place the TV on a soft surface such as a carpet rug or blanket and avoid any sharp edges ...

Page 11: ...s When you are finished place the TV on a stable level surface To ensure proper ventilation leave at least 1 of space between the back of the TV and any other objects like walls Note The image shown here is for illustrative purposes only and may be subject to change The actual number of ports and their locations may vary depending on the model ...

Page 12: ...irst Choose ONE connection type for each device 1 B A A C D B C D Connect to Ethernet Port English 12 Note The image shown here is for illustrative purposes only and may be subject to change The actual number of ports and their locations may vary depending on the model ...

Page 13: ... with Wi Fi section for more information INTERNET CONNECTION HIGH SPEED INTERNET CONNECTION LATEST CONTENT Wi Fi ALSO AVAILABLE2 Antenna COMPOSITE CABLE ANALOG SD VIDEO 480i 1 STEREO AUDIO COMPONENT CABLE ANALOG HD VIDEO 1080p 1 STEREO AUDIO HDMI CABLE HDMI 1 2 DIGITAL HD VIDEO 1080p 1 HD AUDIO Latest Content Gaming Console Cable or Satellite Receiver Blu Ray Player Common Devices ...

Page 14: ...one end of the power cable to the back of the display The flat edge of the connector faces the outer edge of the display Plug the other end of the power cord into an electrical outlet The display powers on automatically 2 ...

Page 15: ...me Use and press OK Follow the on screen instructions to complete the first time setup 3 Choose your mode Select Store Demo for in store display Select Home Use for in home use Seleccione Home Use por Modo de Casa o Store Demo por Demostración de Tienda Choisissez Home Use pour Mode Domicile ou Store Demo pour la Démo en Magasin Store Demo Home Use ...

Page 16: ...ght Guided Setup and press OK The GUIDED SETUP menu is displayed Highlight Network Setup and press OK The Network Setup guide is displayed Connecting to the Internet with Wi Fi VIZIO Netw Slee Time Inpu Wide Exit GUIDED SETUP Channel Setup Network Setup Help VIZIO Network Sleep Timer Input CC ABC Audio Wide Normal Picture Settings Panoramic Wide Zoom 2D 3D Exit TV SETTINGS Picture Audio Timers Net...

Page 17: ...on screen keyboard type your network s password then highlight Connect and press OK Wall blocks signal Furniture blocks signal Far from TV No wall blocks signal No furniture blocks signal Close to TV P Wireless Router Î If you are having trouble connecting to your network check your router placement Walls and large metal objects can block the signal Other devices broadcasting at 2 4 or 5 GHz can i...

Page 18: ... A high speed Internet connection is required to receive product updates and to access online content Getting Started with VIZIO Internet Apps Plus Press the OK button to launch an app Press the Left Right arrow buttons to scroll through the apps on the dock The highlighted App is in the center of the dock Press the V button to display the V I A Plus App dock Press the V button twice to launch the...

Page 19: ... Button twice to launch the fullscreen V I A Plus Apps window My Apps Features the apps installed on your TV Installed Apps The apps displayed here are also available in the V I A Plus App Dock App Tabs Browse through apps on these tabs and add them to your My Apps tab You can also open the app directly from the app store Note App location appearance and availability subject to change without noti...

Page 20: ...ow and OK buttons to highlight User Manual and press OK To navigate the on screen user manual Use the Up and Down arrow buttons to select the chapter you want to view Use the Left and Right arrow buttons to browse through the pages in each chapter Press the EXIT button to exit the on screen User Manual Viewing the on screen user manual ...

Page 21: ...t can scratch or damage the TV 3 Remove the stands by loosening and removing the screws 4 Attach your TV and wall mount to the wall carefully following the instructions that came with your mount Use only with a UL listed wall mount bracket rated for the weight load of this TV Wall mounting the TV D24 D1 D28h D1 Screw Size M4 Hole Pattern 100 mm V x 100 mm H Weight w o Stand 7 48 lbs 9 04 lbs Insta...

Page 22: ...can be used to display output from a personal computer Connecting a computer Note The image shown here is for illustrative purposes only and may be subject to change The actual number of ports and their locations may vary depending on the model ...

Page 23: ...t included to your PC and the RGB port on the back of the TV This cable transmits video 2 Connect a 3 5mm cable not included to your PC and the PC Audio In port on the back of the TV This cable transmits audio 3 Set your PC s resolution to match the resolution of your TV See your TV s user manual for the maximum resolution available ...

Page 24: ...n audio device such as a receiver or sound bar Connecting an audio device Note The image shown here is for illustrative purposes only and may be subject to change The actual number of ports and their locations may vary depending on the model ...

Page 25: ...n the TV HDMI 3 5mm etc 2 Turn the TV and your audio device off 3 Connect the appropriate cable not included to the TV and the device 4 Turn the TV and your device on 3 5mm CABLE ANALOG STEREO CONNECTION 2 0 CHANNEL HDMI CABLE CFC 2 WAY COMMUNICATION 2 0 5 1 DIGITAL AUDIO PCM DTS DOLBY DIGITAL Sound bar sytem Audio Receiver ...

Page 26: ...turned on Press the INPUT button on the remote and select the input to which your device is connected to e g HDMI 1 HDMI 2 COMP etc There are black gray bars on the top bottom sides of the screen Some TV channels add black bars to the picture this is normal Set the TV to Wide or Zoom mode Press the WIDE button highlight Wide or Zoom and press OK Adjust the video settings of your external device Se...

Page 27: ... 9 am to 6 pm CST Phone 877 698 4946 toll free You can also contact our popular support team at Live chat support available Find help with New product setup Connecting your devices Technical problems Product updates and more Award Winning Customer Care At Your Convenience NEED HELP Go to support vizio com ...

Page 28: ...tra Slim HDMI Cable brings television movies sports and gaming to life with support for Ultra High Definition video and audio Easily installed in tight spaces these cables keep your entertainment setup tidy Product sold separately Available at VIZIO com ...

Page 29: ... Quick Start Guide may not be copied in whole or in part without the written permission of VIZIO Inc VIZIO Inc has made reasonable efforts to ensure the accuracy of the information provided herein All product specifications functionality features configurations performance design and other product information described herein are subject to Legal information change without notice VIZIO Inc is not ...

Page 30: ...t on a circuit different from that to which the receiver is connected Consult the dealer or an experienced radio TV technician for help This device complies with Part 15 of the FCC Rules Operation is subject to the following two conditions 1 this device may not cause harmful interference and 2 this device must accept any interference received including interference that may cause undesired operati...

Page 31: ...ppareil est conforme aux CNR exempts de licence d Industrie Canada Son fonctionnement est sujet aux deux conditions suivantes 1 le dispositif ne doit pas produire de brouillage préjudiciable et 2 ce dispositif doit accepter tout brouillage reçu y compris un brouillage susceptible de provoquer un fonctionnement indésirable Industry Canada Class B emission compliance statement This Class B digital a...

Page 32: ...in its Limited warranty original packaging or in packaging that affords an equal degree of protection VIZIO Technical Support will provide instructions for packing and shipping the product to the VIZIO service center ALL USER DATA AND DOWNLOADED APPLICATIONS STORED ON A PRODUCT WILL BE DELETED IN THE COURSE OF SOME IN HOME AND ALL SHIP IN WARRANTY SERVICE If this occurs your product will be restor...

Page 33: ...ONSOLIDATED OR COMBINED WITH ANOTHER ARBITRATION OR PROCEEDING WITHOUT THE PRIOR WRITTEN CONSENT OF ALL PARTIES TO ANY SUCH ARBITRATION OR PROCEEDING Exceptions to Binding Arbitration Agreement and Class Action Waiver IF YOU DO NOT WISH TO BE BOUND BY THE BINDING ARBITRATION AGREEMENT AND CLASS ACTION WAIVER THEN 1 you must notify VIZIO in writing within sixty 60 days of the date that you purchase...

Page 34: ...and downloaded applications is not covered under this warranty In order to protect your personal information VIZIO recommends that you always clear all personal information from the product before it is serviced regardless of the servicer VIZIO s Responsibilities If VIZIO determines that a product is covered by this warranty VIZIO will at its option repair or replace it or refund the purchase pric...

Page 35: ...your original warranty Check www vizio mx for the most current version INFORMATION EXCLUSIVELY FOR MEXICO To make a warranty claim or to obtain parts components supplies and accessories you may contact the importer of record the warranty service provider or the establishment from whom you purchased the VIZIO product Importer of Record VIZIO Sales Marketing México S de RL de CV Presidente Masaryk 1...

Page 36: ... 2015 VIZIO INC ALL RIGHTS RESERVED 151002OC US NC ...

Reviews: