background image

DLP Projector—User’s Manual 

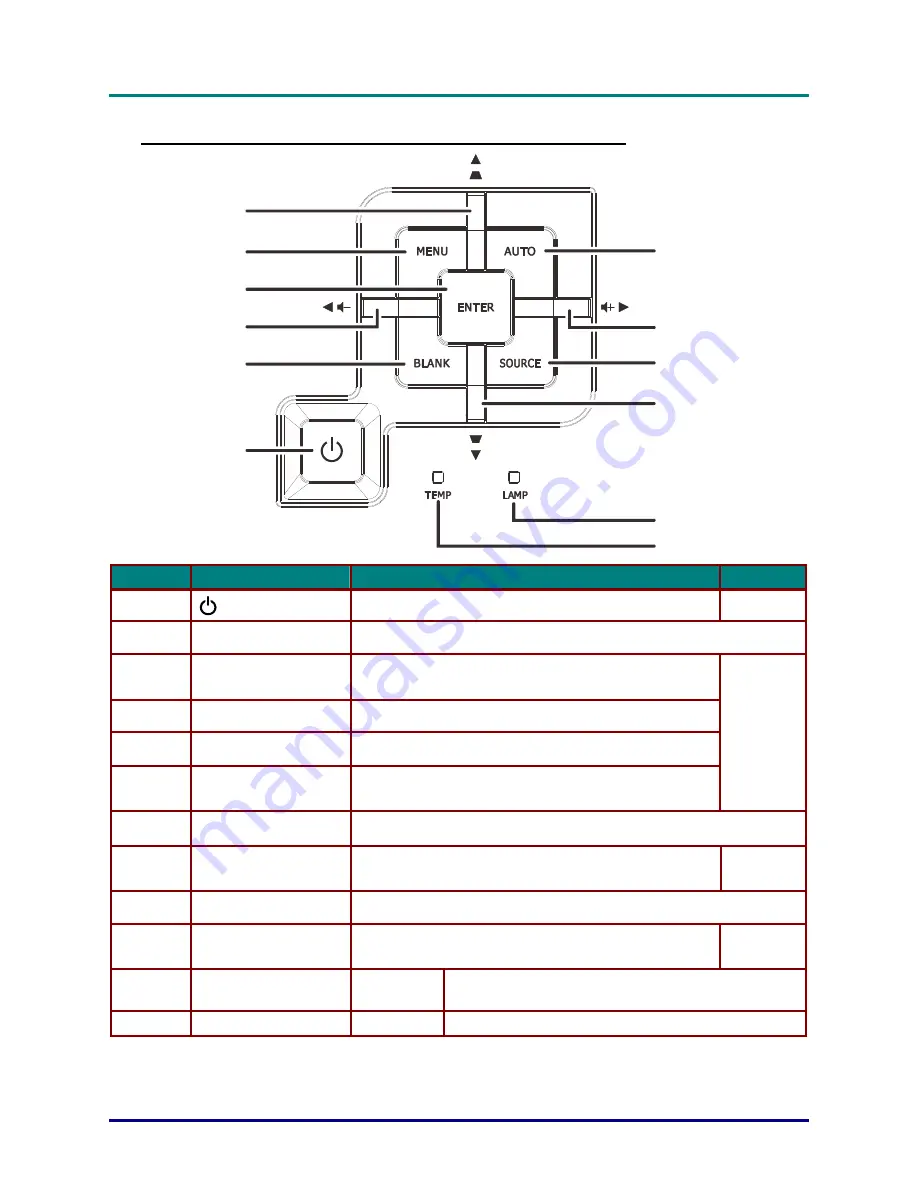
Top view—On-screen Display (OSD) buttons and LEDs 

1

2

3

4

5

7

8

6

9
10

11
12


I

TEM


L

ABEL


D

ESCRIPTION


S

EE PAGE

1.  

 (Power button) 

Turns the projector On or Off. 

11 

2.  

BLANK 

Displays a blank screen and mutes audio 

3.  

 (Left cursor) /  

Volume- 

Navigates and changes settings in the OSD 
Quick Menu – For Volume 

4.  

Enter 

Enter or confirm highlighted OSD menu item 

5.  

MENU 

Opens and exits OSD menus 

6.  

 (Up cursor) /  

Navigates and changes settings in the OSD 
Quick Menu – For Keystone 

18 

7.  

AUTO 

Optimizes image size, position, and resolution 

8.  

 (Right cursor) /  


Navigates and changes settings in the OSD 
Quick Menu – For Volume 

18 

9.  

SOURCE 

Enter the Source menu 

10.  

 (Down cursor) / 

Keystone- 

Navigates and changes settings in the OSD 
Quick Menu – For Keystone 

18 

11.  

LAMP LED 

Flashing 

Lamp is not ready (warming up/shutting down/cooling) 
(see 

LED Error Messages 

on page 52) 

12.  

TEMP LED 

Flashing 

Error code 

 3 


Summary of Contents for D966HD Series

Page 1: ......

Page 2: ...antability or fitness for any particular purpose The manufacturer reserves the right to revise this publication and to make changes from time to time in the content hereof without obligation of the ma...

Page 3: ...e the unit Warning Alerts you to situations that may damage the unit create a hazardous environment or cause personal injury Throughout this manual component parts and items in the OSD menus are denot...

Page 4: ...xhaust vent Ensure that the intake vents do not recycle hot air from the exhaust vent When operating the projector in an enclosed space ensure that the surrounding air temperature within the enclosure...

Page 5: ...r should be connected to the AUDIO IN port and CANNOT be connected to AUDIO OUT or other ports like BNC RCA otherwise it will lead to mute output and even DAMAGE the port Install the projector above 2...

Page 6: ...ur face away from the exhaust vent so that you do not suffer from the gas and broken shards of the lamp Cleaning the Projector Unplug the power cord before cleaning See Cleaning the Projector page 49...

Page 7: ...8 OSD MENU CONTROLS 18 Navigating the OSD 18 SETTING THE OSD LANGUAGE 19 OSD MENU OVERVIEW 20 IMAGE MENU 21 Computer Menu 22 Advanced Feature 23 Color Manager 24 SETTINGS 1 MENU 25 Audio 26 Advanced 1...

Page 8: ...TANCE VS PROJECTION SIZE 57 Projection Distance and Size Table 57 TIMING MODE TABLE 59 PROJECTOR DIMENSIONS 61 REGULATORY COMPLIANCE 62 FCC WARNING 62 CANADA 62 SAFETY CERTIFICATIONS 62 APPENDIX I 63...

Page 9: ...LENS CAP RGB CABLE POWER CORD CARRYING CASE OPTIONAL CD ROM THIS USER S MANUAL QUICK START GUIDE WARRANTY CARD Contact your dealer immediately if any items are missing appear damaged or if the unit d...

Page 10: ...ojector 15 3 Lens Projection Lens 4 IR receiver Receive IR signal from remote control 7 5 Focus ring Focuses the projected image 6 Zoom ring Enlarges the projected image 16 7 Function keys See Top vie...

Page 11: ...ghted OSD menu item 5 MENU Opens and exits OSD menus 6 Up cursor Keystone Navigates and changes settings in the OSD Quick Menu For Keystone 18 7 AUTO Optimizes image size position and resolution 8 Rig...

Page 12: ...Connect the HDMI cable from a HDMI device 10 3D SYNC Connect the 3D IR glasses transmitter Note For Vivitek brand 3D IR glasses only 11 DC 12V TRIGGER When connected to the screen through a commercia...

Page 13: ...pported by screen manufacturers Do not use this jack for anything other than intended use Note If your video equipment has both S VIDEO and RCA jacks composite video connect to the S VIDEO connector S...

Page 14: ...n Push to release adjustor 15 Note When installing ensure that you use only UL Listed ceiling mounts For ceiling installations use approved mounting hardware and M4 screws with a maximum screw depth o...

Page 15: ...ector If the path between the remote control and the projector is obstructed you can bounce the signal off certain reflective surfaces such as projector screens 3 The buttons and keys on the projector...

Page 16: ...e unfreezes the on screen picture 16 Blank Makes the screen blank 17 Source Detects the input device 18 Auto Auto adjustment for phase tracking size position 19 Menu Opens the OSD 18 20 Status Opens t...

Page 17: ...rear of the projector the remote will function well within a radius of about 7 meters 23 feet and 15 degrees above or below the projector level If the projector does not respond to the remote control...

Page 18: ...over in the direction of the arrow 2 Insert the battery with the positive side facing up 3 Replace the cover Caution 1 Only use AAA batteries Alkaline batteries are recommended 2 Dispose of used batte...

Page 19: ...the projector The projector splash screen displays and connected devices are detected See Setting an Access Password Security Lock on page 13 if security lock is enabled 4 If more than one input devic...

Page 20: ...Press Power again message appears press the POWER button The projector turns off Caution 1 Be sure to remove the lens cap before starting projector 2 Do not unplug the power cord until all of fans are...

Page 21: ...Keep the password in a safe place Without the password you will not be able to use the projector If you lose the password contact your reseller for information on clearing the password 1 Press the ME...

Page 22: ...Press the cursor buttons in any order to set the password Push the MENU button to exit the dialog box 6 The password confirm menu appears when user presses the power on key in case the Security Lock...

Page 23: ...uster foot before adjusting the projection angle Ensure the cables are in a safe location You could trip over them 1 To raise the level of the projector lift the projector A and press the height adjus...

Page 24: ...ctor only to resize the projected image and screen size 2 Use the Image focus control on the projector only to sharpen the projected image 3 Use the KEYSTONE buttons on the projector or the remote con...

Page 25: ...ess the Volume buttons on the remote control The volume control appears on the display 2 Press the Left or Right Cursor buttons on the keypad to adjust Volume 3 Press the MUTE button to turn off the v...

Page 26: ...D press the MENU button 2 There are three menus Press the cursor button to move through the menus 3 Press the cursor button to move up and down in a menu 4 Press to change values for settings 5 Press...

Page 27: ...on Press the cursor button to navigate to Settings 1 Press the cursor button to move to the Advanced 1 menu 2 Press Enter to enter the Advanced 1 sub menu Press the cursor button until Language is hig...

Page 28: ...Digital Zoom Keystone Advanced 1 Advanced 2 Auto Source Auto Power On No Signal Power Off Status Reset All Lamp Mode Advanced 1 Advanced 2 Volume Security Lock Blank Screen Keypad Lock 3D Setting Hori...

Page 29: ...he cursor button to enter and set the Display Mode Brightness Press the cursor button to enter and adjust the display brightness Contrast Press the cursor button to enter and adjust the display contra...

Page 30: ...down in the Computer menu ITEM DESCRIPTION Horizontal Position Press the cursor button to enter and adjust the display position to left or right Vertical Position Press the cursor button to enter and...

Page 31: ...r value Sharpness Press the cursor button to enter and adjust the display sharpness Gamma Press the cursor button to enter and adjust the gamma correction of the display Color Temperature Press the cu...

Page 32: ...Color Manager Press the buttons to adjust the Hue Saturation and Gain Blue Select to enter the Blue Color Manager Press the buttons to adjust the Hue Saturation and Gain Cyan Select to enter the Cyan...

Page 33: ...Keypad Projection Press the cursor button to enter and choose from four projection methods Aspect Ratio Press the cursor button to enter and adjust the video aspect ratio Keystone Press the cursor but...

Page 34: ...move to the Settings 1 menu Press to move to the Audio menu and then press Enter or Press to move up and down in the Audio menu ITEM DESCRIPTION Volume Press the cursor button to enter and adjust the...

Page 35: ...o enter and select different color to blank the screen Splash Logo Press the cursor button to enter and select splash logo Closed Captioning Press the cursor button to enter and enable or disable Clos...

Page 36: ...ed 3D content from a 3D DVD or 3D media file 5 You need to enable the 3D source some 3D DVD content may have a 3D on off selection feature 6 You need DLP link 3D or IR 3D shutter glasses With IR 3D sh...

Page 37: ...u and then press Enter or Press to move up and down in the Advanced 2 menu Press to enter and change values for setting ITEM DESCRIPTION Test Pattern Press the cursor button to enter and select intern...

Page 38: ...upplied Lamp Mode Press the cursor button to enter and select the lamp mode for higher brightness or lower brightness to save lamp life Note Remarks to Dynamic ECO of ImageCareTM 1 Shut down is not al...

Page 39: ...s menu and press Enter or to enter ITEM DESCRIPTION Active Source Display the activated source Video Information Displays resolution video information for RGB source and color standard for Video sourc...

Page 40: ...OSD background translucent level Low Power Mode Press the cursor button to enter and turn Low Power Mode on or off Fan Speed Press the cursor button to enter and toggle between Normal and High fan sp...

Page 41: ...atus DHCP Press to turn DHCP On or Off Note If you select DHCP Off complete the IP Address Subnet Mask Gateway and DNS fields IP Address Enter a valid IP address if DHCP is turned off Subnet Mask Ente...

Page 42: ...emark and logo registration in Japan the United States of America and other countries by JBMIA Supported External Devices This projector is supported by the specified commands of the Crestron Electron...

Page 43: ...DLP Projector User s Manual LAN_RJ45 1 Connect an RJ45 cable to RJ45 ports on the projector and the PC Laptop 2 On the PC Laptop select Start Control Panel Network Connections 35...

Page 44: ...Local Area Connection and select Properties 4 In the Properties window select the General tab and select Internet Protocol TCP IP 5 Click Properties 6 Click Use the following IP address and fill in th...

Page 45: ...ress 10 10 10 10 Subnet Mask 255 255 255 0 Gateway 0 0 0 0 DNS Server 0 0 0 0 10 Press Enter to confirm settings Open a web browser for example Microsoft Internet Explorer with Adobe Flash Player 9 0...

Page 46: ...Name 10 Location 10 Projector Assigned To 10 DHCP Enabled N A IP Address 15 Subnet Mask 15 Default Gateway 15 Network Configuration DNS Server 15 Enabled N A New Password 10 User Password Confirm 10 E...

Page 47: ...1 Make sure that user can access the homepage of LAN RJ45 function by web browser for ex ample Microsoft Internet Explorer v6 01 v8 0 2 From the Homepage of LAN RJ45 click Alert Settings 3 By default...

Page 48: ...n copy of the alert to the specified email address This is an optional field for example the projector administrator s assistant The From field is the sender s email address for example the projector...

Page 49: ...RS232 command control way so called RS232 by TELNET for LAN RJ45 interface Quick Start Guide for RS232 by TELNET Check and get the IP Address on OSD of the projector Make sure that laptop PC can acces...

Page 50: ...Connection ready and user can have RS232 command input then Enter key pressed the RS232 command will be workable How to have TELNET enabled in Windows VISTA 7 By default installation for Windows VISTA...

Page 51: ...232 by Telnet control normally Close Windows Telnet utility directly after TELNET connection ready 5 Limitation 1 for Telnet Control there is less than 50 bytes for successive network payload for Teln...

Page 52: ...press Enter or Press to move up and down in the Advanced 2 menu Press to enter and change values for setting ITEM DESCRIPTION Sleep Timer Press the cursor button to enter and set Sleep timer The proj...

Page 53: ...or disable the HDMI 2 source DP Press the cursor button to enter and enable or disable the DisplayPort source VGA 1 Press the cursor button to enter and enable or disable the VGA1 source VGA 2 Press...

Page 54: ...he lamp bulb may burn out during normal operation and cause glass dust or shards to be discharged outward from the rear exhaust vent Do not inhale or do not touch glass dust or shards Doing so could r...

Page 55: ...Pull firmly on the module handle to remove the lamp module 6 Reverse steps 1 to 5 to install the new lamp module While installing align the lamp module with the connector and ensure it is level to av...

Page 56: ...utton to open the OSD menu 2 Press the cursor button to move to the Settings 2 menu Press the cursor button to move down to Advanced 1 and press enter 3 Press the cursor button to move down to Lamp Ho...

Page 57: ...rojector serviced Cleaning the Lens You can purchase optic lens cleaner from most camera stores Refer to the following to clean the projector lens 1 Apply a little optic lens cleaner to a clean soft c...

Page 58: ...r details on purchasing a suitable Kensington security cable The security lock corresponds to Kensington s MicroSaver Security System If you have any comment contact Kensington 2853 Campus Drive San M...

Page 59: ...are securely attached Ensure the attached device is turned on Ensure a connected PC is not in suspending mode Ensure a connected notebook computer is configured for an external display This is usuall...

Page 60: ...blinks OFF 10 blinks Ballast over temp 5 blinks OFF 11 blinks Restrike lamp fail 1 5 blinks OFF 12 blinks Restrike lamp fail 2 5 blinks OFF 13 blinks Lamp fail 1 5 blinks OFF 14 blinks Lamp fail 2 5...

Page 61: ...amma settings on the Image Advanced menu of the OSD Lamp Problems Problem There is no light from the projector 1 Check that the power cable is securely connected 2 Ensure the power source is good by t...

Page 62: ...torted 1 Check the audio cable connection 2 Test the source audio output with other speakers 3 Have the projector serviced Having the Projector Serviced If you are unable to solve the problem you shou...

Page 63: ...Q How do I run HDMI cables longer than 10 meters There are many HDMI Adopters working on HDMI solutions that extend a cable s effective distance from the typical 10 meter range to much longer lengths...

Page 64: ...Sync 15 31 91 4KHz V Sync 24 30Hz 47 120Hz Safety certification FCC B cUL UL CE CCC KC PSB PCT CB ICES 300 UL Argentina Taiwan Green Mark China ECO Label Operation temperature 5 40 C Dimensions 332 8...

Page 65: ...30 2 00 1 50 1097 3 1280 2 56 5 40 2 67 2 00 1463 0 1706 9 75 3 60 4 00 3 00 2194 6 2560 3 112 9 80 5 33 4 00 2926 1 3413 8 150 6 100 6 66 5 00 3657 6 4267 2 188 2 120 8 00 6 00 4389 1 5120 6 225 9 1...

Page 66: ...650 0 8080 0 350 0 230 16 7 9 39 8040 0 9780 0 430 0 280 20 33 11 44 9790 0 520 0 300 21 78 12 25 10490 0 560 0 D968U Screen Size feet Projection distance mm Offset A Diagonal length inch Width Height...

Page 67: ...3 800 x 600 46 9 75 0 800 x 600 48 1 72 2 800 x 600 53 7 85 1 800 x 600 76 3 120 0 1024 x 768 48 4 60 0 1024 x 768 56 5 70 1 1024 x 768 60 0 75 0 1024 x 768 68 7 85 0 1024 x 768 97 6 120 0 1152 x 864...

Page 68: ...15 625 50 0 576p 31 3 50 0 EDTV 480p 31 5 60 0 720p 37 5 50 0 720p 45 0 60 0 1080i 33 8 60 0 1080i 28 1 50 0 1080p 27 24 0 1080p 28 25 0 1080p 33 7 30 0 1080p 56 3 50 0 HDTV 1080p 67 5 60 0 O Frequenc...

Page 69: ...DLP Projector User s Manual Projector Dimensions 107 0 114 6 109 5 255 0 332 8 61...

Page 70: ...stalled and used in accordance with the instruction manual may cause harmful interference to radio communications Operation of this equipment in a residential area is likely to cause harmful interfere...

Page 71: ...Dh Power On P F VXXS0002 56h Xh Xh 53h 30h 30h 30h 32h 0Dh Power Off P F VXXS0003 56h Xh Xh 53h 30h 30h 30h 33h 0Dh Resync P F VXXG0004 56h Xh Xh 47h 30h 30h 30h 34h 0Dh Get Lamp Hours Pn F VXXS0005n...

Page 72: ...30h 36h 0Dh Get Color Temperature 0 Warm 1 Normal 2 Cold Pn F VXXS0106n 56h Xh Xh 53h 30h 31h 30h 36h nh 0Dh Set Color Temperature 0 Warm 1 Normal 2 Cold P F VXXG0107 56h Xh Xh 47h 30h 31h 30h 37h 0D...

Page 73: ...Xh 53h 30h 33h 30h 33h nh 0Dh Auto Keystone On P F VXXG0304 56h Xh Xh 47h 30h 33h 30h 34h 0Dh Freeze On Pn F VXXS0304n 56h Xh Xh 53h 30h 33h 30h 34h nh 0Dh Freeze On P F VXXG0305 56h Xh Xh 47h 30h 33...

Page 74: ...zontal lens shift n 20 20 P F VXXG0315 56h Xh Xh 47h 30h 33h 31h 35h 0Dh 3D 0 Off 1 DLP Link 2 IR Pn F VXXS0315n 56h Xh Xh 53h 30h 33h 31h 35h nh 0Dh 3D 0 Off 1 DLP Link 2 IR P F VXXG0316 56h Xh Xh 47...

Page 75: ...S0412 56h Xh Xh 53h 30h 34h 31h 32h 0Dh STATUS P F VXXS0413 56h Xh Xh 53h 30h 34h 31h 33h 0Dh MUTE P F VXXS0414 56h Xh Xh 53h 30h 34h 31h 34h 0Dh ZOOM P F VXXS0415 56h Xh Xh 53h 30h 34h 31h 35h 0Dh ZO...

Page 76: ...C D96FHDBC D96HUAC D96GCC D96FHDCC D96HUBC D96GDC D96FHDDC D96HUCC D96GEC D96FHDEC D96HUDC D96GFC D96FHDFC D96HUEC D96GGC D96FHDGC D96HUFC D96GHC D96FHDHC D96HUGC D96GIC D96FHDIC D96HUHC D96GJC D96FHD...

Page 77: ......

Reviews: