Vivotek SD83X4E Quick Installation Manual Download Page 6

EN-5

English

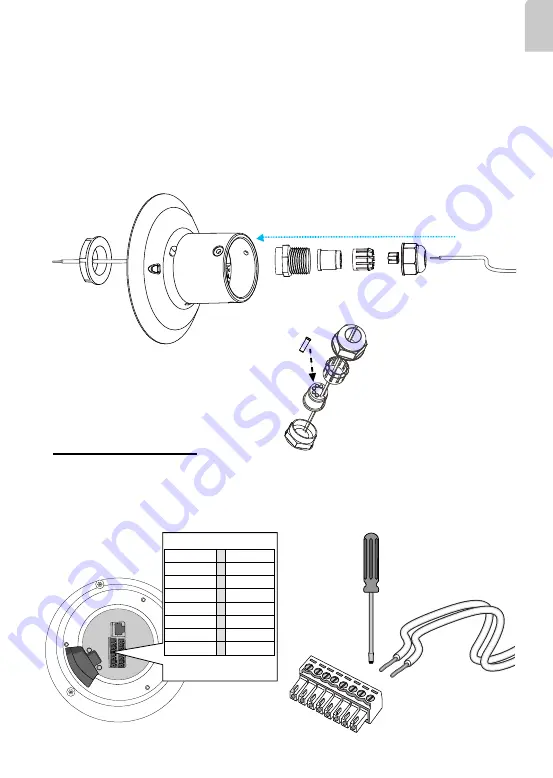
1. Disassemble the components of the waterproof connector into parts (A) ~ (E) as 

shown above.

2. Remove the plastic stopper from the bottom of the dome cap and keep the M20 hex 

nut for later use.

3. Depending on the number of wires, remove seals (C) from the rubber seal (B).
4. If you have external devices such as sensors and alarms, feed IO wires through the 

waterproof connector (E --> D --> B --> A) as illustrated below. Note that there are 16 

holes on the seal (B), and wire range is beteen 1.2 and 1.8mm.

5. Push the seal (B) into the housing (D).
6. Secure the sealing nut (E) tightly.

(E)

(D)

(B)

(A)

(C)

(B)

(D)

3-2-2. Connect cables:

Ethernet

DI GND
DI4

DI3
DI2
DI1
DO2

DO1

DO+(12V)

AC24V
AC24V

Reserved

MIC IN

Line OUT

Audio GND

RS485-

RS485+

AC24V

DI GND

AC24V

DI4

Reserved

DI3

MIC IN

DI2

Line OUT

DI1

Audio GND

DO2

RS485-

DO1

RS485+

DO+(12V)

Wire range: 13~16AWG

Strip length: 6~7mm

Screw: M2

1. Use a small-size flat-blade screwdriver to secure IO 

wires to the included terminal blocks. You may aslo 

purchase an IO combo cable from VIVOTEK. 

M20 hex 
nut

The max. output load on 

DO pins is 50mA.

Summary of Contents for SD83X4E

Page 1: ......

Page 2: ...Camera Do not drop the Network Camera Do not insert sharp or tiny objects into the Network Camera Do not manually pan and tilt the Network Camera when the power is on Package Contents 1 510000210G Sof...

Page 3: ...nal Block SD SDHC SDXC Card Slot Ethernet DI GND DI4 DI3 DI2 DI1 DO2 DO1 DO 12V AC24V AC24V Reserved MIC IN RS485 RS485 Status LED Network LED Reset Button Interface Section Camera Body This drawing s...

Page 4: ...cable and strip part of the sheath Insert the housing into the screw nut Insert the seal into the housing Insert the stripped Ethernet cable through the sealing nut and the housing Clamp the cable wi...

Page 5: ...is section and move to Section 3 3 if you connect the Ethernet cable only 1 3 1 2 1 1 Plan the wire length and complete cabling to the Interface Section Cabling through the dome cap and waterproof con...

Page 6: ...are 16 holes on the seal B and wire range is beteen 1 2 and 1 8mm 5 Push the seal B into the housing D 6 Secure the sealing nut E tightly E D B A C B D 3 2 2 Connect cables Ethernet DI GND DI4 DI3 DI...

Page 7: ...bber seal plug to dome cap for water proofing Mount bracket Dome cap Interface Section 1 IO wires are user supplied 2 Avoid touching the circuit boards to prevent damage by electro static discharge NO...

Page 8: ...hould orient and align the spring contacts with the dehumidifier unit on the dome cap 2 Secure the dome cap to the mount bracket 3 Use the included hex wrench to secure the connection When done the to...

Page 9: ...ove the dome cover by loosening 4 T25 anti tamper screws 2 Replace the desiccant bags by attaching them firmly to the inside of the chassis 3 Re install the dome cover Also note the following 1 Do not...

Page 10: ...mm in diameter and 4cm deep into the wall and then hammer in threaded anchors Note that you should hammer the anchors with hex nuts on them so that the threaded poles will not be deformed If preferred...

Page 11: ...e threaded poles will not be deformed If preferred drill another hole for routing cables 3 Secure the wall mount bracket to wall using 4 sets of captive washers and nuts 4 Align the camera body with t...

Page 12: ...tch Use a High Power PoE power injector separately purchased capable of 60W output to connect between the Network Camera and a non PoE switch Sufficient power is required for low temperature condition...

Page 13: ...uble click on the MAC address that matches the one printed on the camera label or the S N number on the package box label to open a browser management session with the Network Camera Assigning IP Addr...

Page 14: ...e defective in material or workmanship Any repair or replaced part of the product will receive a THREE MONTH warranty extension How To Get Service Contact our authorized distributors in your region Pl...

Page 15: ......

Reviews: