background image

4K 4x4 HDMI2.0 Matrix Switcher                                


16               


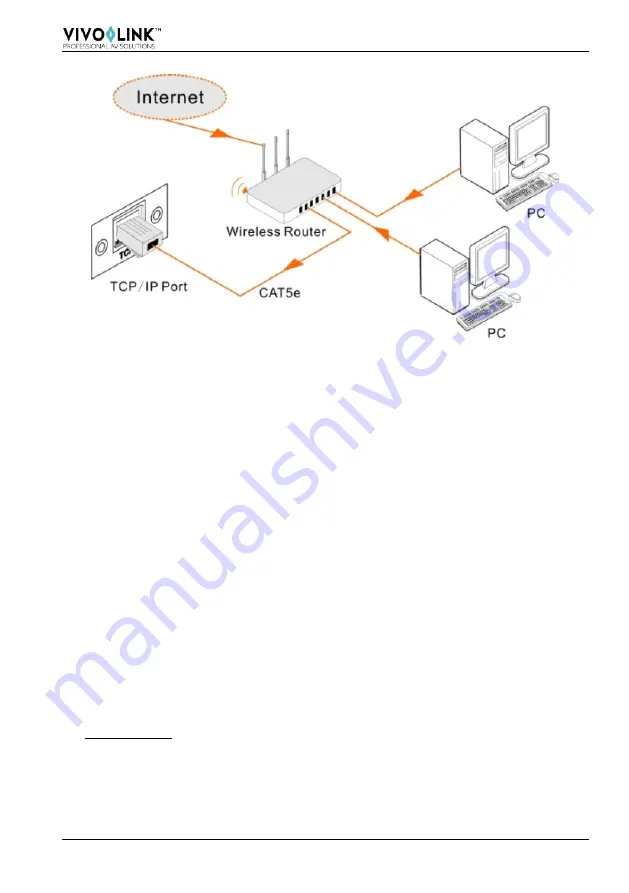
Figure 7- 2 Connect to LAN 


Step1. 

Connect the TCP/IP port of the VLHDMIMAT4X4 to Ethernet port of PC with 
twisted pair. 

Step2. 

Set the PC’s network segment to the same as the VLHDMIMAT4X4. Do please 
remember the PC’s original network segment. 

Step3. 

Set the VLHDMIMAT4X4’s network segment to the same as the router. 

Step4. 

Set the PC’s network segment to the original one. 

Step5. 

Connect the VLHDMIMAT4X4 and PC(s) to the router. In the same LAN, each 
PC is able to control the VLHDMIMAT4X4 asynchronously. 

Then it’s able to control the device via a TCP/IP communication software. 


7.2 TCP/IP Communication Software Control 

(Exampled by TCPUDP software) 

1) 

Connect a computer with TCPUDP software to VLHDMIMAT4X4. Open the 
TCPUDP software (or any other TCP/IP communication software) and create a 
connection, enter the IP address and port of VLHDMIMAT4X4 (default IP: 
192.168.0.178, port:4001): 

Summary of Contents for VLHDMIMAT4X4

Page 1: ...VLHDMIMAT4X4 4K 4x4 HDMI2 0 Matrix Switcher All Rights Reserved Version VLHDMIMAT4X4_2016V1 0 User Manual ...

Page 2: ...rk owner No part of this publication may be copied or reproduced without the prior written consent of Vivolink FCC Statement This equipment generates uses and can radiate radio frequency energy and if not installed and used in accordance with the instructions may cause harmful interference to radio communications It has been tested and found to comply with the limits for a Class B digital device p...

Page 3: ... or install this product near water Do not put any heavy items on the extension cable in case of extrusion Do not remove the housing of the device as opening or removing housing may expose you to dangerous voltage or other hazards Install the device in a place with fine ventilation to avoid damage caused by overheat Keep the module away from liquids Spillage into the housing may result in fire ele...

Page 4: ...ntrol 6 4 1 I O connection switching 6 4 2 EDID Configuration 6 4 3 I O connection Inquiry 7 5 IR Control 8 6 RS232 Control 9 6 1 Installation uninstallation of RS232 Control Software 9 6 2 Basic Settings 9 6 3 RS232 Communication Commands 10 6 3 1 System Commands 10 6 3 2 Lock unlock Commands 11 6 3 3 Switching Commands 11 6 3 4 Scene Commands 12 6 3 5 HDCP Compliance 12 6 3 6 EDID Configuration ...

Page 5: ...7 3 3 EDID Configuration 21 7 3 4 Audio Out 22 7 3 5 Status Setting 23 7 3 6 Network Configuration 24 7 3 7 Password Modification 25 7 4 TCP IP Port Configuration 26 7 5 GUI Update 26 8 Firmware Upgrade through USB port 27 9 Specification 28 10 Panel Drawing 29 11 Troubleshooting Maintenance 30 12 Customer Service 32 ...

Page 6: ...I 2 0 HDCP2 2 compatible and is backward compatible to the earlier versions Transmits 4Kx2K 60Hz 4 4 4 signal up to 16 4 feet 5m via HDMI port Provides powerful EDID management built in EDID can be invoked via DIP switcher on rear panel RS232 command or web based GUI Controllable via front panel button IR RS232 TCP IP or web based GUI LCD screen shows real time I O connection status Convenient fir...

Page 7: ...Turns green in standby mode Blinks red when upgrading IR sensor Built in IR sensor receive IR signal sent from IR remote LCD Screen Displays real time operation status INPUT selector button Total 4 input selector buttons press one of buttons to switch input source OUTPUT selector button Total 4 output selector buttons press the buttons to select output channel FIRMWARE INPUTS OUTPUTS 1 2 3 4 1 2 4...

Page 8: ...r On 0 stands for Off Refer to 4 2 EDID Configurarion for more detials RS232 Serial control port connect with control device IR IN Connects with external IR receiver for using the IR remote to control the Matrix Switcher TCP IP Connect control PC for TCP IP control DC 24V Connect with 24VDC 1 25A power adaptor Ground Connect to ground Pictures shown in this manual are for reference only 1 2 3 4 ON...

Page 9: ...ports with HDMI cables Step3 Connect speakers amplifiers to the SPDIF audio outputs with Toslink cables Step4 Connect the RS232 port of control device e g Central Control System PC and VLHDMIMAT4X4 to enable serial control Step5 Insert an IR receiver to the IR IN port to control this switcher via IR Remote Step6 Connect the TCP IP port of control device e g Laptop and VLHDMIMAT4X4 to enable TCP IP...

Page 10: ...ect amplifiers that are capable to decode HDMI audio to the SPDIF ports or there will be no output on the amplifiers 3 4 System Applications As its good performance in control and transmission the VLHDMIMAT4X4 can be widely used in computer realm monitoring large screen displaying conference system television education and bank securities institutions etc ...

Page 11: ...then it will be off If the conversion failed they will be off immediately 4 2 EDID Configuration The rear panel boasts a 4 pin EDID DIP switcher to manage EDID The EDID data and its corresponding DIP switcher status are shown in the below list DIP Switcher NO Status EDID 0 0000 Pass through default 1 0001 720P 2D Pass through CH 2 0010 720P 3D Pass through CH 3 0011 1080P 2D Pass through CH 4 0100...

Page 12: ...4K 4x4 HDMI2 0 Matrix Switcher 7 4 3 I O connection Inquiry Press OUTPUTS button 1 2 3 or 4 to inquiry its corresponding input and then the indicator of the input button will turn green ...

Page 13: ...responding front panel buttons OUTPUTS Output channel selection buttons same with the corresponding front panel buttons Menu buttons ALL EDID CLEAR and ENTER ALL Select all inputs outputs To convert an input to all outputs Example Input 1 to all Outputs Press INPUTS 1 ALL ENTER EDID management button 1 One input port learns the EDID data from one output port Example Input 2 learns EDID data from o...

Page 14: ...Firstly connect VLHDMIMAT4X4 with necessary input devices and output devices Then connect it with a PC installed RS232 control software Double click the software icon to run this software Here we take the software CommWatch exe as example The icon is showed as below Figure 6 1 Icon of CommWatch The interface of the control software is showed as below Figure 6 2 Control Interface of CommWatch Param...

Page 15: ...ng to software EDID management with grey background 6 3 1 System Commands Command Function Feedback Example Type Query the model VLHDMIMAT4X4 Version Query the version of firmware VX X X Demo Switch to the demo mode convert input and output in turn like1B1 1B2 4B3 4B4 1B1 and so on The switching interval is 2 seconds Demo Mode AV 01 01 AV 01 02 AV 01 03 AV 01 04 AV 02 01 Normal Mode Undo To cancel...

Page 16: ...the input channel x to the output channel x x 1 4 01 Through x Switch off the output channel x x 1 4 01 Closed x Switch on the output channel x x 1 4 02 Open All Switch on all output channels All Open x1 V x2 Switch the input channel x1 to one or several output channels x2 separate output channels with comma x1 x2 1 4 AV 02 04 Status x Query the I O connection status of output x x 1 4 y 1 4 AV Y X...

Page 17: ...e port if the X ALL it means all ports Z is for HDCP compliant status the value may be 1 HDCP compliant or 0 not HDCP compliant O ALL 0 0801 Auto HDCP management activate carrier native mode 0801 9973 Query the HDCP status of the input signals In 01 02 03 04 HDCP Y N Y N 9974 Query the HDCP status of the output signals Out 01 02 03 04 HDCP Y N Y N 6 3 6 EDID Configuration The DIP switcher status s...

Page 18: ...able input Y to learn the EDID data of output X If the EDID data is not available then set it as initialized EDID data EDIDM3B1 EDID x y Set the EDID data of input port x to built in EDID No y y 0 11 correspond to the 12 embedded EDID data separately EDID x y EDIDUpgrade x Upgrade EDID data via the RS232 port X represents the input port and x 5 represents all input ports When the switcher receives...

Page 19: ...DIF audio output port x X 1 2 3 4 enable the port x X 5 enable all ports DigitAudio ON with x ALL Outputs DigitAudioOFF x Disable SPDIF audio output port x X 1 2 3 4 disable the port x X 5 disable all ports DigitAudio OFF with x ALL Outputs 9977 Query the status of digital audio of output channels Out 01 02 03 04 Audio Y Y Y Y ...

Page 20: ...port of the VLHDMIMAT4X4 and set its network segment to the same as the default IP of the VLHDMIMAT4X4 192 168 0 178 Figure 7 1 Modify the IP of PC Controlled by PC s in LAN The VLHDMIMAT4X4 can be connected with a router to make up a LAN with the PC s this make it able to be controlled in a LAN When control just make sure the VLHDMIMAT4X4 s network segment is the same with the router Please conne...

Page 21: ...et the PC s network segment to the original one Step5 Connect the VLHDMIMAT4X4 and PC s to the router In the same LAN each PC is able to control the VLHDMIMAT4X4 asynchronously Then it s able to control the device via a TCP IP communication software 7 2 TCP IP Communication Software Control Exampled by TCPUDP software 1 Connect a computer with TCPUDP software to VLHDMIMAT4X4 Open the TCPUDP softwa...

Page 22: ...r commands in designed area to control VLHDMIMAT4X4 see as below Figure 7 4 Control interface of TCPUDP Here you will receive the feedback after a command is sent Enter your command here Commands are the same with RS232 commands listed in 6 3 RS232 Communication Commands ...

Page 23: ...rk Place in your PC and click the icon as below PCs running Windows XP system may occur issues in finding UPnP icon follow these steps to switch on UPnP protocol 1 Add UPnP component go to Control Panel double click Add Delete Programs double click Add Delete windows component tick UPnP click Next click OK 2 Enable Windows Firewall go to Control Panel double click Windows Firewall click Others tic...

Page 24: ...tem divides into administrator and user mode There are 2 selectable usernames admin default password admin and user default password user Login as admin can access more configuration interfaces than user 7 3 1 Scene Setting Type the user name admin password admin and then click LOGIN it will show the Scene menu as shown below Figure 7 6 Scene Menu ...

Page 25: ...rol Menu The button matrix displays every possible connection between every input and output users can carry on the connections by clicking corresponding button Buttons 1 4 at the right bottom corner provides quick saving and recall for overall connection status For example Step1 Select button1 at INPUT column Step2 Select button 1 at OUTPUT column If all OUTPUT ports in needed you only need to cl...

Page 26: ...er 21 7 3 3 EDID Configuration 1 Click setting button to enter the below interface User can select EDID in accordance with actual needs Figure 7 8 Embedded EDID 2 Select EDID Copy to enter the below interface Figure 7 9 Copy EDID ...

Page 27: ...DID Step2 Select one or more input devices that need to gain EDID When select To All inputs all input devices will copy the EDID from output device Step3 Click Confirm to save the setting or click Cancel to cancel operation 7 3 4 Audio Out Select Audio Out to enter the following interface to turn on off the Audio Output passage Figure 7 10 Audio EDID ...

Page 28: ...el Click Status to enter the following interface to modify the product name and its model and then they will be display in LCD screen Figure 7 11 Status LCD Button label Select Button to enter the following interface to modify the name of buttons Figure 7 12 Status Button ...

Page 29: ... the following interface to modify the name of scenes Figure 7 13 Status Scene 7 3 6 Network Configuration Click Network to enter the below interface to inquire and configure network settings including MAC address IP address subnet mask and Gateway Figure 7 14 Network ...

Page 30: ...7 Password Modification Click Password to enter the below interface to inquire and modify the admin or user password Figure 7 15 Password In the above interface turn on the Front Panel to lock all buttons of machine they cannot be operated ...

Page 31: ... in your browser Enter correct username and password to log in the WebServer Username admin Password admin Here is the main configuration interface of the WebServer Figure 7 16 TCP IP Configuration 7 5 GUI Update GUI for VLHDMIMAT4X4 supports online update in http 192 168 0 178 100 Type the username and password the same as the GUI log in settings modified password will be available only after reb...

Page 32: ...e software and the latest upgrade file bin to PC Step2 Connect the USB ports of VLHDMIMAT4X4 and the PC via USB cable Step3 Double click the update software icon see as below It will enter the upgrade interface shown as below Step4 Click Connect USB Step5 Click Open to load the upgrade file then click Updata to start firmware upgrading Note To ensure available control the COM number of the PC shou...

Page 33: ...pluggable terminal block Video Signal HDMI2 0 HDCP2 2 Audio Signal Dolby Digital DTS DTS HD General EDID Management In built EDID data and manual EDID management Resolution Range 640x480 60Hz 4Kx2K 60Hz 4 4 4 1080P 3D HDMI Cable Length 5m Power Supply 24VDC 1 25A Power Consumption 14W Max Dimension W H D 437 0mm 44 0mm 236 5mm Weight 1 75Kg Temperature 10 55 Reference Humidity 10 90 Recommend usin...

Page 34: ...x Switcher 29 10 Panel Drawing FIRMWARE INPUTS OUTPUTS 1 2 3 4 1 2 3 4 ON DIP INPUTS OUTPUTS CONTROL SPDIF SPDIF SPDIF SPDIF 1 2 3 4 1 4 2 3 On Off 1 2 3 4 1 0 Tx Rx TCP IP EDID IR IN RS232 DC 24V 437 mm 44 mm 23 mm 32 mm ...

Page 35: ...or another input source or enable the display to learn the EDID data of the input No output on the amplifiers connected to audio output ports The amplifiers are not able to decode HDMI audio Change for amplifiers that are capable to decode HDMI audio Cannot control the device via front panel buttons Front panel buttons are locked Send command Unlock to unlock Cannot control the device via IR remot...

Page 36: ... device and the unit Wrong RS232 communication parameters Type in correct RS232 communication parameters Baud rate 9600 Data bit 8 Stop bit 1 Parity bit none Broken RS232 port Send it to authorized dealer for checking Static becomes stronger when connecting the video connectors Bad grounding Check the grounding and make sure it is connected well Cannot control the device by RS232 IR remote front p...

Page 37: ...upplies or parts not meeting our specifications No certificate or invoice as the proof of warranty The product model showed on the warranty card does not match with the model of the product for repairing or had been altered Damage caused by force majeure Servicing not authorized by distributor Any other causes which does not relate to a product defect Shipping fees installation or labor charges fo...

Page 38: ......

Reviews: