-8-
Assembly Steps
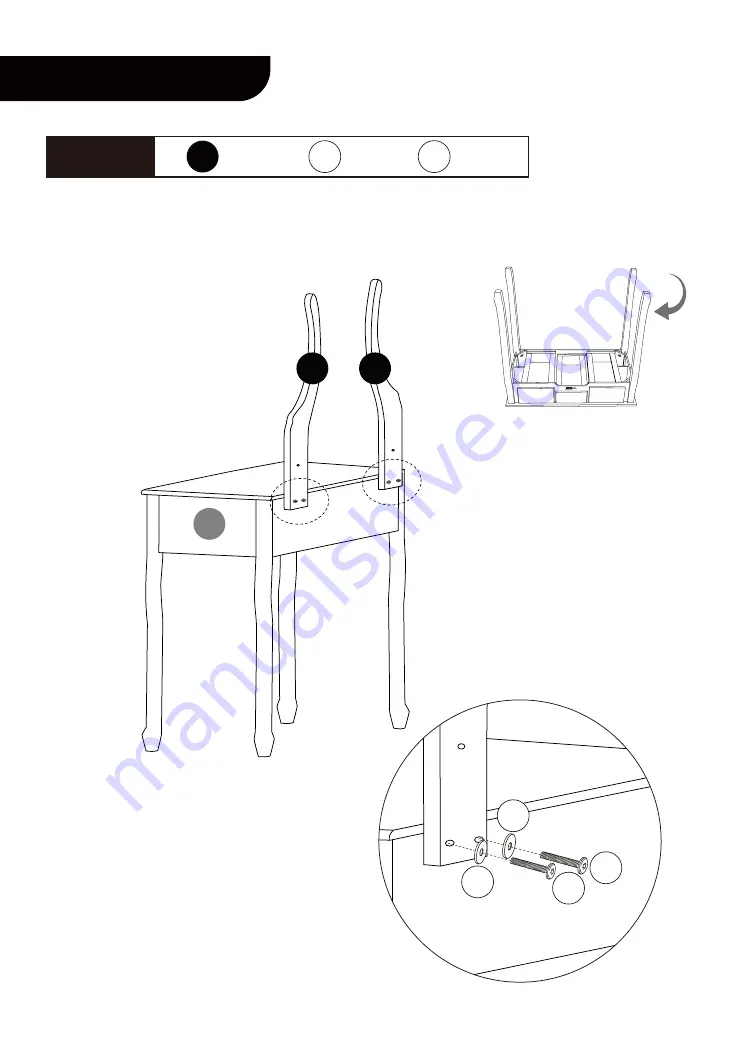
STEP 5
x 2 pcs.
x 4 pcs.
B
C
3
1
180°
Flip the table 180° so that it is right-side up. Use Parts B and Parts C to connect Parts 3
with Part 1, as shown in the figure.
Page 1: ...Assembly Instructions V 2 VANITY SET WITH 10 LED BULBS ...
Page 2: ...pacious surface to aviod product damage do not place the unwrapped product directly on the ground Please do not stand or sit on the wooden boards Please keep the product away from sharp pointed objects and corrosive substances to prevent product damage If you find that the legs are loose please tighten the screws as soon as possible to prevent the issue from persisting Children are not allowed to ...
Page 3: ...X1 X1 X1 X16 X1 2 Parts List and Diagram 1 2 X1 X4 Item no Reference Image Qty 6 7 Item no Reference Image Qty 3 X2 8 5 X4 A 4 X2 9 M6 48 mm ...
Page 4: ...Package includes extra screws All drawers are pre installed in the table Only the handles need to be installed during this assembly Be sure to check whether all of the parts and accessories are in the package before assembling the vanity set If there are any missing parts please contact our VIVOHOME customer service ...
Page 5: ...0 4 Assembly Steps STEP 1 x 4 pcs x 8 pcs A x 8 pcs C 5 x 1 pc 7 7 5 5 5 5 A A C C Turn Part 7 upside down Use Parts A and Parts C to connect Parts 5 with Part 7 as shown in the figure Tighten the screws ...
Page 6: ...180 5 Assembly Steps STEP 2 Flip the stool 180 so that it is right side up ...
Page 7: ... Steps STEP 3 x 1 pc 1 1 1 2 Install the drawer handles 3 pcs on the drawers Remember to put each drawer back in its correct position Remove the handle inside of the drawer Install the handle outside of the drawer ...
Page 8: ... 7 Assembly Steps STEP 4 x 8 pcs A x 8 pcs C 1 x 4 pcs 2 2 2 2 2 180 A A C C Turn Part 1 upside down Use Parts A and Parts C to connect Parts 2 with Part 1 as shown in the figure Tighten the screws ...
Page 9: ... 8 Assembly Steps STEP 5 x 2 pcs x 4 pcs B x 4 pcs C 3 3 1 3 180 B B C C Flip the table 180 so that it is right side up Use Parts B and Parts C to connect Parts 3 with Part 1 as shown in the figure ...
Page 10: ...sembly Steps STEP 6 x 1 pc 4 4 X2 1 2 Install the drawer handle on Part 4 Repeat this step again to make two identical drawers Remove the handle inside of the drawer Install the handle outside of the drawer ...
Page 11: ... 10 Assembly Steps STEP 7 x 2 pcs B x 2 pcs C 1 3 4 4 3 B C Use Parts B and Parts C to connect Parts 4 with Parts 3 as shown in the figure ...
Page 12: ... 11 Assembly Steps STEP 8 x 1 pc x 2 pcs E 6 6 3 3 E E E Use Parts E to connect Parts 3 with Part 6 as shown in the figure ...
Page 13: ... 12 Assembly Steps STEP 9 x 1 pc 8 x 1 pc 9 6 8 9 6 Connect Part 8 the switch with Part 9 the power cord and Part 6 as shown in the figure ...
Page 14: ...he mirror light on or off Long press the button to adjust the brightness The versatile LED mirror lights can meet the different needs of users The assembly is complete Check that all the screws are tightened If any screws are loose please tighten them as soon as possible ...
Page 15: ...tion without prior notification For any questions regarding assembly please watch the video on the product page or contact our customer service Our customer service will gladly assist you with any additional questions comments or concerns Thank you for using VIVOHOME products in your home ...