background image

2

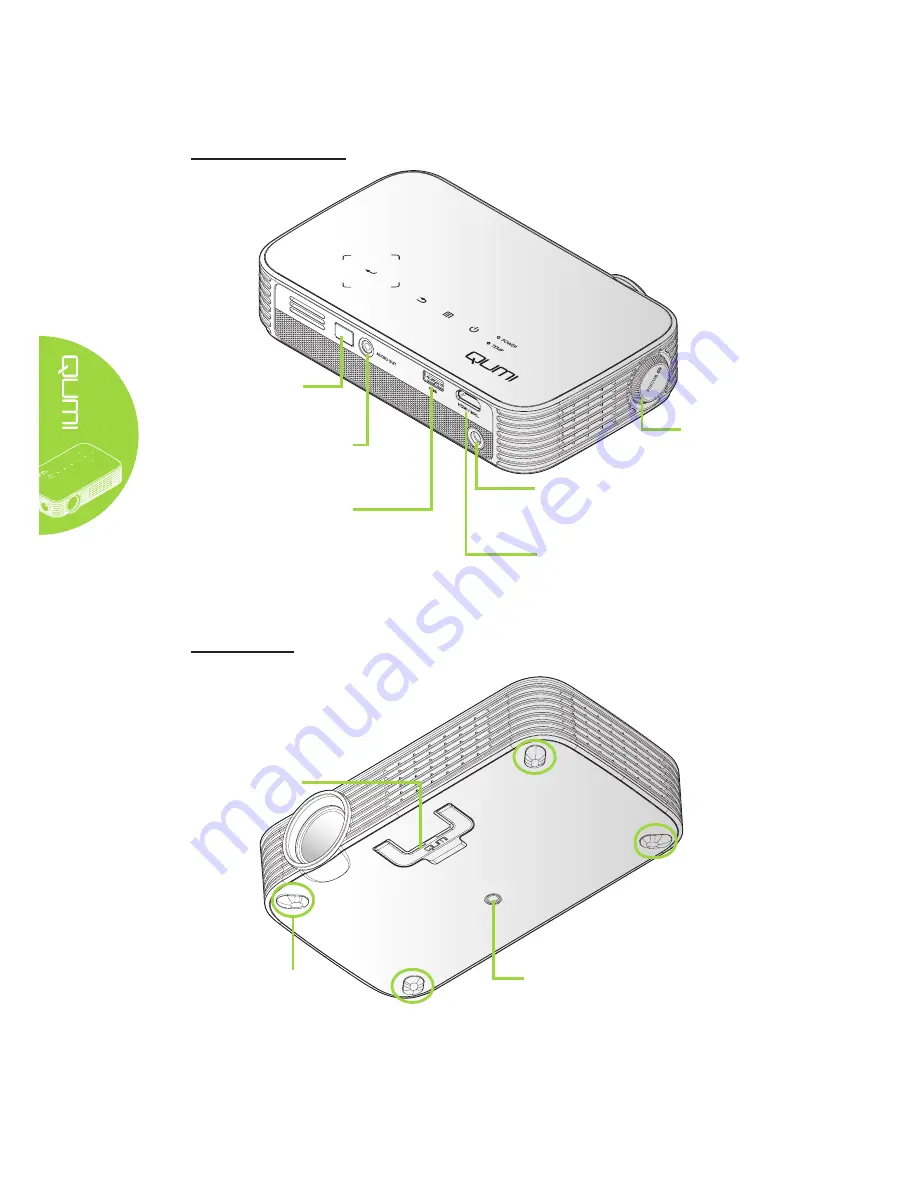
Rear/Top/Left View

Bottom View

Audio Out

Connect an audio cable to 

speakers or headphones

DC In

Connect the supplied 

power adapter

HDMI/MHL

Connect a HDMI/MHL cable 

from a HDMI/MHL device

IR Receiver

Receive IR signal from 

the remote control

USB

Connect an USB drive

Rubber Foot Pad

Stability and maintain cooling 

ventilation

Kickstand

Tripod Connecting Slot

Tripod not included

Focus Ring

Focus the projected image

Summary of Contents for Qumi Q8

Page 1: ......

Page 2: ...erchantability or fitness for any particular purpose The manufacturer reserves the right to revise this publication and to make changes from time to time in the content hereof without obligation of the manufacturer to notify any person of such revision or changes Trademark Recognition HDMI the HDMI Logo and High Definition Multimedia Interface are trademarks or registered trademarks of HDMI Licens...

Page 3: ...uations that may damage the unit create a hazardous environment or cause personal injury Throughout this manual component parts and items in the OSD On Screen Display menus are denoted in bold font as in this example Press the Menu button on the remote control to open the Setting menu General Safety Information Do not open the unit case There are no user serviceable parts in the unit For servicing...

Page 4: ...ure within the enclosure does not exceed operating temperature while Qumi is running and the air intake and exhaust vents are unobstructed All enclosures should pass a certified thermal evaluation to make sure that Qumi does not recycle exhaust air as this may cause the device to shutdown even if the enclosure temperature is with the acceptable operating temperature range Caution 1 Alerts you to s...

Page 5: ...s Main Features Native 1080p resolution with a 16 9 aspect ratio Up to 1 000 LED color brightness and 30 000 1 contrast for brilliant and sharp images Project a large 120 diagonal high definition image from only 4 meters from the projection surface Long life energy efficient LED light source with an estimated 30 000 hours of operation Wirelessly stream and project documents photos movies and other...

Page 6: ...L 36 EZMirror 37 Chapter 4 On Screen Display OSD Settings 38 OSD Menu Controls 38 Setting the OSD Language 39 OSD Menu Overview 40 OSD Menu Overview 41 Color Menu 42 Display Menu 43 Information Menu 45 Audio Menu 46 Management 47 Chapter 5 Taking Care of Your Qumi 48 Cleaning Qumi 48 Cleaning the Lens 48 Troubleshooting 49 Vivitek Support Site 52 Specifications 53 Projection Distance vs Projection...

Page 7: ...ing Vent Do not cover Right Cursor Navigate and change settings in the OSD Enter Cursor Change settings in the OSD Left Cursor Navigate and change settings in the OSD Up Cursor Navigate and change settings in the OSD Menu Open and exit the OSD Down Cursor Navigate and change settings in the OSD Return Return the previous OSD menu Power Switch Turn on off Qumi ...

Page 8: ...e supplied power adapter HDMI MHL Connect a HDMI MHL cable from a HDMI MHL device IR Receiver Receive IR signal from the remote control USB Connect an USB drive Rubber Foot Pad Stability and maintain cooling ventilation Kickstand Tripod Connecting Slot Tripod not included Focus Ring Focus the projected image ...

Page 9: ...N T Y Documentation Kit User Manual Quick Start Guide Warranty Card HDMI cable Carrying Case Contact your dealer immediately if any items are missing appear damaged or if the unit does not work It is recommended that you keep the original packing material in case you ever need to return the equipment for warranty service Note Accessories will vary from model to model ...

Page 10: ...ector Power Off Up N A Moves OSD menu highlight Home Returns to Home Page Returns to Home page Left N A Performs action indicated by menu Enter Play Pause N A Performs action indicated by menu Right N A Performs action indicated by menu Menu Opens OSD menu Closes OSD Down N A move the highlight of OSD menu Exit N A Close OSD Rewind N A N A Stop N A N A ...

Page 11: ...menu is displayed closes menu and opens Volume menu Mute If audio is not muted mutes audio and opens Mute menu If Mute menu is displayed unmutes audio and displays UnMute menu If audio is muted unmutes audio and opens UnMute menu If UnMute menu is displayed mutes audio and displays Mute menu If other menu is displayed closes menu If audio is not muted mutes audio and opens Mute menu If other menu ...

Page 12: ...urns to Home page Left Moves menu selection left Performs action indicated by menu Enter Play Pause Enters media sub menu Plays Pauses media selection Performs action indicated by menu Right Moves menu selection right Performs action indicated by menu Menu Opens OSD menu Closes OSD Down Moves down in entry list Moves OSD menu highlight Exit Exits current menu Closes OSD Rewind Rewinds media play R...

Page 13: ... menu If audio is muted unmutes audio and opens UnMute menu If UnMute menu is displayed mutes audio and displays Mute menu If other menu is displayed closes menu If audio is not muted mutes audio and opens Mute menu If other menu is displayed closes menu If audio is muted unmutes audio and opens UnMute menu Important 1 Be sure nothing obstructs the path between the remote control and Qumi If the p...

Page 14: ...ils about how to control the media functions with the remote control please refer to 15 Note MHL function For app settings Up Down Left and Right are used as directional arrows ENTER and EXIT are also included Controlling your smart device with the remote control When the projector displays the contents of your MHL compatible smart device you can use the remote control to control your smart device...

Page 15: ...as can also be used to play videos and display photos These devices can be connected to Qumi using an appropriate cable Make sure that the connecting device has an appropriate output connector Warning As a safety precaution disconnect all power to Qumi and connecting devices before making connections Connect AC power adapter Connect audio Insert USB device Connect HDMI MHL peripherals ...

Page 16: ...rsonal Computer Smartphone Camera Blue Ray DVD player Connecting to an MHL Device Connect your Qumi to a MHL compatible device by using an HDMI MHL cable optional Tablet Smartphone Note For some MHL compatible devices whose output is not via micro USB an extra cable adaptor may be required Adapters for Samsung devices are sold separately ...

Page 17: ...USB Drive Connect a USB drive to Qumi by inserting the storage device s into the appropriate port Connecting Audio Connect earphones or mini speakers to Qumi by inserting into the Audio Out port Headphone Mini Speaker ...

Page 18: ...let Note Adapter models may vary between regions 2 Press the POWER button to turn on Qumi Qumi splash screen displays and connected devices are detected 3 Press the or button on the remote control to select the function that you desire to play Media EZCastPro USB Connection HDMI MHL EZMirror 4 Press the POWER button to turn off Qumi ...

Page 19: ...mage can be adjusted by moving the focus ring left or right until the image is clear Adjusting the Projector Level Flip down the kickstand to adjust the projector level Using a Tripod Qumi can be used with a tripod by connecting the tripod to the bottom of Qumi Many typical tripods can be connected Supported Tripod Specifications Type Tripod Slot size 1 4 20 L6 3 mm ...

Page 20: ...de facing up 3 Install the cover as shown in the illustration A B C R 2025 B A Caution 1 Use only a 3V lithium battery CR2025 2 Dispose of used batteries according to local ordinance regulations 3 Remove the battery when not using Qumi for prolonged periods Operating Range The remote control uses infrared IR transmission to control Qumi It is not necessary to point the remote directly at Qumi The ...

Page 21: ...e The UI contains five main functions Media Allows the use of media stored in the internal memory or a connected USB drive to display photos music audio and documents EZCastPro Allows the streaming of media from smart devices or mirroring of connected Android iOS Mac Windows devices USB Connection Allows the use of a connected PC as a storage device HDMI MHL Projection by using a connected HDMI or...

Page 22: ...d press Supported Formats The following file formats are supported Image JPEG BMP Audio MP1 MP2 MP3 WMA OGG ADPCM WAV PCM WAV AAC Voice record MP3 WAV Video AVI divx MKV TS DAT VOB MPG MPEG MOV MP4 WMV Adobe PDF pdf PDF 1 0 1 1 1 2 1 3 and 1 4 Microsoft Word doc docx Microsoft PowerPoint ppt pptx ppx ppsx does not support animation and slide transitions Microsoft Excel 97 2010 xls xlsx ...

Page 23: ...select Photo Video Music or Document Function Description Photo Allows you to display photos and provides slide show functionality See Photo on page 19 Video Allows you to play movie files See Video on page 20 Music Allows you to play audio files See Music on page 21 Document Allows you to display documents files See Document on page 22 Note Bold text in Simplified Chinese format and password prot...

Page 24: ...Video Music or Document Function Description Photo Allows you to display photos and provides slide show functionality See Photo on page 19 Video Allows you to play movie files See Video on page 20 Music Allows you to play audio files See Music on page 21 Document Allows you to display documents files See Document on page 22 Note Bold text in Simplified Chinese format and password protected files a...

Page 25: ... in the middle bottom of the image The following functions are available through the Control Panel Icon Description Select to scroll to the previous image Select to scroll to the next image Rotate the image counter clockwise 90 Rotate the image clockwise 90 Reset rotation of image Select to start a slideshow of all the images in the internal memory or the USB device Select to display the photo inf...

Page 26: ...image The following table displays the available functions Icon Description Select to move the play selection to the previous file Select to reverse the current play marker Select to play the selected file Press again to pause or play the selection Select to stop the currently playing file Select to move the current play marker forward Select to move the play selection to the next file Information...

Page 27: ...the music The following table displays the available functions Icon Description Select to move the play selection to the previous file Select to reverse the current play marker Select to play the selected file Press again to pause or play the selection Select to stop the selected file Select to move the current play marker forward Select to move the play selection to the next file Information for ...

Page 28: ...e functions Icon Description If document is scaled outside screen border press to scroll document up If document is scaled outside screen border press to scroll document down If document is scaled outside screen border press to scroll document left If document is scaled outside screen border press to scroll document right Select to zoom in on the document Select to zoom out on the document Note In...

Page 29: ...ect Photo Video or Music and press to adjust the settings Function Description Photo Display ratio Select a display ratio Original or Full Screen Interval time Select a duration time for the set pattern 10 sec 30 sec or 1 min See Photo on page 24 Video Repeat mode Select a repeat mode Sequence Single or Once See Video on page 24 Music Repeat mode Select a repeat mode Sequence Single or Once See Mu...

Page 30: ...ge the setting Item Description Display Ratio Select a display ratio Original or Full Screen Interval Time Select a duration time for the set pattern 10 sec 30 sec or 1 min Video Press the or button on the remote to change the setting Item Description Repeat Mode Select a repeat mode Sequence Single or Once ...

Page 31: ...25 Music Press the or button on the remote to change the setting Item Description Repeat Mode Select a repeat mode Sequence Single or Once ...

Page 32: ...vu com os_download php type 2 l en for more detail and the latest EZCastPro APP download 2 Your PC must be connected to the same network as your Qumi device The EZCastPro software offers two interactive methods EZCastPro and EZCastPro Off Line The EZCastPro version requires a connection to Qumi to manage and configure the various functions The EZCastPro Off Line version provides access to Photo Ca...

Page 33: ...ZCastPro Press to continue To access the EZCastPro software on your smart device you must first download the APP to your smart device 2 You can scan the QR code found on the screen or download from the App Store or Google Play Search for EZCastPro 3 Turn on the WiFi function on your device 4 In the network settings select the SSID EZCastPro_XXXXXXXX as displayed in the menu screen 5 When prompted ...

Page 34: ...updated see the following image 7 On the device tap the EZCastPro application to open Note The device must be networked to Qumi prior to opening the EZCastPro application 8 Tap EZCastPro to display the EZCastPro menu If no other menu displays your smart device has not detected Qumi on the network ...

Page 35: ...29 9 In EZCastPro menu tap Setting 10 In the Setting menu use your smart device or the remote to select Internet 11 Tap or press on the remote to continue ...

Page 36: ...e SSID is selected a password prompt displays Enter the correlating password if required Tap or click OK to enter Tap or click Cancel to stop the process Click Forget to remove the selected WiFi profile Note After setting up the wireless connection you may need to reconnect Qumi and your device ...

Page 37: ...EZCastPro application to open Note The device must be networked to Qumi prior to opening the EZCastPro application 8 Tap EZCastPro to display the EZCastPro menu If the no other menu displays your smart device does not detect Qumi on the network 9 In EZCastPro menu tap Setting 10 In the Setting menu use your smart device or the remote to select Internet 11 Tap or press on the remote to continue 12 ...

Page 38: ...nce only and may differ from actual sample use iOS Android Icon Function Description Mirror Off Tap to stop EZMirror mode Note Mirror Off is only available for Android devices Photo Select to display available image files camera roll or connected device Use to edit a selected photo then save the images with the modifications Camera Select to display the device s camera image Music Select to play t...

Page 39: ...tion must be available to allow CloudS access to the application CloudV Cloud Video Select to open a cloud provider in order to select and download an available file Note Cloud provider application must be installed and appropriate account information must be available to allow CloudV access to the application Split Screen Select to view the split screen option Split Screen allows you to select a ...

Page 40: ...SSID and password change router connection setup boot up mode priority and firmware updating Shared music is synchronized to your device Not available in EZCast Off Line Preference Modify preference setting for the EZCast application Select Preferred Device Host Control preferences and displays versioning information ...

Page 41: ...PC and the other end to the USB socket on Qumi 2 Use the remote control to select USB Connection and press to initiate the USB connection to the PC 3 If the PC detects Qumi check the disk of My Computer from the PC The new folder is Qumi internal memory for use as an external drive You can drag and drop files into the internal memory folder as you would any other storage drive Note 1 Built in memo...

Page 42: ...MHL function see the following information 1 Once both the device and Qumi are powered on connect one end of HDMI MHL cable to the HDMI or MHL socket on the device and the other end to the HDMI socket on Qumi 2 Use the remote control to select HDMI MHL and press Once the device is connected the projector displays the screen on the device ...

Page 43: ...ower on your device before starting the process 2 Use the remote control to select EZMirror and press 3 Turn on the WiFi function on your device 4 In the network settings select the SSID EZCastPro_XXXXXXXX as displayed in the menu screen 5 When prompted for a password enter the listed password as displayed on the screen XXXXXXXX in menu screen Once the device is connected the projector displays th...

Page 44: ...tings for audio can be adjusted in this menu Management Default language and other settings can be adjusted in this menu The OSD menu can be accessed by pressing MENU button on the remote control or pressing MENU on the keypad Navigating the OSD The remote control cursor buttons or the buttons on the top of Qumi can be used to navigate and make changes to the OSD settings 1 Enter the OSD menu 2 Pr...

Page 45: ...ged To change the language in the OSD perform the following steps 1 Enter the OSD menu Press the or button to select the Management and press 2 Press the or button until the language you want is shown in the cursor 3 Press EXIT button to close submenu or MENU button to close the OSD ...

Page 46: ... 1 4 1 6 1 8 2 0 2 2 2 4 Saturation 0 100 Hue 180 180 Wall Color White Yellow Blue Pink Green Display Projector Mode Front Rear Rear Ceiling Front Ceiling Aspect Ratio Auto Full 4 3 16 9 L Box V Keystone 40 40 H Keystone 25 25 4 Corner Correction Auto V Keystone Off On HDMI Color Range Auto Limited Range Full Range HDMI Scan Info Auto Underscan Overscan 3D 3D Mode Auto Frame Packing Side By Side T...

Page 47: ...ute Off On Management Language English Čeština Dansk Deutsch Español Français Italiano Magyar Nederlands Polski Português Suomi Svenska Türkçe Русский ไทย 繁體中文 簡体中文 日本語 한국어 Việt Nam العربية Auto Shutdown Off 15 mins 30 mins 1 hour 2 hour AC Power On Off On LED Mode Eco Normal Fan Speed Normal High WiFi Off On FW Upgrade Reset All ...

Page 48: ...on to set the display mode Brightness Press the or button to adjust the display brightness Contrast Press the or button to adjust the display contrast Sharpness Press the or button to adjust the display sharpness level Color Temperature Press the or button to adjust the color temperature Gamma Press the or button to adjust the gamma correction of the display Saturation Press the or button to adjus...

Page 49: ...ust the video aspect ratio V Keystone Press the or button to adjust the vertical display keystone H Keystone Press the or button to adjust the horizontal display keystone 4 Corner Correction Press and press the or button to adjust four corners of the image Auto V Keystone Press the or button to enable or disable automatic vertical keystone HDMI Color Range Press the or button to select a suitable ...

Page 50: ...ult setting 2 When the projector is connected to an appropriate 3D source the 3D OSD menu item is enabled for selection 3 Use 3D glasses to view a 3D image 4 You need 3D content from a 3D DVD or 3D media file 5 You need to enable the 3D source some 3D DVD content may have a 3D on off selection feature 6 You need DLP link 3D shutter glasses 7 Power on the glasses Glasses normally have a power on of...

Page 51: ...D menu 2 Press the or button to select the Information menu and press Item Description WiFi IP Display the device WiFi IP address Resolution Display resolution information 3D Format Display the 3D format LED Hours Display the LED use information in hours FW Version Display the firmware version ...

Page 52: ...ress the or button to select the Audio menu and press 3 Press the or button to move the cursor up and down in the Audio menu 4 Press the or button to change values for each applicable setting Item Description Volume Press the or button to adjust the audio volume Mute Press the or button to turn on or off the speaker ...

Page 53: ...n Press the or button to enable or disable automatic power off Auto Power On Press the or button to enable or disable automatic power on LED Mode Press the or button to select the LED mode for higher brightness or lower brightness to save LED life Fan Speed Press the or button to enter and toggle between Normal and High fan speeds Note We recommend selecting high speed in high temperature high hum...

Page 54: ...d set in a well ventilated area for several hours before using 4 If a large amount of water gets into the interior of Qumi when cleaning unplug Qumi and have it serviced Cleaning the Lens Optical lens cleaning solutions can be purchased from most camera and other retail stores To clean Qumi lens perform the following steps 1 Apply a small amount of the optic lens cleaning solution to a clean and s...

Page 55: ...replacing non defective parts try to find and isolate the problem For example if you replace batteries and the problem remains put the original batteries back and move to the next step Keep a record of the steps you take when troubleshooting The information may be useful for reference when calling technical support or for bringing Qumi to service personnel LED Error Messages Error Code Messages PO...

Page 56: ...m The image is reversed Check the orientation of the Projector Mode setting in the Display menu in the OSD Problem The image is flat with no contrast Adjust the Contrast setting in the Color menu in the OSD Problem The color of the projected image does not match the source image Adjust the Color Temperature and Gamma settings in the Color menu in the OSD Remote Control Problems Problem Qumi does n...

Page 57: ...s a Microsoft Xbox or Sony PS3 Yes Qumi can be used to display content from an Xbox or PS3 console This can be done by connecting the HDMI cable from the game console to Qumi 2 Can Qumi project content from a television Watching television content can be done by connecting a cable box digital set top box or satellite receiver because televisions are only able to produce images on its own screen Fo...

Page 58: ...es QUMI support Microsoft Office 97 2010 Word Excel PowerPoint Adobe PDF 1 0 1 1 1 2 1 3 and 1 4 9 What type of photo formats does QUMI support JPEG and BMP 10 How long will the LED light source in Qumi last and can it be replaced Qumi does not use a typical light source It uses a set of Light Emitting Diodes LED to illuminate and project images LED s have a greater lifespan than conventional lamp...

Page 59: ...A UXGA Mac Video Compatibility 480i 480p 720p 1080i 1080p Safety Certification FCC B UL CCC CE PSE KC CB CU RoHS ICES 003 Canada Operation Temperature 5 C 35 C Environmental Storage Condition 10 C 60 C 5 95 N A condensation Dimensions WxDxH 189 5mm 7 46 x 113 8mm 4 48 x 44 3mm 1 74 AC Input AC Universal 100 240 Typical 110VAC 100 240 10 Power Consumption 54W Audio Speaker 2W mono speaker Input Ter...

Page 60: ... 2 8 50 127 0 43 6 110 7 24 5 62 2 65 4 166 1 1 2 3 0 60 152 4 52 3 132 8 29 4 74 7 78 4 199 1 1 5 3 8 70 177 8 61 0 154 9 34 3 87 1 91 5 232 4 1 7 4 3 80 203 2 69 7 177 0 39 2 99 6 104 6 265 7 2 0 5 1 90 228 6 78 4 199 1 44 1 112 0 117 6 298 7 2 2 5 6 100 254 0 87 2 221 5 49 0 124 5 130 7 332 0 2 5 6 4 110 279 4 95 9 243 6 53 9 136 9 143 8 365 3 2 7 6 9 120 304 8 104 6 265 7 58 8 149 4 156 9 398 ...

Page 61: ..._120 RB 101 56 119 91 O O VESA 1280x1024_60 63 98 60 02 O O O O VESA 1280x1024_75 79 98 75 02 O O VESA 1280x1024_85 91 15 85 02 O O VESA 1280x960_60 60 60 O O O O VESA 1280x960_85 85 94 85 O O VESA 1400x1050_60 65 32 59 98 O O O VESA 1440x900_60 55 93 59 89 O O O VESA 1600x1200_60 75 60 O O O VESA 1680x1050_60 RB 64 67 59 88 O O O VESA 1680x1050_60 65 29 59 95 O O O VESA 1920x1080_60 67 5 60 O O O...

Page 62: ...56 Qumi Dimensions mm 7 4 mm mm 1 67 mm ...

Page 63: ...f this equipment in a residential area is likely to cause harmful interference in which case the user will be required to correct the interference at his her own expense Changes or modifications not expressly approved by the parties responsible for compliance could void the user s authority to operate the equipment Canada This class B digital apparatus complies with Canadian ICES 003 Safety Certif...

Reviews: