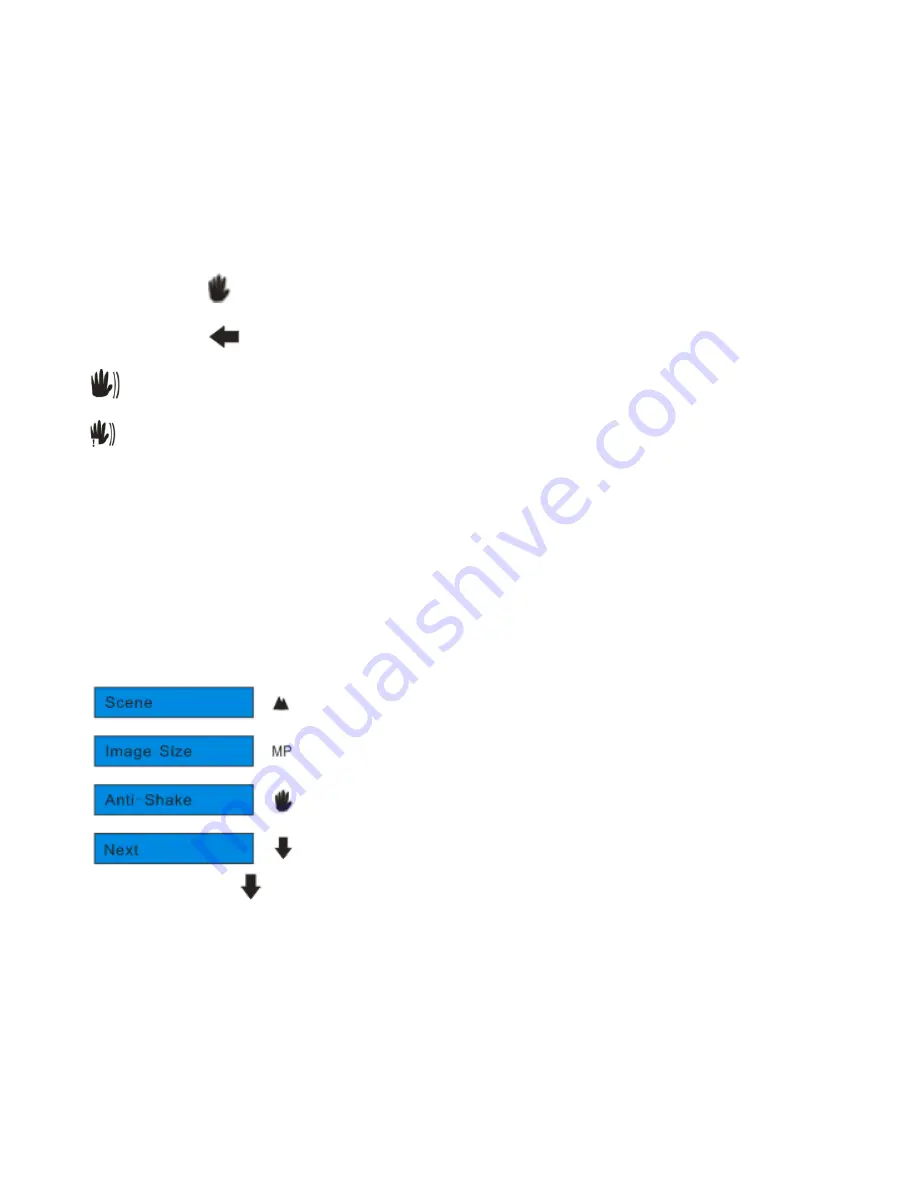
Vivitar ViviCam F328 User Manual Download Page 23


22 

3. 

Touch the icon 

  function area to enter the Anti-Shake menu. 

4. 

Touch the icon 

  function area to select Anti-Shake On or Off. 

    Anti-Shake on 

      Anti-Shake off 


5. 

Press the MENU/OK button to confirm, save and exit to the camera standby mode. 

6. 

The anti-shake icon selected will appear on the left side of the LCD screen. 


Face Detection 

Your camera supports face detecting that allows you to take better portrait photos. 

1. 

Press the MENU/OK button.   


2. 

Touch the Next icon

  function area until you see the 

“Face Detection” option. 

Summary of Contents for ViviCam F328

Page 1: ...With Touch Screen User s Manual 2009 Sakar International Inc All rights reserved Windows and the Windows logo are registered trademarks of Microsoft Corporation All other trademarks are the property o...

Page 2: ...en capturing images 9 Starting Your Digital Camera 10 Camera Mode 12 Video Mode 23 Playback Mode 27 Setup Mode 38 Install the Vivitar Experience Image Manager Software 47 Connect your camera to the co...

Page 3: ...Digital Video resolutions 640x480 Pixels VGA 320x240 Pixels QVGA 14 1 mega pixels camera with choice of 8 digital camera resolutions 14 1M 4416x3312 pixels 10M 3648X2736 pixels 8M 3264x2448pixels 7M H...

Page 4: ...nload photos and videos to your PC you will need the following minimum configuration Pentium 4 processor or above with Windows XP service pack 2 512 MB RAM with 100MB of free disk space 1024 x 768 Rec...

Page 5: ...at least 15GB of available space Support for Super VGA graphics Available USB Interface CD ROM drive QuickTime 6 or higher Microsoft Internet Explorer 7 or higher Internet connection required Computer...

Page 6: ...5 A Quick Look at Your Camera...

Page 7: ...orrect polarity facing up 3 Use the battery clip found in the battery compartment to make sure that the battery is sitting firmly 4 Close the battery door 5 On powering on your camera the battery icon...

Page 8: ...dicating that your camera is in charging mode The LED will switch off when your camera is fully charged Note the camera must be turned off before recharging the battery Installing SD Memory Card Your...

Page 9: ...ring off 2 An external memory card is required for normal use Your camera supports any compatible SD memory card up to 8GB 3 If there is a photo in the internal memory when you insert the card into yo...

Page 10: ...images Turning on the Power button will activate the lens to open out like a periscope Hold the camera steady and correctly as shown is the diagram below Note Do not touch or move the lens once it ope...

Page 11: ...y cause the touch function to fail Power on Press the Power button on the top of the camera to turn on your camera The LCD will light up and the lens will extract indicating that your camera is on and...

Page 12: ...int your photos The Camera mode is for you to take still photos You can shoot video files while in Video mode Use the Setup mode to change the setup features on the camera Set Exposure ISO White Balan...

Page 13: ...reen area with the red circles is very sensitive and you may be unaware that you have activated a certain feature Always double check before using the camera that you are in the correct mode or functi...

Page 14: ...download the photo to your computer using the Vivitar Experience Image Manager software as described below in the section Transfer photos and videos to your computer or insert another SD card to conti...

Page 15: ...st the lens Be careful not to touch the Lens while the camera is adjusting Digital Zoom You can magnify your subject up to 8 times using the digital zoom by touching the icon and function area 1 Touch...

Page 16: ...ar distances For close up shooting up to 80cm 1 Press the MENU OK button 2 Touch the Next icon function area on the bottom right of the touch screen until the Macro menu appears 3 Touch the Macro icon...

Page 17: ...lash Auto Red eye reduction No Flash To set the flash 1 Touch the icon function area on the bottom right of the touch screen until the icon appears on the left side of the LCD screen This will activat...

Page 18: ...the LCD screen display icons To hide the icons that appear on the LCD screen touch the DIS function area on the Touch screen For the icons to reappear touch the DIS function area again Self Timer You...

Page 19: ...the MENU OK button to confirm The self timer icon per your selection will now appear on the screen 6 Press the Shutter button until you see the self timer begin the count down Your camera will count...

Page 20: ...Touch the Next icon function area repeatedly until you see the Scene option appear 3 Touch the icon function area to enter the Scene menu 4 Touch the icon function area to select the scene you want t...

Page 21: ...be saved and the amount of memory required for each photo The higher the photo quality the more memory it will take The image size and quality will also affect the maximum size you can effectively pri...

Page 22: ...ize icon will appear on the top of the LCD screen Note 1 For Image sizes higher than 3M a SD card need to be inserted into the camera 2 Your camera has two HD 7M and 2M high definition image sizes Ant...

Page 23: ...Press the MENU OK button to confirm save and exit to the camera standby mode 6 The anti shake icon selected will appear on the left side of the LCD screen Face Detection Your camera supports face dete...

Page 24: ...on Face detecting off 5 Press the MENU OK button to confirm and exit to the camera standby mode 6 The Face Detection icon selected will appear on the LCD screen Video Mode Press the HOME button for t...

Page 25: ...l appear on the top right of the LCD screen and the icon will flash on the LCD screen 3 Press the Shutter button again to stop the recording and save this file in AVI format Note You can preview the A...

Page 26: ...ouch the icon function area to select the best White Balance option for shooting Auto Incandescent Fluorescent Cloudy Daylight 4 Press the MENU OK button to confirm save and exit to the video standby...

Page 27: ...rm save and exit to the video standby mode 5 The Image Size icon selected will appear on the LCD screen Macro The camera has the function that allows you to capture objects either at very near or very...

Page 28: ...con Macro shooting On Far shooting Off 5 Press the MENU OK button to confirm save your choice and exit to the video standby mode 6 The selected Macro icon appears on the left side of the LCD screen Pl...

Page 29: ...at supports using PictBridge Note The message No File Exist will be displayed on the LCD screen if there are no photos or videos in your camera Press the HOME button to return to the camera mode and b...

Page 30: ...ge delete confirmation message appears on the LCD with Yes or No options 3 Touch the or icon function area to select Yes or No 4 Press the MENU OK button to confirm The selected image is deleted Opera...

Page 31: ...Press the MENU OK button 2 Touch the icon function area to enter the Rotate option 3 Touch the icon function area to select one of the 90 180 270 degrees options 4 Press the MENU OK button to confirm...

Page 32: ...ear on the screen 2 No card inserted will appear on the screen if no SD card is insert Please insert an SD memory card to use this function Protect You can protect your photos videos from accidental d...

Page 33: ...image if you selected to Lock it Note To Unlock the current file follow steps 1 through 4 Select Unlock and press the MENU OK button to unlock the current file Delete Delete unwanted photos and video...

Page 34: ...or icon function area to select Yes if you wish to delete 8 Press the MENU OK button again to confirm the deletion Note You cannot delete files that are locked Crop Image Crop your photos to show and...

Page 35: ...the and icon function area to magnify the rectangle that appears on the LCD before you select the area to be saved as a new file 7 Press the MENU OK button 8 Touch the or icon function area to move th...

Page 36: ...nt 2 Press the MENU OK button 3 Touch the Next icon function area until you see the Pictbridge option 4 Touch the icon function area to enter the Pictbridge menu 5 Touch the icon function area to sele...

Page 37: ...om right of the camera to stop playing the AVI and revert back to the Playback mode Protect In the playback mode you can protect your video from accidental deletion 1 Select an AVI video file you wish...

Page 38: ...unction area 2 The video will appear in the LCD screen 3 Press the MENU OK button to open the Video Playback function mode options 4 Touch the icon function area to enter the Delete menu 5 Touch the i...

Page 39: ...ed them to your computer previous to the deletion Setup Mode Using this mode you can change the setup of the way images will be captured on your camera You can set the Exposure ISO White Balance Sharp...

Page 40: ...save and exit to the camera standby mode 4 The LCD screen will be adjusted as per the Exposure option you selected ISO This is a special function that allows you to compensate the light conditions whe...

Page 41: ...unction area to enter the White Balance setting 3 Touch the icon function area to select the White Balance option you desire Auto Fluorescent Incandescent Cloudy Daylight 4 Press the Menu OK button to...

Page 42: ...A HIGH setting means you can take fewer photos but they will be of better quality The default value is STANDARD 1 Touch the Next icon function area until you see the Quality option 2 Touch the icon fu...

Page 43: ...English Deutsch Espanol Portugues Italiano Nederands Russian Turkish and French 4 Press the MENU OK button to confirm save your choice and exit to the camera standby mode Digital Zoom This setting all...

Page 44: ...icon function area to enter the Frequency setting 3 Touch the icon function area to select one of the options 50 Hz 60 Hz 4 Press the Menu OK button to confirm save and exit to the camera standby mod...

Page 45: ...onfirm On selecting On the date will appear on the photo once it is taken On selecting Off no date will appear on the photo On selecting Set Date the Set Date settings screen will appear You will be a...

Page 46: ...ard 1 Touch the Next icon function area until you see the Format option 2 Touch the icon function area to enter the Format menu 3 Touch the icon function area to select OK or Cancel 4 Press the MENU O...

Page 47: ...ption 2 Touch the icon function area to enter the Default menu 3 Touch the icon function area to select OK or Cancel 4 Press the MENU OK button to confirm 5 A Default Setting message will appear on th...

Page 48: ...tar Experience Image Manager software 1 Insert the installation CD into your CD ROM drive The installation screen should automatically open 2 On PC The Vivitar Experience Image Manager Installer windo...

Page 49: ...uage window opens choose your language and click Next to open the next window 4 Select your camera model from the list and click Next to open the next window 5 Click Next to confirm your camera model...

Page 50: ...button when the installation is complete 11 Click the Launch Vivitar Experience Image Manager to open the application or close the window and run the Vivitar Experience Image Manager by clicking the d...

Page 51: ...our camera to your computer An SD card needs to be inserted Do not disconnect the cable during transfer Doing so will cancel the transfer of any files on their way to your computer 1 Select the Get Im...

Page 52: ...puter A media download progress bar appears on the bottom left showing the number of media files downloading to your computer A message appears when the download is complete 9 The photo and video file...

Page 53: ...appears on your computer with a list of options select Open folder to view files and click OK 4 Open the DCIM folder and the folder inside to view the media files 5 Select the media and copy the file...

Page 54: ...de to view the media files 5 Select the files and drag them into your computer Optionally select the files and choose Copy from the Finder s Edit menu Then select a folder and choose Paste from the Ed...

Page 55: ...sulting from defects in material or workmanship and damages or malfunctions from other than normal use including but limited to repair by unauthorized parties tampering modification or accident What T...

Page 56: ...website Can t find what you are looking for E mail us at support vivitar com and one of our technical support team members will answer your questions For phone support in the US please call 1 800 592...

Page 57: ...FT LCD Touch Screen Lens 3X 36 108mm 1 2 8 4 8 Zoom 8X Digital Zoom 3X Optical Zoom Exposure 3 0EV 3 0EV White Balance Auto Daylight Cloudy Incandescent Fluorescent ISO Auto 100 200 400 Scene Auto Nig...

Page 58: ...do I make sure I don t lose important pictures Your camera uses SDRAM memory which requires a constant electric current to store your test photos Should your camera lose power for instance if the bat...

Reviews: