background image

EN-60

MENU OPTIONS

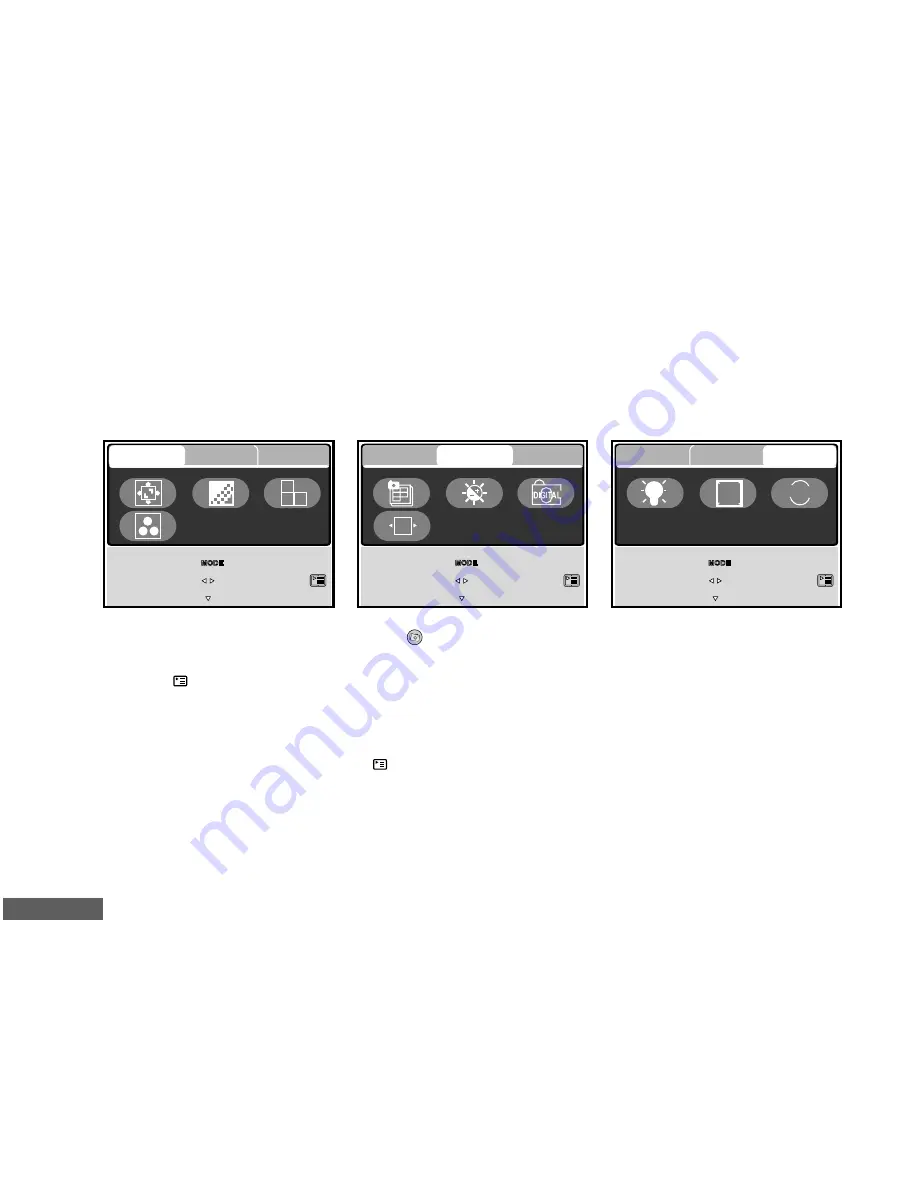
Camera Menu

1. Press the 

MODE

 button to access in [ 

 (CAMERA)] mode with 

S

,

T

,

W

, or 

X

, then press the 

OK

button.

2. Press 

 to access in [CAMERA] menu, then use 

W

 or 

X

 to select [PICTURE] / [FUNCTION] / [AE /

AWB] menu.

3. Use 

S

,

T

,

W

, or 

X

 to select the desired option item in [PICTURE] / [FUNCTION] / [AE / AWB] menu,

then press the 

OK

 button.

4. To exit from the menu, press the 

 button.

SELECT ITEM:

EXIT:

PICTURE

FUNCTION

AE/AWB

Q

R

G B

SELECT PAGE:

SELECT MODE:

SELECT ITEM:

EXIT:

PICTURE

FUNCTION

AE/AWB

SELECT PAGE:

SELECT MODE:

EV

SELECT ITEM:

EXIT:

PICTURE FUNCTION

AE/AWB

SELECT PAGE:

SELECT MODE:

WB

ISO

Manual

WB

This menu is for the basic settings to be used when capturing still images in camera mode.

Summary of Contents for Vivicam 5340s

Page 1: ...cations However there is no guarantee that interference will not occur in a particular installation If this equipment does cause harmful interference to radio or television reception which can be dete...

Page 2: ...fferent from those described in this manual This is due to the fact that different retailers often specify slightly different product inclusions and accessories to suit their market requirements custo...

Page 3: ...ire or electric shock For repair or internal inspection ask the store of purchase Use the supplied AC adapter only with the indicated power supply voltage Use with any other power supply voltage might...

Page 4: ...s might cause damage to the camera Do not use the camera in humid steamy smoky or dusty places This might cause fire or electric shock Do not remove the battery immediately after long period of contin...

Page 5: ...at pass the expiration date are exceptions might affect the number of images that can be taken Therefore to maximize their performance and lifetime we recommend that you fully charge the batteries and...

Page 6: ...urning the Power On Off 22 Entering the Main Menu 22 Setting the Date and Time 23 Choosing the Screen Language 24 Formatting an SD Memory Card or Internal Memory 25 Setting Image Resolution and Qualit...

Page 7: ...ng a Voice Recording File 51 TRANSFERRING FILES FROM YOUR VIVICAM 5340S TO YOUR COMPUTER 52 Step 1 Install the USB driver Windows 98 98SE users only 53 Step 2 Connect Vivicam 5340s to your computer 54...

Page 8: ...CD monitor Optical zoom 3x Digital zoom Preview mode 4x Playback mode 8x 10MB internal built in memory Images can be captured without using a memory card Support for SD memory card for memory expansio...

Page 9: ...tch or damage promptly contact your dealer Common Product Components Vivicam 5340s Digital Still Camera User s Manual USB Cable Software CD ROM AV Cable Common Optional Accessories SD Memory Card AC P...

Page 10: ...ING TO KNOW YOUR VIVICAM 5340S Front View 1 2 3 6 7 4 5 8 9 1 Self timer LED 2 Shutter button 3 Power button 4 Strap eyelet 5 Battery SD memory card cover 6 Lens 7 Auto Focus auxiliary LED 8 Flash 9 M...

Page 11: ...2 W Zoom out Wide angle button Thumbnail button 3 T Zoom in Telephoto button 4 Menu button 5 MODE button 6 Control buttons 7 Delete button 8 Display LCD on off button 9 Tripod socket 10 Docking statio...

Page 12: ...Buttons 1 2 3 4 5 1 S Flash button 2 Playback button 3 SCN T Scene Mode button 4 X Self Timer button 5 OK button Top View of Docking Cradle 1 Cradle 2 USB port 3 AV OUT port 4 DC IN 5V port 5 Cradle p...

Page 13: ...ty Super Fine Fine Normal 3 Image size 5M 2560 x 1920 3M 2048 x 1536 M 1 2 1280 x 960 M 0 3 640 x 480 TIFF IMAGE 4 Possible number of shots 5 Memory card indicator 6 Remaining battery status Full batt...

Page 14: ...tery power indicator 6 Time 7 Date 8 Zoom state 1 2 4 5 8 T W 6 7 VGA 3 Audio Mode 1 Audio mode 2 Current file total number of audio files 3 SD memory card indicator if present 4 Battery power indicat...

Page 15: ...eo clips 4 SD memory card indicator if present 5 Battery power indicator 6 Playback indicator 7 Movie mode Audio Playback 1 Audio mode 2 Current file total number of audio files 3 SD memory card indic...

Page 16: ...or Solid red 1 Vivicam 5340s is powering up 2 Vivicam 5340s is in the process of battery charge LED indicator Solid green USB communication is in progress Blinking green USB transfer is in progress Se...

Page 17: ...icam 5340s is off before inserting or removing the battery 1 Slide the battery cover in the direction of the OPEN arrow 2 Insert the battery in the correct orientation as shown in the illustration 3 C...

Page 18: ...eo clips or voice recording files output to a TV monitor or another recorder recording device for example on your desktop The cradle will facilitate the battery charge of Vivicam 5340s in conjunction...

Page 19: ...DC IN 5V 2 Connect the other end of the AC power adapter to a wall outlet Charging time differs depending on the ambient temperature and the status of battery Vivicam 5340s must be used with the speci...

Page 20: ...ical outlet Make sure to use the specified AC power adapter of Vivicam 5340s Damage caused by the use of an incorrect adapter is not covered under the warranty To prevent unexpected auto power off res...

Page 21: ...SD memory card in the correct orientation as shown in the illustration 3 Close the battery SD memory card cover To remove the SD memory card make sure Vivicam 5340s is turned off Press lightly on the...

Page 22: ...he Main Menu After turning on Vivicam 5340s the Main Menu screen appears Follow the steps below to select the desired mode 1 Press the button to turn on the power 2 Press the MODE button to access in...

Page 23: ...ETUP mode with S T W or X then press the OK button 3 Press X to select the CUSTOM menu 4 Use S T W or X to select DATE SETUP then press the OK button 5 Press W or X to select the Year Month Day and Ti...

Page 24: ...SCH ITALIANO and ESPA OL 1 Press the button to turn on Vivicam 5340s 2 Press the MODE button to access in SETUP mode with S T W or X then press the OK button 3 Press X to select the CUSTOM menu 4 Use...

Page 25: ...yed 3 Use S T W or X to select FORMAT then press the OK button 4 Use S or T to select YES then press the OK button to confirm When you format an SD memory card be aware that all data of which will be...

Page 26: ...n to turn on Vivicam 5340s 2 Press the MODE button to access in CAMERA mode with S T W or X then press the OK button 3 Press the button The PICTURE menu is displayed 4 Use S T W or X to select SIZE th...

Page 27: ...s 1 Press the button to turn on Vivicam 5340s 2 Compose your scene on the LCD monitor 3 Press the shutter button The LCD monitor darkens in strong sunlight or bright light This is not a malfunction To...

Page 28: ...alf way to focus the image When you press the shutter button down half way Vivicam 5340s Auto Focus feature automatically focuses the image and exposure 5 Press the shutter button the rest of the way...

Page 29: ...29 Scene Modes Your Vivicam 5340s offers you seven scene modes to capture images easily in a situation that is programmed to handle all adjustments for you by selecting the following shooting conditio...

Page 30: ...ode then press the OK button to confirm 4 Compose the image and then press the shutter button AUTO BACKLIGHT LANDSCAPE SPORT MACRO In this mode Flash mode will be set to Forced Flash automatically The...

Page 31: ...am 5340s reaches its maximum optical zoom factor 3x A useful feature as it is however the more the image is magnified the grainer the image may become To capture a zoomed image perform the following s...

Page 32: ...et the smallest detail 1 Press the button to turn on Vivicam 5340s 2 Press T SCN to access in SCENE mode 3 Use S T W or X to choose MACRO then press the OK button The icon appears on the LCD monitor 4...

Page 33: ...subject is too far away for the flash to have any effect The flash fires automatically according to suit the photographic conditions The flash will always fire regardless of the surrounding brightnes...

Page 34: ...the desired self timer mode 4 Compose your scene and press the shutter button The self timer function is activated and the status of countdown will be displayed on the LCD monitor The photography is t...

Page 35: ...nge from 2 0EV to 2 0EV 1 Press the MODE button to access in CAMERA mode with S T W or X then press the OK button 2 Press then use X to select the FUNCTION menu 3 Use S T W or X to select EXPOSURE the...

Page 36: ...then press the OK button 2 Press then toggle X to select the AE AWB menu 3 Use T to select WHITE BALANCE then press the OK button 4 Use S or T to select the desired setting 5 To exit from the menu pr...

Page 37: ...button 4 Use S or T to select CONTINUOUS then press the OK button 5 To exit from the menu press the button The indicator is displayed on the monitor screen 6 Press the shutter button halfway to lock...

Page 38: ...mode with S T W or X then press the OK button 2 Press then use X to select the FUNCTION menu 3 Use T to select CAPTURE MODE then press the OK button 4 Use S or T to select AEB A then press the OK butt...

Page 39: ...n 2 Press then toggle X to select the AE AWB menu 3 Use T and X to select MANUAL WB then press the OK button 4 Point Vivicam 5340s at an enclosed gray card for which you can set the white balance This...

Page 40: ...ccess in PLAY mode with S T W or X then press the OK button 3 In the PLAY mode use W or X to select the desired images To view the previous image press the W button To view the next image press the X...

Page 41: ...ss the W button To view the next image press the X button 3 Adjust the zoom ration by using the T W button To enlarge the selected image press the T button To return to the normal image press the W bu...

Page 42: ...To stop slide show press the OK button Resizing an Image You can follow the steps below to an image to one of the four sizes You can change the image size of a captured image to one of the following...

Page 43: ...Press the shutter button to start recording 4 Press the shutter button again to stop recording The function of optical zoom 3x can be activated before you start to record video clips Pressing the but...

Page 44: ...Press the shutter button to start playing back the video clips To pause or resume video playback press the shutter button To stop playback press the OK button Use to start fast reverse playback Use S...

Page 45: ...am 5340s then turn all connected devices off 1 Position Vivicam 5340s on the cradle 2 Match the docking connectors and carefully insert Vivicam 5340s until it fits in place 3 Connect one end of the A...

Page 46: ...0 degree clockwise or counterclockwise 1 Press the MODE button to access in PLAY mode with S T W or X then press the OK button 2 In the PLAY mode use W or X to display the image you want to rotate 3 P...

Page 47: ...ppears use W or X to select YES then press the OK button If you wish to cancel the deletion select NO To delete all images video clips at once 1 Press the MODE button to access in PLAY mode with S T W...

Page 48: ...W or X button then press the OK button 3 Use S or T to choose the desired setting then press the OK button ONE IMAGE Protect one image movie ALL IMAGES Protect all images movies at once EXIT Exit from...

Page 49: ...MODE button to access in PLAY mode with S T W or X then press the OK button 2 In the PLAY mode press to access in PLAY menu 3 Use S T W or X to select CHANGE LOGO then press the OK button 4 Use S or T...

Page 50: ...he shutter button again STOP AUD_0001 AUD_0002 W VOLUME T VOLUME RECORD 1 13 AUD_0003 Playing Back a Voice Recording File 1 Press the MODE button to access in AUDIO mode with S T W or X then press the...

Page 51: ...Vivicam 5340s Start stop voice recording Shutter Press the shutter button to start or stop voice recording button Choose previous next voice S T Use S or T to choose previous or next voice recording...

Page 52: ...order to do this you must install the USB driver onto your computer first Note that before you begin to install the software you need to check your system according to the table as shown below System...

Page 53: ...stall the USB driver 1 Insert the enclosed CD ROM into your CD ROM drive 2 When the welcome screen appears click Install USB Driver Follow the on screen instructions to complete the installation 3 Aft...

Page 54: ...on your computer 4 There will be a new Removable Disk icon detected in My Computer in which contains your recorded images video clips audio files For Mac users double click untitled or unlabeled disk...

Page 55: ...Your images are inside these folder s Select the desired still images video clips audio files and then choose Copy from the Edit menu Open the destination location folder and choose Paste from the Edi...

Page 56: ...in one tool for owners of digital cameras WebCams DV camcorders scanners or anyone who strives to effectively organize a large collection of digital media 1 Insert the enclosed CD ROM into your CD ROM...

Page 57: ...photographic filters and special effects Embellish projects by adding creative design elements such as frames callouts and stamp objects Share results with family and friends via e mail and multiple...

Page 58: ...e User Manual on the CD ROM is that you have Acrobat Reader Adobe Reader installed on your computer Updates to this manual and versions in other languages may be found on the Vivitar website www vivit...

Page 59: ...installed in your computer Acrobat Reader is included on the camera CD ROM Using Acrobat Reader you can read the user s manual and print sections of interest 1 Insert the CD ROM that came with the ca...

Page 60: ...the desired option item in PICTURE FUNCTION AE AWB menu then press the OK button 4 To exit from the menu press the button SELECT ITEM EXIT PICTURE FUNCTION AE AWB Q R G B SELECT PAGE SELECT MODE SELE...

Page 61: ...2560 x 1920 3M 2048 x 1536 M 1 2 1280 x 960 M 0 3 640 x 480 TIFF IMAGE QUALITY Sets the quality compression rate at which the image is captured SUPER FINE FINE NORMAL SHARPNESS Sets the level of imag...

Page 62: ...whether or not to use digital zoom at the time of photography The adjustment range is from 5 to 5 DIGITAL ZOOM Sets whether or not to use digital zoom at the time of photography ON OFF EXPOSURE Sets...

Page 63: ...he sensitivity for capturing images When the sensitivity is raised and the ISO figure is increased photography will become possible even in dark locations but the more pixilated grainer the image will...

Page 64: ...red setting then press the OK button 4 To exit from the menu press the button Item Functional Description SIZE Sets the size of the image that will be recorded 640X480 320X240 COLOR Refer to Camera Me...

Page 65: ...function is useful for checking your images or for presentations etc Refer to section in this manual titled Slideshow Display for further details 3SEC 5SEC 7SEC 9SEC PROTECT Set the data to read only...

Page 66: ...Allows you to view 4 or 9 thumbnail images on the LCD monitor at the same time which can quickly search for the image that you want 4 9 RESIZE Changes the size of a recorded image 2560 x 1920 2048 x...

Page 67: ...USTOM menu 3 Use S T W or X to select the desired option item then press the OK button 4 Press the MODE button to return to Main Menu and select the desired mode SELECT ITEM BASIC CUSTOM SELECT PAGE S...

Page 68: ...operation performed for a specific period of time the status of LCD monitor will turn into idle mode also known as power save mode and the LCD monitor will turn off You can press any button to resume...

Page 69: ...anual titled Setting the Date and Time for further details LANGUAGE Sets the language that is displayed on the LCD monitor Refer to section in this manual titled Choosing the Screen Language for furth...

Page 70: ...EN 70 CONNECTING YOUR CAMERA TO OTHER DEVICES...

Page 71: ...tele Focal length 5 4 mm 16 2 mm Range of focus Normal 18 infinity 0 5 M infinity Wide 2 16 0 06 0 4 M Tele 14 18 0 35 0 5 M LCD display 1 9 LTPS color LCD Self timer 3 or 10 second delay Exposure Aut...

Page 72: ...files to your computer and then delete unnecessary files or use a different memory card Select a different flash mode Select SINGLE in the capture mode of CAMERA menu Insert a new SD memory card Chec...

Page 73: ...16 2048 x 1536 pixels Super fine 1 8 Fine 1 12 Normal 1 16 1280 x 960 pixels Super fine 1 8 Fine 1 12 Normal 1 16 640 x 480 pixels Super fine 1 8 Fine 1 12 Normal 1 16 TIFF IMAGE The above data shows...

Page 74: ...time depending on the capacity of the SD memory card Image size SD memory card 8MB 16MB 32MB 64MB 128MB 256MB 512MB 640 x 480 0 18 0 47 1 46 3 42 7 36 15 14 30 48 320 x 240 1 13 3 08 6 58 14 38 29 58...

Reviews: