background image


Preparing Your Camera for Use 

Battery Installation 

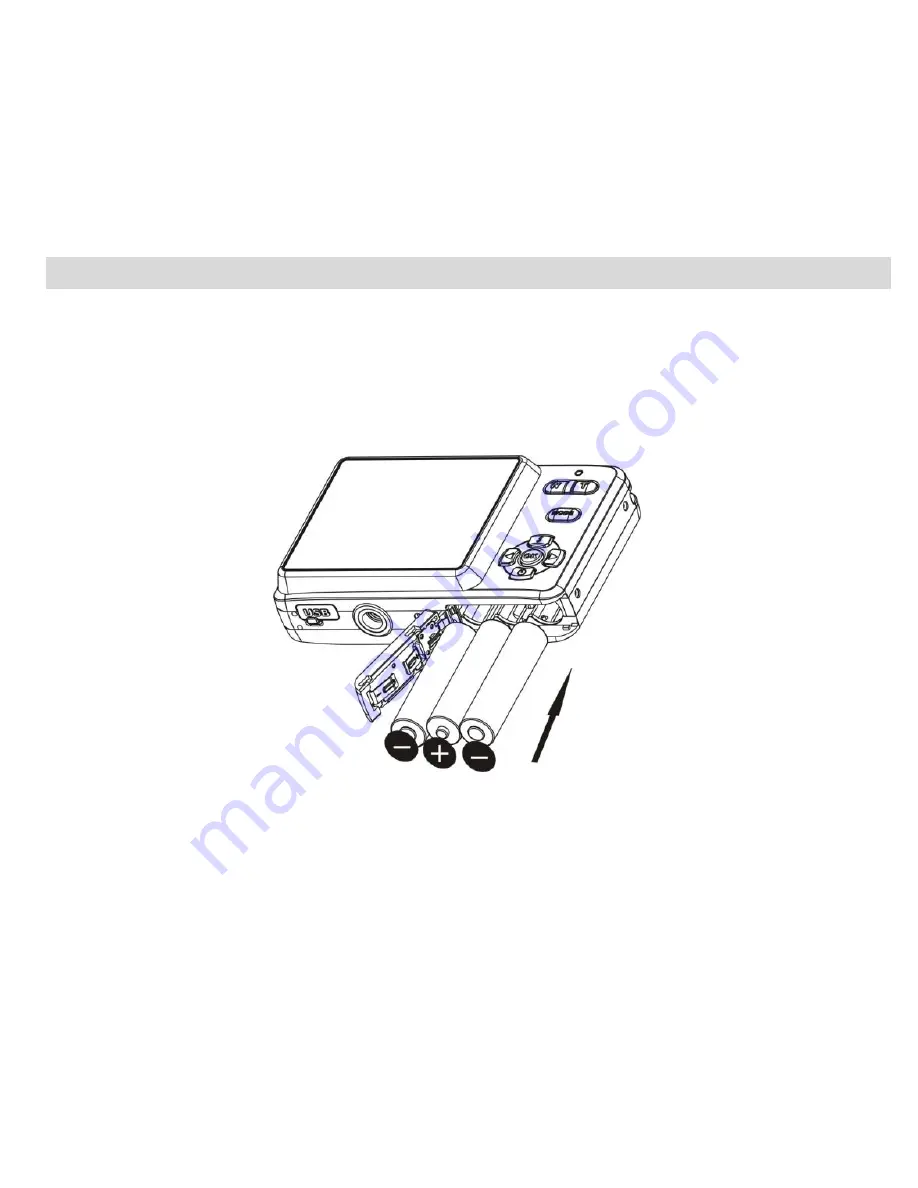
Your camera requires 3 AAA batteries. To insert the batteries into the camera: 

1. 

Slide and open the battery compartment at the bottom of the camera. 

2. 

Please make sure that the batteries are inserted with the correct polarity facing up. 


3. 

Close the battery door. 


When  the 

“No  Power”  is  displayed  on  the  LCD,  this  indicates  that  your  camera  has  an  insufficient  battery 

power level and will be automatically powered off. You need to download the sample photos and videos to your 

PC.    If there is no SD card inserted before it powers  off the photos and videos will be lost. 

Summary of Contents for ViviCam 5022

Page 1: ...l Camera User s Manual 2010 Sakar International Inc All rights reserved Windows and the Windows logo are registered trademarks of Microsoft Corporation All other trademarks are the property of their r...

Page 2: ...Card 6 Starting Your Camera 8 Camera Modes 8 Install the Vivitar Experience Image Manager Software 20 Connect your camera to the computer 22 Get photos and videos from your camera to your computer 23...

Page 3: ...ly first in order to get the most out of your digital camera Key Features Digital Image Resolution 5M 3M 2M VGA SD RAM 8MB Support s SD MMC memory card not included up to 32GB 1 8 inch TFT Color LCD V...

Page 4: ...ickTime 6 or higher Microsoft Internet Explorer 7 or higher Windows Media Player 10 or higher Internet connection required Computer System Requirements for Windows Vista To be able to download photos...

Page 5: ...Macintosh Macintosh with Intel processor running Mac OS X v10 5 or later 256 MB RAM 100 MB free disk space Display 1024 x 768 or higher resolution monitor QuickTime 6 or higher Internet connection re...

Page 6: ...e make sure that the batteries are inserted with the correct polarity facing up 3 Close the battery door When the No Power is displayed on the LCD this indicates that your camera has an insufficient b...

Page 7: ...alkaline standard carbon zinc or rechargeable nickel cadmium metal hydride batteries 5 In order to conserve battery power if the camera is on but not in use for 60 seconds it will automatically shut...

Page 8: ...ange to card will appear on the LCD screen when you insert the card indicating that photos and videos will now be stored on the SD memory card Reversely Card removed change to internal memory will app...

Page 9: ...e your object as appears in the LCD screen 2 Press the Shutter button and wait a moment for the photo to be taken Note When the internal memory is full the LCD screen will display Memory Full Insert a...

Page 10: ...ed 5 Press the Up button once more until you see the icon appear on the LCD screen This indicates that the flash is forced on 6 To turn off the flash function press the Up button again until the icon...

Page 11: ...s the Up Down button to select one of the following resolutions 5M 2592x1944 pixels 3M 2048x1536 pixels 2M 1920x1080 pixels VGA 640x480 pixels 5 Press the Menu OK button again to confirm your selectio...

Page 12: ...4 Press the Up Down button to select either 50 HZ 60 HZ 5 Press the Menu OK button to confirm Anti shake function Your Digital Camera has a function that prevents photos coming out blurry as a result...

Page 13: ...French Portuguese or Spanish 5 Press the Menu OK button to confirm and save your choice The camera menus and interface now appear in the language that you selected Macro Far shooting The camera has th...

Page 14: ...n you use the self timer 1 Press the Down or Timer button 2 The timer icon will now appear instead of the camera icon on the top left corner of the LCD 3 Press the Shutter button 4 The camera will beg...

Page 15: ...ond self timer countdown will begin Delete last photo quickly In camera mode you can quickly delete the last photo you have taken 1 Press the Right button 2 A Delete File message will appear on the LC...

Page 16: ...recording The video will be saved as an AVI file on the memory card Note 1 Insert an SD Memory Card will appear on the LCD screen as soon as you enter the Video mode 2 You can playback the AVI file b...

Page 17: ...he higher 640 VGA Language You can change the language setting on your Digital Camera 1 Press the Menu OK button 2 Press the Up Down button and select the Language option 3 Press the Menu OK button 4...

Page 18: ...ns to select and view your photos and videos taken JPG will appear on the LCD if you selected a photo The resolution icon of the photo will appear on the bottom left corner of the LCD for each photo A...

Page 19: ...r This action is irreversible Print your photos Your camera supports the PictBridge printing function that allows you to print photos any time directly from your camera to the compatible printer 1 Sel...

Page 20: ...tain that you wish to use this function In the playback mode 1 Press the Menu OK button 2 Press the Up Down button to select the FORMAT option 3 Press the Menu OK button 4 Press the Up Down button to...

Page 21: ...the Vivitar Experience Image Manager software 1 Insert the installation CD into your CD ROM drive The installation screen should automatically open 2 On PC The Vivitar Experience Image Manager Install...

Page 22: ...e camera Click the How to transfer photos and videos from my camera to my computer button for instructions 5 If you have internet access the Choose your language window opens choose your language and...

Page 23: ...r 12 On PC Click the Close button when the installation is complete On Macintosh Click the Quit button when the installation is complete 13 Click the Launch Vivitar Experience Image Manager to open th...

Page 24: ...o be inserted Do not disconnect the cable during transfer Doing so will cancel the transfer of any files on their way to your computer 1 Select the Get images button from the Main menu 2 The Get media...

Page 25: ...the bottom left showing the number of media files downloading to your computer A message appears when the download is complete 9 The photo and video files that you selected are now downloaded to your...

Page 26: ...Pictures My Pictures folder and the videos into the Videos My Videos folder 6 Do not disconnect the cable during transfer Doing so will cancel the transfer of any files on their way to your computer T...

Page 27: ...t no charge for parts or labor for a period of one year What Is Not Covered By Warranty Damages or malfunctions not resulting from defects in material or workmanship and damages or malfunctions from o...

Page 28: ...port issues please visit our website at www vivitar com You can find manuals software and FAQ s at the website Can t find what you are looking for E mail us at support vivitar com and one of our techn...

Page 29: ...x480pixels Lens f 7 23mm F2 8 Internal memory SD RAM 8MB External memory Support SD card up to 32GB Flash Auto force on red eye reduction off Self timer 10S Power saving 60S Printing PictBridge Batter...

Page 30: ...do I make sure I don t lose important pictures Your camera uses SDRAM memory which requires a constant electric current to store your test photos Should your camera lose power for instance if the bat...

Reviews: