background image


12 

2. 

Hold the camera steady and press the Shutter button to take the photo. 

3. 

The LED light will flash and there will be a short delay while the camera saves the JPEG photo to 

memory.   


Note:


1. 

When  the camera

’s memory (photo capacity) is full,  the camera will emit “beeps” when you attempt to 

take more photos and the 

Memory Full! Transfer Test Images to PC and Insert a SD Memory Card to 

Take More Images!

” 

message appear on the LCD.   

2. 

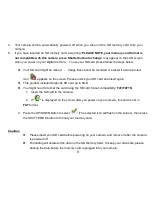
Either  download  the  photo  to  your  computer  using  the  Vivitar  Experience  Image  Manager  software  as 
described below in the section “

Transfer photos and videos to your computer

” and thereafter delete 

them from your SD card or insert another SD card to continue taking more photos and videos. 

3. 

Please download these photos to your computer as soon as possible.   


Flash 

In low light conditions, it is best to use the built-in flash. You can also use the flash to compensate for backlight 

conditions. 


To set the flash in camera mode:   

1. 

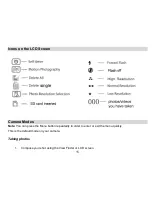
Press the Up/Flash button to toggle between the flash options. 


    Auto Flash,


Force Flash ,

    No Flash           


1. 

The 

  icon appears on the LCD screen.    This will activate the automatic flash. 

Summary of Contents for ViviCam 4090

Page 1: ...al Camera User s Manual 2009 Sakar International Inc All rights reserved Windows and the Windows logo are registered trademarks of Microsoft Corporation All other trademarks are the property of their respective companies ...

Page 2: ...rd 7 Starting Your Camera 10 Icons on the LCD Screen 11 Camera Modes 11 Install the Vivitar Experience Image Manager Software 17 Connect your camera to the computer 19 Get photos and videos from your camera to your computer 20 Get started 21 Transfer media from my camera to my computer manually Using Windows 22 Transfer media from my camera to my computer manually Using Macintosh 22 Maintenance of...

Page 3: ... this manual carefully first in order to get the most out of your digital camera Key features Digital Video resolution 320x240 pixels 4 1 mega pixels camera with 3 digital camera resolutions 2304x1728 pixels 4 1M 2048x1536 pixels 3M 640x480 pixels VGA 1 5 color TFT LCD Internal memory SDRAM 16MB support SD MMC card not included SD Memory Card slot accepts SD compatible memory card up to 8 GB Built...

Page 4: ...ad photos and videos to your PC you will need the following minimum configuration Pentium 4 processor or above with Windows XP service pack 2 512 MB RAM with 100MB of free disk space 1024 x 768 Recommended screen resolution 16 bit color or higher display adaptor CD ROM Drive QuickTime 6 or higher Microsoft Internet Explorer 7 or higher Windows Media Player 10 or higher Internet connection required...

Page 5: ...at least 15GB of available space Support for Super VGA graphics Available USB Interface CD ROM drive QuickTime 6 or higher Microsoft Internet Explorer 7 or higher Internet connection required Computer System Requirements for Macintosh Macintosh with Intel processor running Mac OS X v10 4 6 or later 256 MB RAM 100 MB free disk space Display 1024 x 768 or higher resolution monitor QuickTime 6 or hig...

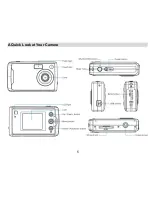
Page 6: ...5 A Quick Look at Your Camera ...

Page 7: ...the batteries with the correct polarity facing up as shown the diagram 3 Close the battery door When the Low Battery icon flashes on the LCD this indicates that your camera has insufficient battery power and will automatically power off Please replace the batteries before you turn the camera back on Note 1 If you don t intend to use your camera for an extended period remove the batteries to avoid ...

Page 8: ...batteries Installing SD Memory Card Your camera has a memory card slot that enables you to insert any SD compatible memory card up to 8GB An SD memory card is required for normal use Adding a memory card will allow you to increase the capacity of your camera before you have to transfer photos videos to your computer Note Limited internal memory is provided for test images Installing the SD memory ...

Page 9: ...ernal memory card is inserted into the camera all the images taken will be stored on the external memory card Important Note 1 You have to insert the SD memory card with your camera powered off otherwise the camera will be turned off automatically when you inserted the SD memory card 2 Please download the test photos videos to your computer before inserting an SD memory card 3 Insert the SD memory...

Page 10: ...ock your SD card and insert again This product included Supports SD card up to 8GB You might need to format the card using the SD card format compatibility FAT FAT16 1 Insert the SD card in the camera 2 If is displayed on the screen after you power on your camera this card is not in FAT format 3 Press the UP DOWN button to select The selected icon will flash on the screen then press the SHUTTER OK...

Page 11: ...D Memory Card has been inserted in the camera when the camera powers off or when you change your batteries Starting Your Camera Power on Press the Power button on the top of the camera to turn on your camera The LCD screen will be light up This will confirm that your camera is on and ready for use Power off Press and hold the Power button for 3 seconds to power off your camera In order to conserve...

Page 12: ...D Screen Camera Modes Note You can press the Menu button repeatedly in order to enter or exit the menu quickly This is the default mode on your camera Taking photos 1 Compose your shot using the View Finder or LCD screen ...

Page 13: ...r computer using the Vivitar Experience Image Manager software as described below in the section Transfer photos and videos to your computer and thereafter delete them from your SD card or insert another SD card to continue taking more photos and videos 3 Please download these photos to your computer as soon as possible Flash In low light conditions it is best to use the built in flash You can als...

Page 14: ...he default flash setting Note This function will not work if your battery power is insufficient Self Timer You can include yourself in a photo by using this feature to delay the time between your pressing the Shutter button and when the photo is actually taken It is recommended that you use a tripod when you use the self timer function 1 Press the Menu button 2 Press the Up Down button repeatedly ...

Page 15: ...in this mode will be saved as AVI format without audio 2 You cannot playback the AVI files in your Digital Camera 3 The shooting time varies slightly depending on the available space on your camera 4 The elapsed shooting time will be displayed on the LCD screen Photo resolution setting You can change the resolution size of the photos taken 1 Press the Menu button 2 Press the Up Down button repeate...

Page 16: ... for you to preview the photos you have taken Make sure you have taken photos before you use this mode View photos 1 Press the Down button to enter the Playback mode 2 Press the Up button to preview the photos manually one by one going forward 3 Press the Down button to preview the photos manually one by one going backward Delete single photo 1 Select a photo you want to delete 2 Press the Menu bu...

Page 17: ... and press the Up Down button until the icon appears on the LCD 2 Press the Shutter OK button 3 Press the Up Down button to select the 4 Press the Shutter OK button to confirm the deletion Note 1 At step 3 you can select and then Press the Shutter OK button to exit without deleting 2 Press the Down button to enter the Playback mode and you can press the Shutter OK button to revert back to the Came...

Page 18: ...ive The installation screen should automatically open 2 On PC The Vivitar Experience Image Manager Installer window appears If the window does not appear open the application s CD DVD drive and click on Setup bat to launch the installer 3 On Macintosh Click the icon to install the Vivitar Experience Image Manager 4 If you do not have internet access at the time of inserting the CD ROM connect to t...

Page 19: ...ess the Choose your language window opens choose your language and click Next to open the next window 6 Select your camera model from the list and click Next to open the next window 7 Click Next to confirm your camera model selection and to install the application 8 Please wait while the application is being installed on your computer 9 Please review the license terms On PC Click the I Agree butto...

Page 20: ...ion is complete On Macintosh Click the Quit button when the installation is complete 13 Click the Launch Vivitar Experience Image Manager to open the application or close the window and run the Vivitar Experience Image Manager from your computer Connect your camera to the computer 1 Use the USB cable that came with your camera to connect your camera to your computer 2 Turn on the camera 3 MSDC wil...

Page 21: ...your camera to your computer An SD card needs to be inserted Do not disconnect the cable during transfer Doing so will cancel the transfer of any files on their way to your computer 1 Select the Get images button from the Main menu ...

Page 22: ...number of media files downloading to your computer A message appears when the download is complete 9 The photo and video files that you selected are now downloaded to your computer to the selected folder and albums ready for your use Get started Using the Vivitar Experience Image Manager you can upload and manage photos and videos to and from the most popular photo sharing and social networking si...

Page 23: ... 6 Do not disconnect the cable during transfer Doing so will cancel the transfer of any files on their way to your computer Transfer media from my camera to my computer manually Using Macintosh 1 Use the USB cable that came with your camera to connect your camera to your computer 2 The camera s device icon appears on the desktop 3 Click on the device icon and open the DCIM folder and the folder in...

Page 24: ...at no charge for parts or labor for a period of one year What Is Not Covered By Warranty Damages or malfunctions not resulting from defects in material or workmanship and damages or malfunctions from other than normal use including but limited to repair by unauthorized parties tampering modification or accident What To Do When Service Is Required When returning your defective product postage pre p...

Page 25: ...ar com You can find manuals software and FAQ s at the website Can t find what you are looking for E mail us at support vivitar com and one of our technical support team members will answer your questions For phone support in the US please call 1 800 592 9541 in the UK call 0800 917 4831 If you would like to call from anywhere else please visit www vivitar com for your local toll free number ...

Page 26: ...st photos for buffer if without SD memory card AVI about 20 seconds Example of External SD memory card 256MB Standard quality about 603pcs 2304x1728 4 1M 958pcs 2048x1536 3M 2612pcs 640x480 VGA Note the total number of images you take is according to the different environment and memory card capacity Flash Auto force on off Self timer 10S Power saving 60S Battery 3 AAA batteries 4 5V Transmission ...

Page 27: ...ortant pictures Your camera uses SDRAM memory which requires a constant electric current to store your test photos Should your camera lose power for instance if the battery dies or run out of power the photo will be lost This camera requires an SD card for normal use If the camera powers off nothing will happen to the images stored on the SD memory card We recommend always downloading your photos ...

Reviews: