background image

26

E

Flash mode

Description

Auto

The flash fires automatically according to the photography conditions, is suitable for
general photography.

Red-eye reduction Use this mode to avoid the red-eye effect when photographing people in low-light conditions.

Forced flash

The flash fires regardless of the surrounding brightness, is suitable for

recording images in artificial light (backlighting, fluorescent lighting, etc.).

Off

Use this mode in the environment that the flash use is prohibited or under the situation
that the distance to the subject is too far away for the flash to have any effect.

Flash photography

The flash is designed to function automatically in dark places (default setting: Auto). To suit the
different conditions, however, you can change the flash modes.

1. Power on the camera.
2. Set the mode dial to the      mode or the        mode.
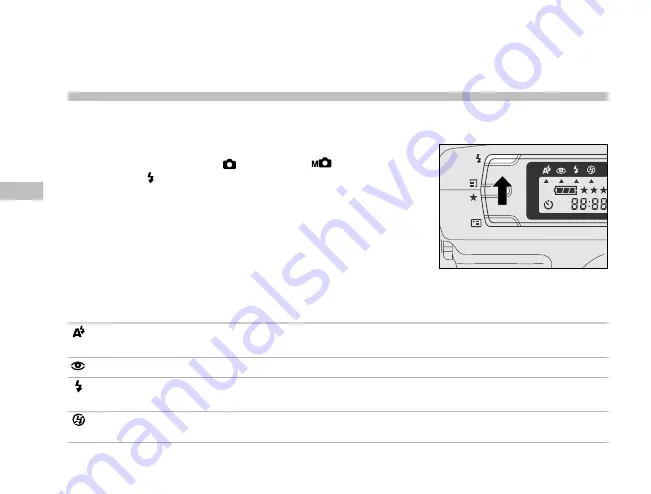
3. Press the      button several times to select your desired

mode. (The arrow points to your selected flash mode on the
status LCD.)

4. Compose the picture.
5. Press and hold the shutter button down halfway to focus the

subject. (When the focus and exposure are adjusted, LED 1
lights orange. When this camera is ready for recording
images, LED 2 lights green.)

6. Press the shutter button down fully.

Summary of Contents for Vivicam 3665

Page 1: ...Vivicam 3665 User Manual English 021009...

Page 2: ...ations However there is no guaran tee that interference will not occur in a particular installation If this equipment does cause harmful interference to radio or television reception which can be dete...

Page 3: ...or an electrical shock If the camera has been dropped or if the camera case has been damaged turn the camera off and then disconnect the power source batteries or AC power adapter If you are using the...

Page 4: ...so may damage the cords or cables and cause a fire or an electrical shock When leaving the camera unused for long periods such as during a vacation always unplug the camera from the power source batte...

Page 5: ...15 GETTING STARTED 16 Installing the batteries 16 Using the AC power adapter optional 16 Loading the memory card 17 Attaching the strap 17 Setting the language and date time 18 IMAGE RECORDING 19 Auto...

Page 6: ...E 43 TRANSFERRING IMAGES TO YOUR COMPUTER 46 System requirements 46 Step 1 Installing the USB driver on Windows 47 Installing the USB driver on Macintosh 47 Step 2 Connecting this camera to your compu...

Page 7: ...uirements for videoconferencing 54 Step 1 Installing the PC camera driver 55 Step 2 Connecting this camera to your computer 56 Step 3 Running software application for example Windows NetMeeting 57 SPE...

Page 8: ...ess the button To zoom out on the subject press the button Press the shutter button Press and hold the shutter button down halfway to focus the subject Press the shutter button down fully In movie mod...

Page 9: ...age on the LCD monitor by pressing the button in the modes Set the mode dial to mode The last image will display on the LCD monitor Press the buttons to select your desired image To select the next im...

Page 10: ...TION Package contents Digital camera USB cable Video cable Software CD ROM User s manual Wrist strap Lens cap with lens strap Optional accessories Memory card AC power adapter Camera pouch 4xAA alkali...

Page 11: ...onnecting this camera to other devices Camera TV Viewing images on TV Printer Card Printer Printing images Computer Downloading Editing images on a computer CD RW Recording images onto CD USB NTSC PAL...

Page 12: ...11 E GETTING TO KNOW YOUR CAMERA Front view Status LCD Mode dial Shutter button Strap eyelet Menu button Quality Resolution button Flash mode button Flash Viewfinder window Self timer lamp Lens...

Page 13: ...12 E Rear view...

Page 14: ...ecord mode allows you to manually adjust the white balance and exposure compensation during photography Playback mode allows you to view the recorded images movie files Movie mode allows you to record...

Page 15: ...e Blinking Image processing No compression Decompression LED1 Orange Blinking When transferring images to your No computer LED2 Green On System ready Yes 1 LED2 Green On Ready to record after AF is lo...

Page 16: ...15 E...

Page 17: ...the open arrow 3 Insert the batteries Alkaline or Lithium according to the po larity marks or shown on the inner side of the battery cover 4 Close and lock the battery cover to make sure it is firmly...

Page 18: ...card cover 3 Insert the memory card in the direction of the arrow 4 Close the card cover 1 Thread one end of the lens strap through the strap eyelet on the camera and pull the other end through the l...

Page 19: ...guage with the button 2 Press the button to confirm To set the DATE TIME 1 Enter the YEAR MONTH DAY TIME with button Press the button to confirm whenever each item is set 2 When the last item is set p...

Page 20: ...nitor and taking pictures using the viewfinder instead 1 Power on the camera 2 Set the mode dial to the mode 3 Use the viewfinder window to compose the picture 4 Turn the diopter adjustment dial until...

Page 21: ...lfway to focus the subject When the focus and exposure are adjusted LED 1 lights orange When this camera is ready for recording images LED 2 lights green 6 Press the shutter button down fully NOTE The...

Page 22: ...be displayed on the LCD monitor in the modes With the button however you can only view the last recorded image For all images playback go to the mode 1 Press the button and the last recorded image dis...

Page 23: ...l to the mode or the mode 3 Press the button to turn on the LCD monitor 4 Press the button button to enlarge the subject Press the button button can take wide angle shots 5 Press and hold the shutter...

Page 24: ...it can go 5 Press the button again to activate 2X digital zoom function 6 Press and hold the shutter button down halfway to focus the subject When the focus and exposure are adjusted LED 1 lights oran...

Page 25: ...tter button down halfway to focus the subject When the focus and exposure are adjusted LED 1 lights orange When this camera is ready for recording images LED 2 lights green 6 Press the shutter button...

Page 26: ...the icon on the status LCD 4 Compose the picture 5 Press and hold the shutter button down halfway to focus the subject When the focus and exposure are adjusted LED 1 lights orange When this camera is...

Page 27: ...that the distance to the subject is too far away for the flash to have any effect Flash photography The flash is designed to function automatically in dark places default setting Auto To suit the diff...

Page 28: ...lution and quality is ideal for printing However it is highly recom mended to use the smaller resolution and quality for e mail transmission To change the resolu tion and quality settings press the bu...

Page 29: ...on Quality Compression ratio Estimated images Estimated images Internal memory Memory card 4MB 1600x1200 16 1 20 10 800x600 16 1 83 43 1600x1200 12 1 15 8 800x600 12 1 62 32 1600x1200 8 1 10 5 800x600...

Page 30: ...button again or select EXIT and press the button LCD BRIGHTNESS Adjusts the brightness of the LCD monitor 5 to 5 QUICKVIEW This feature allows you to view the image on the LCD monitor as soon as you t...

Page 31: ...d manual record menu appears 4 Select WHITE BALANCE or EV COMPENSATION with the button 5 Change the settings with the button and press the button to confirm It will return to the mode 6 Compose the pi...

Page 32: ...tton and press the button to confirm It will return to the mode 5 If you do not want to make any changes while entering the menu settings screen you can press the button again or select EXIT and press...

Page 33: ...recording outdoors on a bright day SHADE recording for overcast shaded twilight or evening skies FLUORESCENT for recording under fluorescent lighting TUNGSTEN for recording under tungsten lighting EV...

Page 34: ...last recorded image movie file appears on the LCD monitor 2 Select your desired image with the button button displays the previous image button displays the next image NOTE You can also view the imag...

Page 35: ...Set the mode dial to the mode 2 Select the image you want to enlarge with the button 3 Enlarge the image with the button 4 To view the different portion of the enlarged image press the button 5 To re...

Page 36: ...tion 1 Set the mode dial to the mode 2 Press the button and image information appears 3 Press the button again and thumbnail display appears 4 Select the image you want to play at full size with the b...

Page 37: ...dial to the mode 2 Press the button and playback menu appears 3 Select SLIDE SHOW 4 Select the playback interval with the button and press the button to confirm 5 The slideshow starts The image is dis...

Page 38: ...tion or select NO to cancel A next image appears 5 Repeat step 2 to continue deletion if necessary 6 If all images are deleted NO IMAGES will show on the LCD monitor To delete all images at a time 1 S...

Page 39: ...mode 5 If you do not want to make any changes while entering the menu settings screen you can press the button again or select EXIT and press the button LCD BRIGHTNESS Adjusts the brightness of the LC...

Page 40: ...ENABLE and press the button to confirm the camera will save the settings and return to the playback menu If DISABLE is selected and confirmed all the settings will be erased DPOF shortcut You can use...

Page 41: ...LED 1 lights orange When this camera is ready for recording movies LED 2 lights green 4 Press the shutter button down fully 5 The movie recording starts 6 To stop recording movie press the shutter but...

Page 42: ...e with the button 3 Press the shutter button to start 4 To pause continue movie playback midway press the shutter button again 5 To stop movie playback and return to the playback mode press the button...

Page 43: ...n and press the button to confirm 4 Change the settings with the button and press the button to confirm It will return to the mode 5 If you select EXIT and press the button on step 3 it will return to...

Page 44: ...time LANGUAGE Sets the displayed language on the LCD monitor ENGLISH FRAN AIS DEUTSCH ESPA OL PORTUGU S E F E F SOUND Enables or disables the sound function ON sounds each time when operating the cam...

Page 45: ...f no operation is carried out for 90 seconds the camera will stay idle to prevent battery con sumption stand by To bring the camera power back press any button or switch the mode dial If no operation...

Page 46: ...e resolution 1600x1200 Image quality Fine Flash Auto LCD brightness 0 Quick view Off White balance Auto EV compensation 0 0 Slide show delay 4 seconds Auto power off Battery 3 min AC power adapter 30...

Page 47: ...ansfer images to a computer follow the steps below Step 1 Installing the USB driver Step 2 Connecting this camera to your computer Step 3 Downloading images System requirements Pentium 166 MHz process...

Page 48: ...the USB driver installation is complete restart your computer For Mac OS 9 0 or higher users the computer will automatically recognize the camera and load its own USB drivers Installing anything sepa...

Page 49: ...the other end of the USB cable to the USB connec tor on the camera 4 Look for a new removable disk appearing in the My Com puter window Your recorded images will be in a folder on this removable disk...

Page 50: ...k Windows computers Open the removable disk select your desired images and then choose Copy from the Edit menu Then open the destination location and choose Paste from the Edit menu NOTE Before downlo...

Page 51: ...stuff Get your images ready and go explore this amazing program To install MGI PhotoSuite 1 Insert the CD ROM packaged with the camera into the CD ROM drive The welcome screen appears 2 Click Install...

Page 52: ...gether and its intuitive interface will let even a novice get great results in minutes To install MGI PhotoVista 1 Insert the CD ROM packaged with the camera into the CD ROM drive The welcome screen a...

Page 53: ...can view the user s manual just as its original looks no matter what application or systems you have installed 1 Insert the CD ROM packaged with the camera into the CD ROM drive The welcome screen ap...

Page 54: ...rs 2 Click Install Acrobat Reader Follow the on screen instructions to complete the installation Installation steps for Mac users 1 Insert the CD ROM packaged with the camera into the CD ROM drive 2 S...

Page 55: ...riends or family To use this camera as a PC camera follow the steps below Step 1 Installing the PC camera driver Step 2 Connecting this camera to your computer Step 3 Running software application for...

Page 56: ...tion provided on this camera is not supported by Macintosh platform 1 Insert the CD ROM packaged with the camera into the CD ROM drive The welcome screen appears 2 Click Install PC Camera Driver Foll...

Page 57: ...ERA with the button and press the button to confirm 5 Connect one end of the USB cable to an available USB port on your computer 6 Connect the other end of the USB cable to the USB connec tor on the c...

Page 58: ...erson you are calling must have Windows NetMeeting running and also accept your call to start the videoconference NOTE The video capture resolution is 320x240 pixels It is recommended that you use the...

Page 59: ...2mm focus distance 0 2m infinity Aperture ratio F2 8 F5 6 W F4 4 F8 6 T Shutter speed 1 10 1 800 sec Zoom 3 x Optical 2 x Digital File format JPEG EXIF 2 1 DPOF DCF AVI Memory Internal 8MB External M...

Page 60: ...te balance Auto Manual Sun Shade Fluorescent Tungsten Language supported English French German Spanish Portuguese Japanese Traditional Chinese Simplified Chinese Connectors DC IN jack USB connector VI...

Reviews: