background image


39 

To Enable/Disable the Timestamp:   

1)  Press the 

MENU/HOME

 button to open the menus for the current mode. 

2)  Press the 

LEFT

 or 

RIGHT

 button to scroll and select the Date/Time menu.   

3)  Press the 

UP

 or 

DOWN

 button to highlight the desired menu selection. 

4)  Press the 

SET/OK

 button to confirm and select the highlighted menu option. 

5)  A 

  selected option icon will appear on the selected item. 

6)  Press the 

LEFT

 or 

RIGHT

 button to select the next menu item. 

7)  Press the 

MODE

 button to exit the menu and return to your previous mode. 

8)  Remember that this setting will be saved by your camcorder until you manually change the setting 

or restore the c

amcorder’s default factory settings. 


To Set the Date and Time: 

1)  Press the 

MENU

 button to open the menus for the current mode. 

2)  Press the 

LEFT

 or 

RIGHT 

button to scroll and select the Date/Time menu.   

3)  Press the 

UP

 or 

DOWN


button to highlight the “Date Setup” menu option, and then press the 

SET/ 

OK

 button to open the menu. 

4)  Scroll through the date and time menus with the 

RIGHT

 and 

LEFT 

direction buttons.   

5)  For each field in the menu, use the 

UP 

and 

DOWN

 direction buttons to set the specific date and 

time. 

6)  When you have finished setting the date and time, press the 

SET/OK

 button to save your settings 

and return to the previous mode. 

7)  Press the 

MODE

 button to exit the menu without saving your settings and return to your previous 

screen. 


Silent Mode Menu 


You hav

e the option of activating the camcorder’s Silent mode to disable all of the sound effects 

(except for beeps heard during the Self-Timer countdown) that the camcorder emits when performing 

functions.   

Note

: This menu does not affect the sound during video capture. 

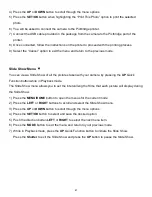
1)  Press the 

MENU/HOME

 button to open the menus for the current mode. 

Summary of Contents for DVR 548NHD

Page 1: ...mcorder User Manual 2009 2012 Sakar International Inc All rights reserved Windows and the Windows logo are registered trademarks of Microsoft Corporation All other trademarks are the property of their...

Page 2: ...g the Menus 12 Video Capture Mode 13 Video Playback Mode 26 Photo Capture Mode 29 Photo Playback Mode 43 Connecting the Digital Camcorder to a TV 48 Installing the Software 49 Connecting the Camcorder...

Page 3: ...Memory card up to 32GB for normal use SD Memory cards are not included and need to be purchased separately Important It is recommended to use a Class 4 SD card or higher SD card Please read this manua...

Page 4: ...button while in the Video Capture mode Photo Capture Mode Use this mode to capture pictures with your digital camcorder After turning on your camcorder press the MODE button once to open the Photo Cap...

Page 5: ...Auto Daylight Cloudy Incandescent Fluorescent ISO Auto 100 200 400 Scene Auto Scenery Portrait Night Scenery Night Portrait High Sensitivity Sport Beach Party Language English French Spanish Portugue...

Page 6: ...itor 1024 X 768 recommended screen resolution CD ROM Drive QuickTime 6 or higher Microsoft Internet Explorer 7 or higher Windows Media Player 10 or higher DirectX 9 or higher Internet connection requi...

Page 7: ...er Button 5 USB Port 19 Up LED On Off Button 6 Shutter Button 20 Power LED Indicator Light 7 AV Out Port 21 SET OK Button 8 Hand Strap Connector 22 Right Delete Button 9 Battery Compartment Cover 23 D...

Page 8: ...ver securely Use 4 x AAA 1 5V batteries Alkaline batteries are recommended Batteries not included Note Remove the batteries from the camera when not in use for an extended period Do not mix alkaline a...

Page 9: ...D card until you hear a slight clicking sound This indicates the SD card has been inserted correctly Note After the digital camcorder is powered on an SD icon appears on the LCD display If you do not...

Page 10: ...e and press the SET OK button to confirm the selection Setting the Date and Time The next step in the initial camcorder setup is to set the date and time Set the Date and Time as Desired and press the...

Page 11: ...ring ON OFF Your Digital Camcorder Make sure the batteries have been inserted properly into your digital camcorder Make sure an SD card has been inserted into your digital camcorder SD card up to 32GB...

Page 12: ...The icons that appear on the LCD screen are the best default settings so that you can begin to capture and enjoy clear quality photos To change the active camera mode make sure the camera is powered O...

Page 13: ...ess the SET OK button to confirm and select the highlighted menu option 5 If the selection can be remembered by the camera a selection icon will appear to the right of the selected menu option Changes...

Page 14: ...to capture 2 Use the T Zoom In and W Zoom Out buttons to better set the camera display if desired Note The actual shape of these buttons may vary per camera model 3 Press the Shutter button to START t...

Page 15: ...well as previously captured videos Down ViviLink Opens the ViviLink for Videos menu Other Shutter STARTS STOPS the video capture MENU HOME Opens the menu options for Video Capture Mode SET OK Saves yo...

Page 16: ...15 Video Capture Mode Menus The following are the menus that appear in your camcorder s Video Capture Mode...

Page 17: ...restore the camcorder s default factory settings Image Resolution Menu The Image Resolution menu allows you to choose the desired size of the images taken by your camcorder Keep in mind that images w...

Page 18: ...9 Remember that this setting will be saved by your camcorder until you manually change the setting or restore the camcorder s default factory settings Anti Shake Menu The Anti Shake feature reduces im...

Page 19: ...to exit the menu and return to your previous mode 8 An icon reflecting your selection will display on the LCD screen 9 Remember that this setting will be saved by your camcorder until you manually ch...

Page 20: ...enters your camcorder s lens This setting should be adjusted when the environment is lighter or darker than normal When the environment has more light than is needed reduce the exposure setting by us...

Page 21: ...DE button to exit the menu and return to your previous mode 8 An icon reflecting your selection will display on the LCD screen 9 Remember that this setting will be saved by your camcorder until you ma...

Page 22: ...EFT or RIGHT button to scroll and select the Language menu 3 Press the UP or DOWN button to highlight the desired menu selection 4 Press the SET OK button to confirm and select the highlighted menu op...

Page 23: ...ress the LEFT or RIGHT button to scroll and select the Date Time menu 3 Press the UP or DOWN button to highlight the Date Setup menu option and then press the SET OK button to open the menu 4 Scroll t...

Page 24: ...d to be turned on again with the power button before the next use 1 Press the MENU HOME button to open the menus for the current mode 2 Press the LEFT or RIGHT button to scroll and select the Auto Pow...

Page 25: ...nently delete all of the content on your camcorder s memory card This option will delete all of the content at one time If you would like to delete individual images use the delete menu in the camcord...

Page 26: ...re version on your camera or to reset your camera settings to the Factory Default Settings 1 Press the MENU HOME button to open the menus for the current mode 2 Press the LEFT or RIGHT button to scrol...

Page 27: ...ay your selected video Press the Shutter button to START playing the video Press the Shutter button again to PAUSE the video and to continue playing and pausing as needed To fully STOP the video and r...

Page 28: ...USES a playing video W Zoom Out Opens Thumbnail View To Navigate in the Thumbnail View press the UP DOWN LEFT RIGHT buttons To select an image in the Thumbnail View press the SET OK button MENU HOME O...

Page 29: ...the SET OK button to select and save the desired option 8 You will be asked to confirm your selection 9 The videos will be deleted as desired Protect Lock Menu Pictures and Videos taken with your camc...

Page 30: ...ure is automatically saved to the camcorder s SD memory card Photo Capture Mode Quick Function Buttons Your digital camcorder has a four directional direction control button that functions as Quick Fu...

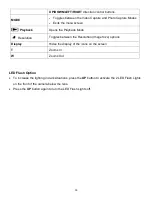
Page 31: ...Mode Resolution Toggles between the Resolution Image Size options Display Hides the display of the icons on the screen T Zooms In W Zooms Out LED Flash Option To increase the lighting in dark situati...

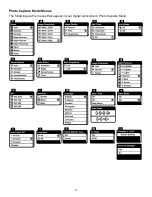
Page 32: ...31 Photo Capture Mode Menus The following are the menus that appear in your digital camcorder s Photo Capture Mode...

Page 33: ...restore the camcorder s default factory settings Image Resolution Menu The Image Resolution menu allows you to choose the desired size of the images taken by your camcorder Keep in mind that images w...

Page 34: ...ult factory settings Self Timer Menu The Self Timer menu allows you to set a delay between the time that the camcorder s Shutter button is pressed and the actual capture of the picture This is an opti...

Page 35: ...e Menu The White Balance feature allows your camcorder to adjust the coloring of the captured images depending on the type of light source in the current environment Properly adjusting the White Balan...

Page 36: ...n enabled the Multi SnapShots feature allows you to take six rapid snapshots in a row with a single click of the Shutter button This feature can be effective when trying to capture a particular moment...

Page 37: ...enters your camcorder s lens This setting should be adjusted when the environment is lighter or darker than normal When the environment has more light than is needed reduce the exposure setting by us...

Page 38: ...DE button to exit the menu and return to your previous mode 8 An icon reflecting your selection will display on the LCD screen 9 Remember that this setting will be saved by your camcorder until you ma...

Page 39: ...EFT or RIGHT button to scroll and select the Language menu 3 Press the UP or DOWN button to highlight the desired menu selection 4 Press the SET OK button to confirm and select the highlighted menu op...

Page 40: ...ress the LEFT or RIGHT button to scroll and select the Date Time menu 3 Press the UP or DOWN button to highlight the Date Setup menu option and then press the SET OK button to open the menu 4 Scroll t...

Page 41: ...d to be turned on again with the power button before the next use 1 Press the MENU HOME button to open the menus for the current mode 2 Press the LEFT or RIGHT button to scroll and select the Auto Pow...

Page 42: ...nently delete all of the content on your camcorder s memory card This option will delete all of the content at one time If you would like to delete individual images use the delete menu in the camcord...

Page 43: ...are version on your camera or to reset your camera settings to the Factory Default Settings 1 Press the MENU HOME button to open the menus for the current mode 2 Press the LEFT or RIGHT button to scro...

Page 44: ...your selected Photo Press the T Zoom In button to Zoom In and magnify the selected photo Use the UP DOWN LEFT RIGHT buttons to navigate around the photo Note Press the SET OK button to return to view...

Page 45: ...n ViviLink Opens the ViviLink for Photos menu Other Shutter Stops a playing Slide Show W Zoom Out Opens Thumbnail View To Navigate in the Thumbnail View press the UP DOWN LEFT RIGHT buttons To select...

Page 46: ...to open the menus for the current mode 3 Press the LEFT or RIGHT button to scroll and select the Delete menu 4 Press the UP or DOWN button to scroll through the menu options 5 To delete this one video...

Page 47: ...E button to open the menus for the current mode 2 Press the LEFT or RIGHT button to scroll and select the Protect Lock menu 3 Press the UP or DOWN button to scroll through the menu options 4 Press the...

Page 48: ...camera by pressing the UP Quick Function button while in Playback mode The Slide Show menu allows you to set the interval length of time that each picture will display during the Slide Show 1 Press t...

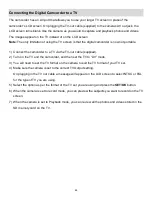
Page 49: ...a TV via the TV out cable supplied 2 Turn on the TV and the camcorder and then set the TV to AV mode 3 You will need to set the TV format on the camera to suit the TV format of your TV set 4 Make sur...

Page 50: ...ation s CD DVD drive and click on Setup exe to launch the installer 3 On Macintosh Click the icon that appears on the desktop to install the Vivitar Experience Image Manager 4 If you do not have inter...

Page 51: ...m will be installed and then click Install 11 Please wait while the application continues the installation process on your computer 12 On PC Click the Close button when the installation is complete Th...

Page 52: ...en it will be selected automatically 5 Select a location on the computer where to place the new photo and video files 6 Add the new photo and video files to albums if desired 7 Select to remove the me...

Page 53: ...and Videos WINDOWS 1 Use the USB cable that came with your camera to connect your camera to your computer 2 MSDC appears on the LCD 3 A window appears with a list of options select Open folder to view...

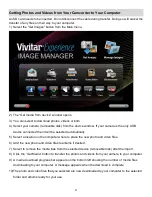
Page 54: ...s below 1 Connecting your digital camcorder to your iPad using an iPad Camera Connector Plug the Camera Connector into the dock connector port on your iPad then attach your digital camcorder using a U...

Page 55: ...led written description of the problem 3 Your return address and telephone number Daytime MAIL TO ADDRESS BELOW Technical Support For technical support issues please visit our website at www vivitar c...

Page 56: ...rs off If the photos are saved to the SD memory card then all the photos should appear Q How do I make sure I don t lose important pictures This camera requires an SD card for normal use If the camera...

Reviews: