background image

VIVAX


ENG

10

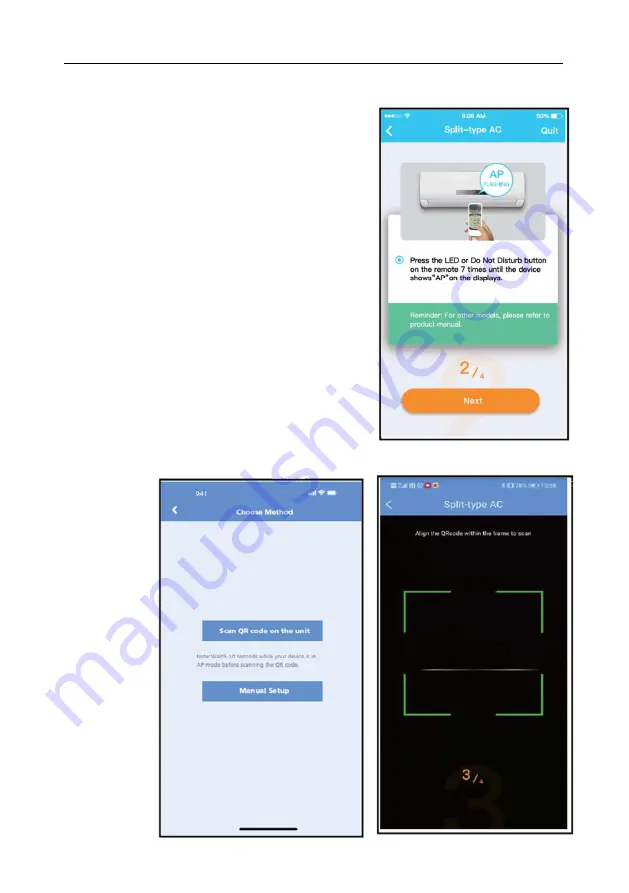
b)  Press the LED or Do Not Disturb button on the 

remote 7 times until the device shows “AP” on the 
displays. 


Note: 
The 3rd (following) step is for Android system only! 
iOs system does not need this step. 


3. 

Choose the network configuration method and then Choose „Scan the QR Code“ Method 


Summary of Contents for OSK105

Page 1: ......

Page 2: ...ENG VIVAX 1...

Page 3: ...device complies with FCC and IC radiation exposure limits set forth for an uncontrolled environment In order to avoid the possibility of exceeding the FCC and IC radio frequency exposure limits human...

Page 4: ...e for any issue as a result of the incompatibility SMART KIT wireless safety strategy Smart kit Only support WPA PSK WPA2 PSK encryption and none encryption WPA PSK WPA2 PSK encryption is recommended...

Page 5: ...AP mode The procedure includes the following steps 1 Disconnect the power supply of AC 2 Connect the power supply of AC and continuously press the digital display button or do not disturb button seven...

Page 6: ...click Registration Caution It is better to log in your email box and active your registration account by clicking link in case you forget the password It is necessary to forget any other around networ...

Page 7: ...ply of AC 2 Connect the power supply of AC and continuously press the LED DISPLAY or DO NOT DISTURB button seven times in 10 seconds 3 When the AC displays AP it means that the AC Wi Fi has already en...

Page 8: ...ENG VIVAX 7 3 Wait smart devices to find then click to add it 4 Select home Wi Fi enter the password 5 Wait connecting to the network 6 Configuration Success you can modify the default name...

Page 9: ...VIVAX ENG 8 7 You can choose an existing name or customize a new name 8 Bluetooth network configuration is successful now you can see the device in the list...

Page 10: ...iguration by select appliance type 1 If the bluetooth network cofiguration is failure please select the appliance type 2 Please follow the following steps to enter AP mode a Power on the device wait 5...

Page 11: ...b button on the remote 7 times until the device shows AP on the displays Note The 3rd following step is for Android system only iOs system does not need this step 3 Choose the network configuration me...

Page 12: ...ENG VIVAX 11 4 When choose the Manual Setup method Android Connect to the wireless network iOS 5 Please enter password...

Page 13: ...cue words on the screen Due to different internet environment it is possible that the device status still display offline If this situation occurs it is necessary to pull and refresh the device list o...

Page 14: ...xt steps 1 Click Sign in 2 Select the target air conditioner to enter into the main control interface 3 Thus user can control air conditioners on off status operation mode temperature fan speed and so...

Page 15: ...ote If the air conditioner do not support the above function the function will be hided from the function list Schedule Weekly user can make an appointment to turn on or off AC on specific time User a...

Page 16: ...ENG VIVAX 15 Sleep User can customize their own comfortable sleep by setting target temperature...

Page 17: ...th this function When finishing this procedure it can display the normal items abnormal items and detail information Share Device The air conditioner can be controlled by multi users at the same time...

Page 18: ...ENG VIVAX 17 3 The other users must log in Nethome Plus App first then click Add Share Device on their own mobile then ask them to scan the QR Code Now the others can add the shared device...

Page 19: ...you will prevent possible negative effects on the environment and human health which could otherwise be caused due to improper disposal of that product The recycling of materials from this product you...

Page 20: ......

Reviews: