Vitus Audio SIA-025 Owner'S Manual Download Page 57

57

SIA-025 

| Version 1

8. RC-010 examples

Example 2

Setting the hotkeys.

In example 2 .1, 2 .2 and 2 .3 we 

have a SCD-025 and a SP-103 

connected to a SIA-025 . 

It is convenient to set the 

hotkeys so that you can easily 

switch between products . 

The remote will automatically 

send the volume command 

to the product under hotkey 

2 . When you are in SCD-025 

or SP-103 and you change 

the volume . Then the remote 

sends the volume command to 

the SIA-025 .    

We will show you how can set 

the hotkeys for all the products
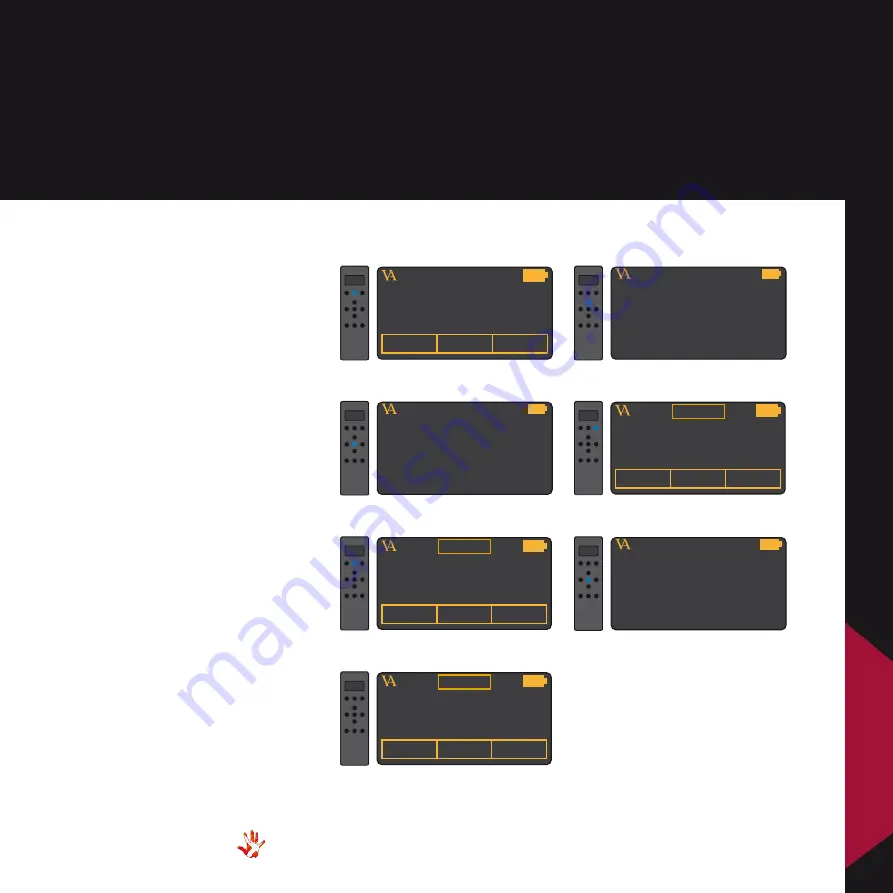
Example 2.1

In the following 7 steps we will 

show how you can set hotkey 2 

to be SP-103 .

VITUS

SIA-025

PRODUCT

SCD-025

INPUT 2


   ENABLE

KEY  1 : INPUT  1

KEY  3 : INPUT  2

4 . Scroll to SL-103 in the list 

under hotkey 2

VITUS

SIA-025

PRODUCT

SCD-025

SP-103


   ENABLE

KEY  1 : INPUT  1

KEY  3 : INPUT  2

4 . Press select

VITUS

SIA-025

PRODUCT

SCD-025

SP-103

4 . Hotkey 2 is now set to 

SL-103

VITUS

PRODUCT

SCD-025

INPUT 2

1 . Press and hold button 2 for 3 

seconds to enter menu mode .

SIA-025

VITUS


LEAVE MENU

2 . Navigate to the edit product 

sub-menu

SIA-025

VITUS


EDIT PRODUCT

3 . Enter the edit product 

sub-menu

SIA-025

VITUS


LEAVE MENU

7 . Leave the menu .

SIA-025

8 .

 RC-010

Summary of Contents for SIA-025

Page 1: ...SIA 025 Owner s Manual...

Page 2: ...topology of the volume control 10 2 connecting Turning the SIA 025 on and off 11 SIA 025 rear panel 12 Connecting the SIA 025 12 3 operation Operation modes 14 Functions left front panel 16 Functions...

Page 3: ...ote RC 010 System Remote 45 8 RC 010 getting started What s included 46 RC 010 System Remote Device overview 47 8 RC 010 operation RC 010 System Remote operation modes 48 The menu structure 53 RC 010...

Page 4: ...025 Product ID Serial __________________________________ Product Build Date __________________________________ Signed __________________________________ All products details specifications and measur...

Page 5: ...considered to be impossible to ever get working however they have convinced many people and reviewers world wide of the opposite Before any of our new topologies are implemented in our products they...

Page 6: ...ase tell us Important information is presented like this Ignoring this information may cause damage to you or the unit Damage caused to the unit by ignoring this information might invalidate the warra...

Page 7: ...heavy make sure to be at least two people to unpack the unit You might damage both your back and the amplifier if extra care is not applied Vitus Audio A S cannot be held responsible for any damage t...

Page 8: ...5 Two people carefully lift the amplifier out of the box and put it directly onto the floor Store the empty box and the protective foam for later use What s in the box SIA 025 RC 010 System Remote Rem...

Page 9: ...erview 9 SIA 025 Version 1 1 getting started 1 getting started The body of the SIA 025 is constructed of anodized aluminium Material anodized aluminium Dimensions H x W x D 130 x 435 x 435 Weight 42 k...

Page 10: ...per formance possible When you change volume a different number of shunt resistors are used To prevent pop in the output we have chosen to first add the new shunt resistors and then wait a short time...

Page 11: ...e a pre amplifier a power amplifier Always turn off your products in reverse order Power amplifier a pre amplifier a Source Not following this procedure may cause damage to any of your products speake...

Page 12: ...sources to the inputs of the SIA 025 labelled INPUT 1 to 5 on the rear panel Connect the Speaker output of the SIA 025 Carefully connect the mains to the amplifier after you have connected both inputs...

Page 13: ...Series SIA 025 Integrated Amplifier Input 4 Input 5 Input 2 Input 3 Output Input 1 NEUTRIK PUSH NEUTRIK PUSH NEUTRIK PUSH NEUTRIK PUSH NEUTRIK PUSH NEUTRIK PUSH Figure 4 SIA 025 Rear panel Speaker ou...

Page 14: ...Figure 5 SIA 025 Front panel 14 SIA 025 Version 1 3 operation Operation modes...

Page 15: ...3 operation modes 1 Normal mode This is the mode you use when listening to music 2 Menu mode In this mode you can alter the settings of the SIA 025 3 Standby mode In this mode the controls of the SIA...

Page 16: ...ects between the 5 inputs 2 MENU Switches to Menu mode 3 STANDBY Switches in and out of Standby Mode Menu mode You enter menu mode by pushing the MENU button once in Normal mode In the Menu mode there...

Page 17: ...t front 1 Turns volume UP 2 MUTE Mutes the output 3 Turns volume DOWN Menu mode In the text menu it is possible to change the name of the input This is done by using the following buttons from the rig...

Page 18: ...setting by pressing the MENU button down 2 3 sec When SAVE is shown in the display the setting has been saved Input name settings As a standard the inputs are named input 1 input 2 etc In the text men...

Page 19: ...andby it will start in this volume step Examples 9 and 10 pages 38 and 39 Input sensitivity Devices can have differences in output level You can adjust the sensitivity of each input between 2 Vrms 4 V...

Page 20: ...he input Select between 2 Vrms 4 Vrms and 8 Vrms The sensitivity level needs to be higher then the input level To prevent clipping of the input TEXT Choose a name for input X DATA Shows information ab...

Page 21: ...E CLASS RESET NO RESET YES SETUP 0 1 2 3 INPUT 4 INPUT 3 INPUT 2 INPUT 1 BACK USED NOT USED USED BACK INPUT 5 99 dB 11 dB ADJUST FIX ON FIX OFF SET FIX BACK 12 dB 12 dB 2 4 8 Vmrs OFFSET SENS TEXT FIX...

Page 22: ...Vitus Audio Mains supply voltage Any unit may be set for operation in 100V 115V or 230V AC Units are shipped set for the mains supply voltage according to the destination The voltage setting can be up...

Page 23: ...fuse When the fuse blows repeatedly on replacement then the unit most likely has a malfunction In case of malfunction the unit must be returned to Vitus Audio for repair Fuse type 20x5mm 6 3A T 230V 1...

Page 24: ...or example There is a spare fuse available in the fuse carrier Pull the fuse carrier out Put two fingers around the fuse carrier The fuse carrier is placed on the back under the power connector Replac...

Page 25: ...arrier back into the machine Place the spare fuse in the fuse carrier Take the spare fuse out of the fuse carrier Throw the blown fuse away Use the blown fuse to flip the spare fuse out of the fuse ca...

Page 26: ...will pay return freight of its choice IMPORTANT A returned product MUST be accompanied by a written description of the defect and a photocopy of the original purchase receipt This receipt must clearl...

Page 27: ...sured from the date of shipment of the equipment to the Vitus Audio partner In the event warranty service is needed under these conditions the owner of the equipment must provide a copy of his purchas...

Page 28: ...duct In the unlikely event of service required beyond the capabilities of the importer Vitus Audio will fulfill the conditions of the warranty Such products must be returned at the owner s expense to...

Page 29: ...y Response DC to 800KHz Signal to Noise Ration 110dB THD Noise Better than 0 01 Input Sensitivity 2 4 or 8 V RMS Input Impedance RCA 10K XLR 10K Slew Rate 35V s Power Consumption RMS Standby 2 5W Clas...

Page 30: ...SELECT submenus and select settings 3 Scroll backward in the menu Enter the CLASS submenu The display now shows CLASS Press the button The display now shows CLASS A Press the SELECT button The SIA 025...

Page 31: ...illustrates how to disable Input 4 Press the MENU button to enter Menu Mode Navigate to the INPUT sub menu using the function buttons on the left front 1 Scroll forward in the menu 2 MENU Enter Exit...

Page 32: ...the left front 1 Scroll forward in the menu 2 MENU Enter Exit SELECT submenus and selectsettings 3 Scroll backward in the menu Adjust the volume step to 0 0 dB and press the SELECT button The display...

Page 33: ...dB higher than the signal on the source using input 2 We will reduce the differences in volume between input 1 and input 2 by lowering the offset gain of input 1 with 3 dB Press the MENU button to en...

Page 34: ...using the function buttons on the left front 1 Scroll forward in the menu 2 MENU Enter Exit SELECT submenus and selectsettings 3 Scroll backward in the menu In the SENS submenu you can adjust the sens...

Page 35: ...submenu you will find a list of predefined names that you can choose from Scroll through the list using the and the buttons Select the name SCD 025 using the SELECT button The name of INPUT1 has now...

Page 36: ...racter We will now change the input name Line 1 to PICKUP Not in the predefined list We continue from the TEXT sub menu in the previous example The display is showing LINE 1 Press MUTE The first chara...

Page 37: ...ckward in the menu Enter the RESET submenu The display now shows RESET NO Press the button The display now shows RESET YES Press the SELECT button The settings of the SIA 025 have now been restored Th...

Page 38: ...e V INIT submenu you can adjust the initial volume step This is the volume step the SIA 025 start up in when it leaves standby mode The initial volume step is as a standard set to 40 Set the volume st...

Page 39: ...o remember the current volume step The SIA 025 will start up in this volume step when it leaves standby This volume step however is not remembered when the power cord is removed Then the SIA 025 will...

Page 40: ...n the menu 2 MENU Enter Exit SELECT submenus and select settings 3 Scroll backward in the menu Enter the BRIGHTNESS submenu The display now shows 1 Press the button The brightness is now set to 2 Pres...

Page 41: ...s Vitus Audio Products Signature Series SCD 025 SIA 025 Integrated Amplifier SL 103 Linestage SP 103 Phonostage SS 103 Stereo Amplifier 3rd Party Products Media Center Turntable 41 SIA 025 Version 1 7...

Page 42: ...5 The SCD 025 is used as a DAC The SIA 025 is powering the hi and mid tones The SS 103 is connected to the PRE OUT of the SIA 025 The SS 103 is powering the bass Units Speakers SIA 025 SP 103 SCD 025...

Page 43: ...werfull bass speakers Then it is possible to dedicate an SM 103 to each bass speaker and let the SIA 025 power the mid and hi tones Units SIA 025 SP 103 SCD 025 SM 103 SM 103 Speakers Turntable Media...

Page 44: ...cting devices Connecting devices 3 It is possible to connect an active subwoofer to the Pre out Units SIA 025 SCD 025 SP 103 Speakers Active Subwoofer Media Center Turntable P r e o u t Hi Mid Hi Mid...

Page 45: ...lasts as long as possible on one charge The RC 010 has two hotkeys buttons 1 and 3 With these hotkeys you can jump to another product without scrolling through the list of products The remote automati...

Page 46: ...46 SIA 025 Version 1 8 RC 010 getting started What s included RC 010 System Remote AC DC Adapter RC 010 Manual VITUS REP STB A AB SIA 025 RC 010 System Remote AC DC Adapter...

Page 47: ...47 SIA 025 Version 1 8 RC 010 getting started RC 010 System Remote Device overview Material Anodized Aluminium Weight 287 gr VITUS REP STB A AB SIA 025 55 mm 178 mm 21 mm 8 RC 010...

Page 48: ...de This is the mode you use when listening to music 2 Menu mode In this mode you can alter the settings of the RC 010 3 Standby mode In this mode the controls of the RC 010 are deactivated 4 Flight mo...

Page 49: ...e class 11 Standby A hotkey is a button that can be programmed by the user Normal mode Display In normal mode the display has 6 information fields A VA logo B The device that the RC 010 is controlling...

Page 50: ...ailable in the EDIT PRODUCT sub menu Menu mode Display In the menu mode the screen has 2 different layouts and information fields There are 6 sub menus 1 LEAVE MENU 2 FABRIC 3 ADD PRODUCT 4 DISPLAY 5...

Page 51: ...list under button 1 item 5 to the right number 4 Set the input in the predefined list under button 3 item 7 to the right number 5 Set hotkey 1 button 1 to a product that you can choose from in the pre...

Page 52: ...to send when this button is pressed 4 Enable disable this button 5 Delete the settings for this button Now you can reinstall this button 6 Hotkey 1 Enter this item by pressing button 1 Scroll through...

Page 53: ...In this sub menu you can change the power down time delay the time it takes before the RC 010 enters power down mode It is possible to set the delay to OFF 1 2 3 4 5 and 10 seconds When you select OF...

Page 54: ...ive a name to the new product DISPLAY Set the delay of the display EDIT PRODUCT Change settings of the selected product DISABLE Disable the selected product ENABLE Enable the selected product KEY 1 an...

Page 55: ...1 INPUT 1 ENABLE DISABLE INPUT 1 2 3 4 5 The same sequence as key 1 The INPUT in the list of possible de vices under button 1 is now updated with the input that you have chosen KEY 3 INPUT 2 2 2 2 6 6...

Page 56: ...S PRODUCT SCD 025 INPUT 2 ENABLE DISABLE SS 050 5 Disable the SS 050 VITUS PRODUCT SCD 025 INPUT 2 ENABLE DISABLE SS 101 5 Disable the SS 101 VITUS SIA 025 PRODUCT SCD 025 INPUT 2 ENABLE KEY 1 INPUT 1...

Page 57: ...hotkeys for all the products Example 2 1 In the following 7 steps we will show how you can set hotkey 2 to be SP 103 VITUS SIA 025 PRODUCT SCD 025 INPUT 2 ENABLE KEY 1 INPUT 1 KEY 3 INPUT 2 4 Scroll t...

Page 58: ...SP 103 SIA 025 8 Hotkey 1 is now set to SP 103 hotkey 2 is now set to SIA 025 SCD 025 VITUS LEAVE MENU 2 Navigate to the edit product sub menu SCD 025 VITUS EDIT PRODUCT 3 Enter the edit product sub m...

Page 59: ...5 8 Hotkey 1 is now set to SCD 025 and hotkey 2 is set to SIA 025 SP 103 VITUS LEAVE MENU 2 Navigate to the edit product sub menu SP 103 VITUS EDIT PRODUCT 3 Enter the edit product sub menu SP 103 VIT...

Page 60: ...rogrammed In the next example we will show how you can program the buttons of the new product CDPLAYER VITUS PRODUCT 7 Now you can find the new product CDPLAYER in the list of products when you switch...

Page 61: ...EAVE MENU 2 Navigate to the program key sub menu CDPLAYER VITUS PROGRAM KEY 3 Enter the program key sub menu CDPLAYER VITUS SELECT KEY 4 Select the button that you want to program We take button 7 CDP...

Page 62: ...ITUS SIA 025 PRODUCT SCD 025 INPUT 2 ENABLE KEY 1 INPUT 1 KEY 3 INPUT 2 4 Scroll to INPUT 1 in the list under hotkey 2 VITUS SIA 025 PRODUCT INPUT 1 INPUT 2 ENABLE KEY 1 INPUT 1 KEY 3 INPUT 2 5 Scroll...

Page 63: ...TUS PRODUCT SCD 025 INPUT 2 1 Press and hold button 2 for 3 seconds to enter menu mode SIA 025 VITUS FABRIC 2 Navigate to the FABRIC sub menu SIA 025 VITUS FABRIC 2 Enter the FABRIC sub menu SIA 025 V...

Page 64: ...set the delay to 10 seconds VITUS PRODUCT SCD 025 INPUT 2 1 Press and hold button 2 for 3 seconds to enter menu mode SIA 025 VITUS DISPLAY 2 Navigate to the DISPLAY sub menu SIA 025 VITUS DISP TIME 1...

Page 65: ...Version 1 8 RC 010 specifications Specifications Remote Data communication protocol RC5 Battery Lithium Ion 1000 mAh AC DC Adapter Type FW74010 05 Switchmode Input 100 240 V 50 60 Hz 310 mA Output 5V...

Page 66: ...up Button 5 release Previous Track Previous input Previous input Input Previous input Button 5 press Fast BackWard Button 6 Play Mute Mute Mute Mute Button 7 release Next Track Next input Next input I...

Page 67: ...103 SL 103 MP P201 Button 4 Volume up Volume up Volume up Volume up Sens up Button 5 release XLR Input Previous input Input Button 5 press Button 6 Mute Mute Mute Button 7 release RCA Input Next input...

Page 68: ...68 SIA 025 Version 1 9 pictures SIA 025 Picture 1 SIA 025 Inside view SIA 025 Inside view...

Page 69: ...Picture 2 SIA 025 Front 69 SIA 025 Version 1 SIA 025 Front 9 pictures SIA 025 9 pictures...

Page 70: ...70 SIA 025 Version 1 9 pictures RC 010 Picture 2 RC 010 Front RC 010 Picture...

Page 71: ...cal photocopying recording or otherwise without the prior written permission of Vitus Audio Any person who does any unauthorized act in relation to this publication may be liable to criminal prosecuti...

Page 72: ...Handcrafted in Denmark v i t u s a u d i o AVA Group A S Vitus Audio Hammershusvej 3H DK 7400 Herning Denmark Phone 45 9626 8046 Fax 45 9626 8045 e mail info vitusaudio com web site www vitusaudio com...

Reviews: