background image

VT-KBD1 


15 

POWER

AC 24V

AC 24V

POWER

POWER

AC 24V

BNC

SPOT MONITOR

MAIN MONITOR

BNC

BNC

AWG # 24

SW1

TX

B

(T

X

-)

TXA(

T

X

+

)

RX

A

RXB

TX

A

TX

B

TX

B

TX

A

RXB

RXA

1 AUX OUTPUT

4 ALARM INPUT

RS-485 or
RS-422 HALF  DUPLEX  MODE

TXA(

TX+

)

RXB(

RX -

)

RXA(

RX

+

)

TXB(

TX-

)

FGND AC- AC+

TXB TXA RXB RXA

RXA

RXB

TX

A

AC+

AC-

TX

B

VIDEO

Tx

+(

D

O

M

E

1

+

)

T

x

-(

DO

ME1

 -)

4 ALARM INPUT

RS-422
FULL DUPLEX  MODE

1 AUX OUTPUT

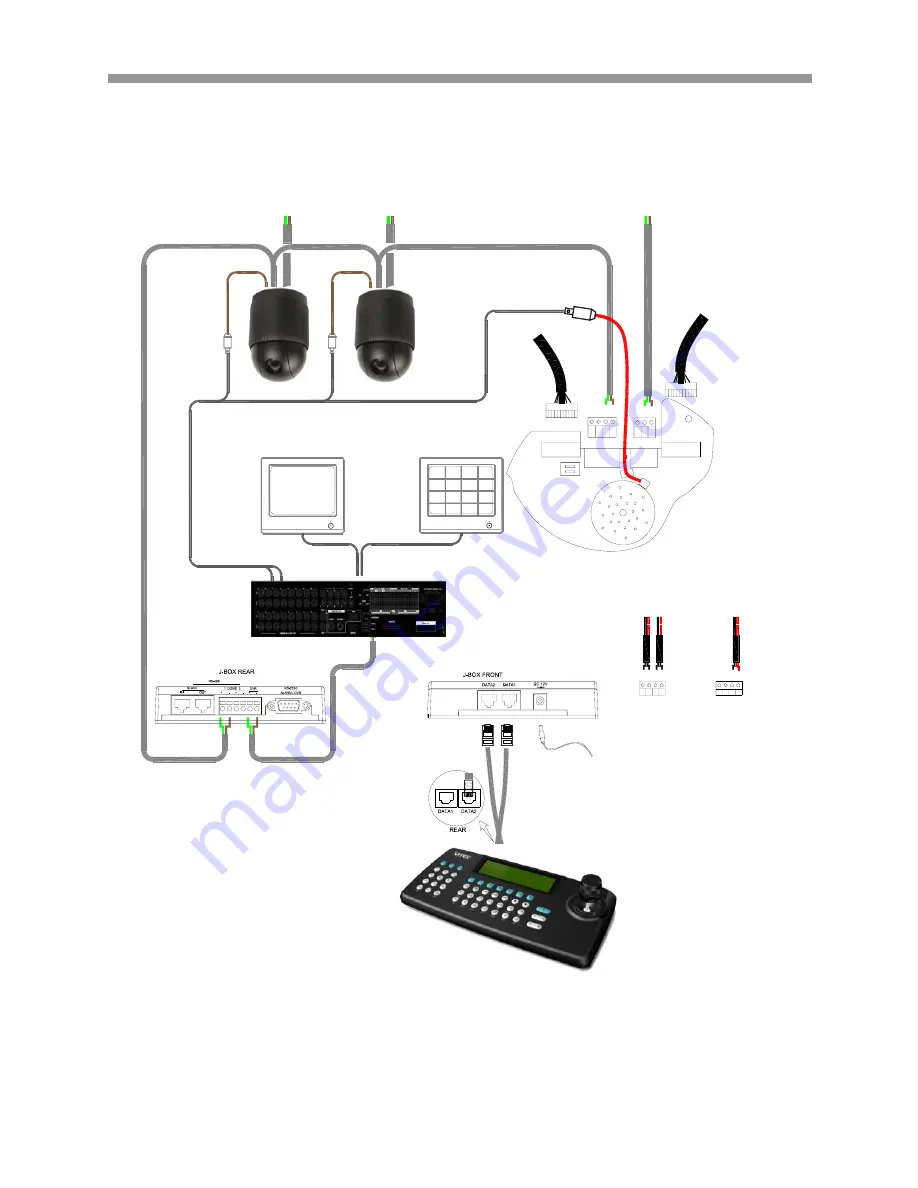
2.2 SINGLE DVR CONFIGURATION 


Summary of Contents for Xpress VT-KBD1

Page 1: ... to 256 Devices including Xpress Domes and VITEK Saga Series Digital Video Recorders Digital Flip to follow objects Enable Disable 3 X 6 Programmable function keys Recall 8 Pre Programmed tours Recall up to 248 Preset Positions Built in RS 485 422 half duplex mode supports up to 64 devices Simplex mode supports up to 256 devices Real time Clock ...

Page 2: ...VT KBD1 0 ...

Page 3: ...era please verify that the packaging contains the following contents 1 One Xpress Keyboard 2 One Data Junction Box 3 This Instruction Manual 4 Two data cables 5 One AC Adaptor 6 One Power Cable If any of the contents are missing please contact the Vitek Customer Help Desk immediately ...

Page 4: ...ning flash with arrowhead symbol within an equilateral triangle is intended to alert the user to the presence of uninsulated dangerous voltage within the product s enclosure that may be of sufficient magnitude to constitute a risk of electric shock to persons The exclamation point within an equilateral triangle is intended to alert the user to the presence of important operating and maintenance se...

Page 5: ...ated into any language in any form by any means without prior written permission of Vitek Industrial Video Products Inc Vitek makes no warranties for damages resulting from corrupted or lost data due to a mistaken operation or malfunction of the Xpress Domes the software keyboard joystick controller personal computers peripheral devices or unapproved unsupported devices Trademark Acknowledgements ...

Page 6: ...is equipment does cause harmful interference to radio or television reception which can be determined by turning the equipment off and on the user is encouraged to try to correct the interference by on or more of the following measures Reorient or relocate the receiving antenna Increase the separation between the equipment and receiver Connect the equipment into an outlet on a circuit different fr...

Page 7: ...note that the Xpress keyboard is intended for surveillance use and should never be used in a manner that invades other people s privacy or contravenes international or domestic privacy act and its regulations Please be advised that in certain cases the monitoring of individuals private properties or commercial properties may contravene legal rights of such individuals even if the images were recor...

Page 8: ...ting the equipment if a heavy object is dropped or the casing is damaged Do not strike or shake Failure to do so may result in fire or electrical shock Immediately unplug the power cord from the power outlet Please consult the Xpress Keyboard distributor or the closest Vitek customer help desk z Do not allow the equipment come into contact with or become immersed in water or other liquids Do not a...

Page 9: ...the wire and insulation creating the potential for fires or electrical shocks z Use only the recommended power accessories Use of power sources not expressly recommended for this equipment may lead to overheating distortion of the equipment fire electrical shock or other hazards z The supplied AC power adaptor and power cable are designed for exclusive use with the Xpress Keyboard Do not use it wi...

Page 10: ...n 41 F 104 F and humidity below 90 The normal operating power source for this device is 12VDC 3 amps PREVENTING MALFUNCTION z Avoid strong magnetic fields Never place the Xpress Keyboard in close proximity to electric motors or other equipment generating strong electromagnetic fields Exposures to strong magnetic fields may cause malfunctions or corrupt image data z Avoid condensation related probl...

Page 11: ...et reflecting own view settings such as zoom focus iris and so on Store and recall up to 4 Patterns which comprise of a sequential series of pan tilt zoom and focus movements Store and recall up to 16 Scans with smooth Vector Scan Store and recall up to 8 tours each consisting 64 functions including Preset Pattern Scan and other Tours Global Preset recalls the Preset of all Xpress Dome cameras Man...

Page 12: ...R control mode 4 LCD DISPLAY Displays information regarding the functions modes and menu 5 JOYSTICK Controls the PTZ camera or navigate through menus 6 CAMERA Selects a PTZ camera when used in combination with numeric buttons 7 NUMERIC BUTTONS Selects numeric values of various functions such as selecting a camera DVR Preset Pattern Scan and Tour 1 2 5 3 4 6 7 10 8 9 11 12 13 14 15 ...

Page 13: ...the PTZ camera or DVR 10 DVR CONTROLS Toggle between different multichannel display modes of the DVR Access the DVR menu screen Rewind Play Pause Fast Forward Stop Record 11 PTZ CONTROLS ROW 2 Number Access the Preset menu Recall Presets Number Access the Tour menu Recall Tours Deactivated any alarms Activate Relay Output Deactivate Relay Output Select previous PTZ camera Select next PTZ camera ...

Page 14: ...ard menu Control all PTZ cameras functions simultaneously Activate the secondary functions for various buttons Executes highlighted functions 13 MANUAL IRIS CONTROL Manually adjust the iris of the PTZ camera 14 MANUAL FOCUS CONTROL Manually adjust the focus of the PTZ camera 15 TURBO Toggle between Turbo movement and normal movement speed 1 2 REAR LAYOUT Data Port 1 Data Port 2 ...

Page 15: ...tches are located at the bottom of the Xpress Keyboard J1 Connector Reserved S1 Dip Switches 1 Data Port 1 Termination 2 Reserved 3 Data Port 2 Termination 4 DVR Port Termination 5 Slave Port Termination 6 Reserved 7 Reserved 8 Slave On Off ...

Page 16: ...VT KBD1 14 II SYSTEM CONFIGURATION AND CONNECTION 2 1 BASIC INSTALLATION DIAGRAM ...

Page 17: ...24 SW1 TXB TX TXA TX RXA RXB TXA TXB TXB TXA RXB RXA 1 AUX OUTPUT 4 ALARM INPUT RS 485 or RS 422 HALF DUPLEX MODE TXA TX RXB RX RXA RX TXB TX FGND AC AC TXB TXA RXB RXA RXA RXB TXA AC AC TXB VIDEO Tx DOME1 Tx DOME1 4 ALARM INPUT RS 422 FULL DUPLEX MODE 1 AUX OUTPUT 2 2 SINGLE DVR CONFIGURATION ...

Page 18: ...OWER AC 24V AC 24V POWER POWER AC 24V BNC AWG 24 SW1 1 AUX OUTPUT 4 ALARM INPUT FGND AC AC TXB TXA RXB RXA RXA RXB TXA AC AC TXB VIDEO Tx DOME1 Tx DOME1 4 ALARM INPUT 1 AUX OUTPUT Camera 1 16 Camera 17 12 15 2 3 SINGLE XPRESS KEYBOARD WITH TWO DVR CONFIGURATION ...

Page 19: ...ALARM INPUT Tx DOME1 Tx DOME1 VIDEO TXB AC AC TXA RXB RXA TXB TXA RXB RXA FGND AC AC 4 ALARM INPUT 1 AUX OUTPUT SW1 AWG 24 BNC AC 24V POWER POWER AC 24V AC 24V POWER 1ST MAIN MONITOR 2ND MAIN MONITOR SPOT MONITOR 2 4 MULTIPLE XPRESS KEYBOARD CONFIGURATION ...

Page 20: ...nation ON S1 Dome1 port Termination ON SW1 Termination ON SW1 Termination ON DVR Termination ON SW1 Termination ON SW1 Termination ON SW1 Termination ON SW1 Termination ON S1 Dome1 port Termination ON S4 DVR port Termination ON DVR Termination ON DVR Termination ON SW1 Termination ON S1 Dome1 port Termination ON S3 Dome2 port Termination ON SW1 Termination ON ...

Page 21: ...ard is powered on for the first time the password prompt will appear Please enter the password for the proper user level The default passwords are z Administrator 9999 z User 1111 The LCD screen will display the Log On confirmation accordingly z Admin Log On z User Log On ...

Page 22: ...VT KBD1 20 ...

Page 23: ...rough menu items UP OR DOWN Navigate through menu items DOWN Complete Title editing 1 Change Value TWIST LEFT OR RIGHT 2 Enter Title Edit mode SHIFT JOYSTICK MOVEMENT Turbo Speed Movement ESC Exit without making changes HOME OR OFF BUTTON Delete Value or Name of a Field 3 3 MAIN LCD SCREEN 3 3 1 PTZ MODE Press the SYS button to control cameras 1 2 3 4 5 6 7 ...

Page 24: ...tton 3 WRITE PRESET Select a camera view position then press this button to save as a preset 4 AUTOMATIC FOCUS Enable disable automatic focus 5 AUTOMATIC IRIS Enable disable automatic iris control 6 DIGITAL ZOOM ON OFF Enable disable digital zoom 7 AUTOMATIC IRIS Enable disable automatic iris control 8 AUTOMATIC PAN Enable disable automatic pan 11 12 13 14 8 9 10 ...

Page 25: ...ide dynamic range 11 ON SCREEN DISPLAY ON OFF Enable disable On Screen Display 12 WRITE RECALL ALIAS PRESET Write and recall alias presets 13 KEYBOARD LOCK Lock unlock the Xpress Keyboard 14 FLIP Flip the view of the camera to the opposite direction by 180 degrees 3 3 2 DVR MODE SAGA SERIES DVRS 1 2 3 4 5 6 7 8 9 10 11 12 13 14 ...

Page 26: ...dio channel with a combination with a numerical button 6 RESET Reset the alarm notification 7 BOOKMARK Bookmark a desired section during playback 8 STATUS Display the status window 9 LIVE PLAYBACK Toggle between live display mode and paused playback mode 10 AUTOMATIC SEQUENCE Activate the automatic sequencing of various display modes 11 FREEZE Digitally freeze a single channel or multiple channels...

Page 27: ...VT KBD1 25 Activate picture in picture mode 13 SPOT MONITOR Activate spot monitor mode 14 DIGITAL ZOOM Activate digital zoom mode 15 20 RESERVED ...

Page 28: ...nu screen has been stacked to illustrate all options 4 1 CONFIGURATION Configuration menu sets some basic Xpress Keyboard settings 4 1 1 KEY BEEP Select the beeping response of the buttons when pressed on or off 4 1 2 KEY LOCK Select the automatic keyboard lock option on or off The timer can be set up to 30 minutes after the last press of the button ...

Page 29: ...can be entered for the password 4 1 4 CHANGE ADMIN PASSWORD Move the joystick to the right to access the administrator password change screen Enter the current administrator password and then the new password and then confirm the new password Up to eight digits can be entered for the password 4 1 5 FACTORY DEFAULT Revert back to the factory default 4 1 6 SAVE AND EXIT Save the settings and return ...

Page 30: ...x 4 2 1 DOME 1 Move the joystick to the right to access the DOME 1 port setup screen Select the device type of DOME 1 port Select the communication speed of DOME 1 port Save the settings and exit to the PORT menu 4 2 2 DOME 2 Move the joystick to the right to access the DOME 2 port setup screen ...

Page 31: ...n speed of DOME 1 port Save the settings and exit to the PORT menu 4 2 3 SLAVE Move the joystick to the right to access the SLAVE port setup screen Select the device type of SLAVE port Select the communication speed of SLAVE port Save the settings and exit to the PORT menu ...

Page 32: ...en Select the device type of DVR port Select the communication speed of DVR port Save the settings and exit to the PORT menu 4 2 5 ALARM Move the joystick to the right to access the ALARM port setup screen Select the device type of ALARM port Select the communication speed of ALARM port ...

Page 33: ...figures the cameras connected to the Xpress Keyboard 4 3 1 DOME SCAN Dome scan automatically scans any Xpress Domes connected through the DOME ports on the junction box of the Xpress Keyboard 4 3 2 CAMERA CONFIGURATION Move the joystick to the right to access the camera configuration screen Select the ID of the PTZ camera ...

Page 34: ...ion of the PTZ camera Select the communication speed to the PTZ camera Select the option to receive alarm notifications from the PTZ camera 4 3 3 EXIT Exit to the main menu screen 4 4 TIME DATE Time Date menu configures time and date related settings for the Xpress Keyboard ...

Page 35: ... the date display format 4 4 3 TIME FORMAT Select the time display format 4 4 4 DAY LIGHT SAVING Select day light saving time on or off 4 4 5 DAY LIGHT SAVING Configure the day light starting date time and the end date time 4 4 6 SAVE AND EXIT Save the changes and exit to the main menu ...

Page 36: ...on on for the duration of programmed time or off 4 5 3 ALARM ACTION Move the joystick to the right to access the alarm action configuration screen Select the PTZ dome to configure the alarm action Up to 500 different configurations can be programmed Select the alarm input which would trigger the alarm action ...

Page 37: ...ore information When finished configuring alarm actions press the SHIFT button to save the settings 4 5 4 ALARM HISTORY Move the joystick to the right to access the alarm history screen Up to 5000 alarms will be listed from the most recent to the oldest 4 5 5 SAVE AND EXIT Save settings and exit to the main menu 4 6 ALIAS PRESET ...

Page 38: ... select the PTZ ID and then press the alarm button to view programmed position 4 7 SCHEDULE 4 7 1 NIGHT SHOT Move the joystick to the right to access the night shot configuration screen Select automatic night mode switching of the PTZ camera on or off Define the night mode starting time Define the night mode end time ...

Page 39: ...VT KBD1 37 ...

Page 40: ...onfiguration screen 4 7 2 EXIT Exit to the main menu screen 4 8 DATA 4 8 1 DATA BANK The settings of a PTZ camera can be downloaded and saved onto the keyboard and then transferred to another PTZ camera at a later time if desired 4 9 SLAVE CONTROLLER SETUP ...

Page 41: ... 2 DOME HOLDING TIME Define the master controller s PTZ control holding time from 1 to 200 seconds or infinite 4 9 3 DVR CONTROL Enable or disable DVR control from slave controllers 4 9 4 CAMERA MENU CONTROL Enable or disable PTZ camera s menu access from slave controllers 4 9 5 SAVE AND EXIT Save the settings and exit to the main menu ...

Page 42: ...40 4 10 DVR 4 10 1 DVR MODEL Select the DVR model 4 10 2 SAVE AND EXIT Save the changes and exit to the main menu 4 11 EXIT Exit to the main LCD screen 4 12 CONFIGURATION SLAVE MODE Please see 4 1 CONFIGURATION ...

Page 43: ...3 1 SLAVE ID Select the ID of the slave controller 4 13 2 BAUD RATE Select the communication speed of the slave controller 4 13 3 SAVE AND EXIT Save changes and exit to the main menu screen 4 14 TIME DATE SLAVE MODE Please see 4 4 TIME DATE ...

Page 44: ...VT KBD1 42 4 15 EXIT SLAVE MODE Exit to the main LCD screen ...

Page 45: ...VT KBD1 43 RX TX ...

Page 46: ...VT KBD1 44 ...

Page 47: ...VT KBD1 45 ...

Page 48: ...28492 CONSTELLATION ROAD VALENCIA CA 91355 WWW VITEKCCTV COM 888 VITEK 70 ...

Reviews: