ENGLISH
5
•
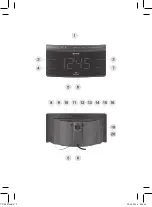
Open the battery compartment lid
(5) having preliminary unscrewed
the fixing screw. Insert a CR2032
battery (not included), with the
“plus” upward.
•
Close the battery compartment lid
(5) and tighten up the screw.
•
To connect the unit to the mains,
insert the plug of the power cord
(18) into the mains socket.
Attention!
Battery leakage can cause injuries or
unit damage. To avoid the unit dam-
age, follow the instructions given
below:
–
insert the battery strictly follow-
ing the polarity (with the “plus”
upward);
–
remove the battery if you are not
planning to use the unit for a long
time;
–
do not dismantle the battery, do
not subject it to high tempera-
tures;
–
replace the battery in time.
DATE AND TIME SETTING
•
Connect the unit to the mains.
•
Press and hold down the «MEM/
M+/NAP/
» button (10), blink-
ing year digits will be shown on
the display.
•
Set the current year by pressing
consequently or holding down
the buttons (15) «
◄◄
» and (14)
«
►►
».
•
Press the «MEM/M+/NAP/
»
button (10). Blinking month digits
will be shown on the display.
•
Use the buttons (15) «
◄◄
» and
(14) «
►►
» to set the current
month.
•
Press the «MEM/M+/NAP/
»
button (10). Blinking day digits will
be shown on the display.
•
Use the buttons (15) «
◄◄
» and
(14) «
►►
» to set the current day.
•
Press the «MEM/M+/NAP/
»
button (10), blinking symbols of
current time format will be shown
on the display: 24 hours (24 Hr) or
12 hours (12 Hr).
•
Use the buttons (15) «
◄◄
» and
(14) «
►►
» to select the current
time format (12 Нr or 24 Нr).
•
Press the «MEM/M+/NAP/
»
button (10). The blinking hour dig-
its will be shown on the display.
•
Use the buttons (15) «
◄◄
» and
(14) «
►►
» to set the current hour.
Note: To set afternoon time in 12 hours
format (12 Hr), press the buttons (15)
«
◄◄
» and (14) «
►►
» consequently
until the «PM» indicator (2) appears.
•
Press the «MEM/M+/NAP/
»
button (10). The blinking minute
digits will be shown on the display.
•
Use the buttons (15) «
◄◄
» and (14)
«
►►
» to set the time in minutes.
•
To finish the setup procedure,
press the «MEM/M+/NAP/
»
button (10).
Note: If during current time setting
the buttons (15) «
◄◄
» or (14) «
►►
»
are not pressed within 30 seconds,
previous settings will be displayed.
Current date view
•
To view the year and the date in the
current time mode (the radio is off)
press the «
◄◄
/Y-M-D/
D
» button
(15) consequently, year, month/
day and current time digits will be
shown on the display (1).
VT-6607.indd 5
20.10.2014 9:54:19


