6
Rechargeable Electric Shaver for
dry/wet shaving
Before using
This electric shaver can be used for
dry, as well as wet shaving using shav-
ing cream. The shaver features a
water resistant body, so it can be
washed under a stream of water. Try
wet shaving using shaving foam - you
will notice a significant difference.
When switching from one type of
shaver to another, your skin requires
some time to adjust; facial skin adapts
to new shaving methods within about
one month.
Parts list
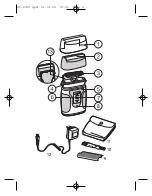
1. Protective cap
2. External shaving screen
3. Internal cutting block
4. Screen block removal buttons
5. Shaver body
6. Power switch
7. Power blocking button
8. Battery charging indicator
9. Spare external shaving screen
10. Cleaning brush
11. Travel case
12. Charger
13. Trimmer
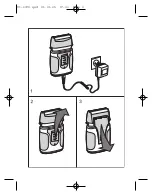
CHARGING (Pic. 1)
Before first use of the shaver and after
long periods of disuse, the batteries
must be charged for 5 hours:
- Place the charger's plug (12) into
the charging socket on the bottom
of the shaver body and connect the
charger to an electrical outlet; the
charging indicator (8) will light.
- Consecutive charging cycles
should not exceed two hours.
OPERATION
- Remove the protective cap (1).
- Turn on the power switch (6).
- Lightly touch the skin and shave
with soft motions against the hair
growth. The best effects are
achieved on stretched skin.
- Turn the shaver power-switch (6)
off when finished shaving.
For wet shaving
- Spread a thin layer of shaving foam
onto your skin; it will act as a lubri-
cant. In this case, shaving foam is
the best thing to use among other
means for sale (gel, soap, cream,
etc.). Do not apply a thick layer of
foam onto the skin, as it can reduce
the shaving ability of the shaver. If
the shaving head gets clogged with
foam, simply rinse it under running
water.
Using the trimmer (Pic. 2, 3)
- Move the trimmer switch (13) to the
upper position.
- Turn on the shaver with the switch
(6).
- Position the shaver at the correct
angle to the skin and move it grad-
ually down, evening the whiskers.
- Turn off the shaver and move the
trimmer switch (13) to the lower
position.
CLEANING THE SHAVER
Dry cleaning
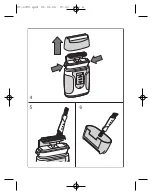
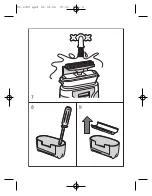
- Press the buttons (4) simultane-
ENGLISH
Vt-1372.qxd 21.01.05 17:30 Page 6
Summary of Contents for Sharp Rock VT-1372 B
Page 2: ...Vt 1372 qxd 21 01 05 17 30 Page 2 ...
Page 3: ...Vt 1372 qxd 21 01 05 17 30 Page 3 ...
Page 4: ...Vt 1372 qxd 21 01 05 17 30 Page 4 ...
Page 5: ...Vt 1372 qxd 21 01 05 17 30 Page 5 ...
Page 45: ...45 Vt 1372 qxd 21 01 05 17 30 Page 45 ...
Page 46: ...46 Vt 1372 qxd 21 01 05 17 30 Page 46 ...

